| Attention Before you read this post, I highly recommend you check out my resources page for access to the tools and services I use to not only maintain my system but also fix all my computer errors, by clicking here! |
Error 0x80040154 can occur, and typically does, without any prior symptoms or warnings. Most end users report that their system was working without any hiccups, prior to the error. Error 0x80040154 is typically related to the Microsoft Security Essentials tool, preventing end users from either removing or opening the program.
Despite that, it’s not uncommon for error 0x80040154 to occur at other stages of Windows usage. Such as when using skype for example, or opening email client software. But in this particular post, I’ll be focusing primarily (though not exclusively) on end users who encounter this problem while attempting to use Microsoft Security Essentials.
Error 0x80040154 is a Microsoft Security Essentials related issue, as a result, the error itself can be the result of conflicts, between this security tool and third-party tools the end user may have installed. In more extreme circumstances, the end users may encounter error 0x80040154 even after removing Microsoft Security Essentials from their system. This is because of an installer problem, which inhibits the uninstallation process. In other circumstances, the cause could be the result of a malicious file, corrupting integral system files.
What Causes Error 0x80040154
Error 0x80040154 is known to occur in several different circumstances, with the usage of Microsoft Security Essentials being the most common. Below are a number of the more common causes of this error:
- Software conflict.
- Corrupted Windows registry.
- Corrupted or missing DLL files.
Because this error is commonly associated with the use of internet security tools. This makes resolving it, all the more important.
How to Fix It
When it comes to fixing this error. There are several solutions available to you. All of which I have outlined below, in order of effectiveness and ease of deployment.
But before we get to those solutions. The first thing I’d recommend you did, was uninstall any third-party internet security tool(s) installed on your system. If you don’t know how to remove these tools, then simply follow the instructions outlined below:
1. First, ensure you have booted into your system as a full administrator.
2. Then press  + R, type Appwiz.cpl and click on OK.
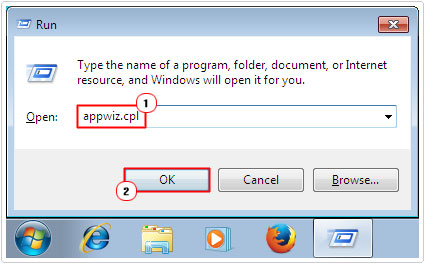
3. When Add/Remove Programs loads up, simply locate the Internet Security Tool, click on it, then click on Uninstall.
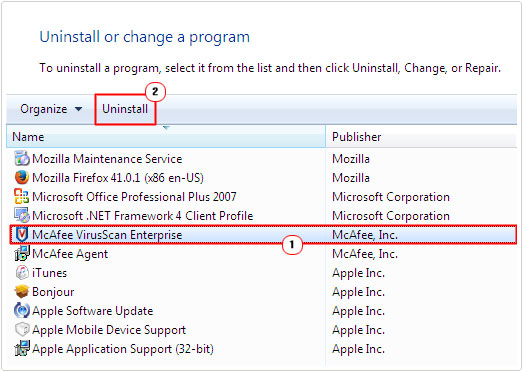
4. Once you’ve completed the above process, you can now try, running Microsoft Security Essentials again.
Note: If you purchased a branded machine, then it’s more than likely that it came with a third-party antivirus tool pre-installed. In most cases, these tools are trial copies that expire after 30 – 90 days. In any case, you’ll want to remove this tool.
When it comes to uninstalling Microsoft Security Essential, the process is pretty much the same. However, it’s not uncommon for error 0x80040154 to inhibit the process. The end result is only a partial remove. For step by step instructions on how to manually remove this tool, I suggest you continue reading.
Run Reimage to Fix Error 0x80040154
The first option you should deploy, before anything else, is a full Windows reset, using Reimage. The advantages of deploying this method is that it’s holistic, easy to do, and poses no risks to the data already present on your system.
Reimage, is a Windows repair tool that is capable of reinstalling your operating system, from the ground up, without deleting, editing or corrupting your current personal files.
It has a range of features and capabilities, which you can learn more about, from the link below:
CLICK HERE TO CHECK OUT REIMAGE
 The solution(s) below are for ADVANCED level computer users. If you are a beginner to intermediate computer user, I highly recommend you use the automated tool(s) above! The solution(s) below are for ADVANCED level computer users. If you are a beginner to intermediate computer user, I highly recommend you use the automated tool(s) above! |
Remove Microsoft Security Essentials
As was previously stated, error 0x80040154 typically prevents the system from completely removing all remnants of Microsoft Security Essentials. However, as a viable work around, end users can create a .bat file to complete the process.
To do that, simply follow the instructions below:
1. First, boot into your computer as an admin.
2. Then press  + R, type Notepad and click on OK.
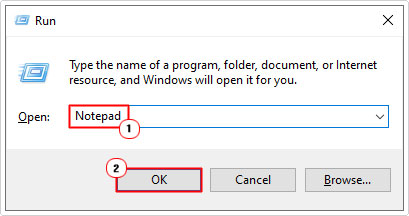
3. When Notepad loads up, Copy and Paste the follow information into it, then click on File -> Save As.
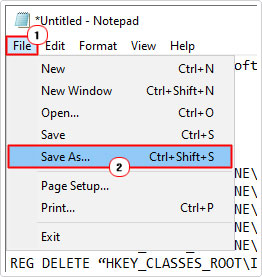
cd /d “%ProgramFiles%\Microsoft Security Client”
setup.exe /x
TASKKILL /f /im MsMpEng.exe
TASKKILL /f /im msseces.exe
net stop MsMpSvc
sc delete MsMpSvc
REG DELETE “HKEY_LOCAL_MACHINE\SYSTEM\CurrentControlSet\services\MsMpSvc” /f
REG DELETE “HKEY_LOCAL_MACHINE\SOFTWARE\Microsoft\Microsoft Antimalware” /f
REG DELETE “HKEY_LOCAL_MACHINE\SOFTWARE\Microsoft\Microsoft Security Client” /f
REG DELETE “HKEY_LOCAL_MACHINE\SOFTWARE\Policies\Microsoft\Microsoft Antimalware” /f
REG DELETE “HKEY_LOCAL_MACHINE\Software\Microsoft\Windows\Current Version\Run\MSC” /f
REG DELETE “HKEY_CLASSES_ROOT\Installer\Products\4C677A77F01DD614880F352F9DCD9D3B” /f
REG DELETE “HKEY_CLASSES_ROOT\Installer\Products\4D880477777087D409D44E533B815F2D” /f
REG DELETE “HKEY_LOCAL_MACHINE\SOFTWARE\Microsoft\Windows\CurrentVersion\Uninstall\Microsoft Security Client” /f
REG DELETE “HKEY_LOCAL_MACHINE\SOFTWARE\Microsoft\Windows\CurrentVersion\Uninstall\{774088D4-0777-4D78-904D-E435B318F5D2}” /f
REG DELETE “HKEY_LOCAL_MACHINE\SOFTWARE\Microsoft\Windows\CurrentVersion\Uninstall\{77A776C4-D10F-416D-88F0-53F2D9DCD9B3}” /f
REG DELETE “HKEY_CLASSES_ROOT\Installer\UpgradeCodes\1F69ACF0D1CF2B7418F292F0E05EC20B” /f
REG DELETE “HKEY_CLASSES_ROOT\Installer\UpgradeCodes\11BB99F8B7FD53D4398442FBBAEF050F” /f
REG DELETE “HKEY_LOCAL_MACHINE\SOFTWARE\Microsoft\Windows\CurrentVersion\Installer\UserData\S-1-5-18\Products\4C677A77F01DD614880F352F9DCD9D3B” /f
REG DELETE “HKEY_LOCAL_MACHINE\SOFTWARE\Microsoft\Windows\CurrentVersion\Installer\UserData\S-1-5-18\Products\4D880477777087D409D44E533B815F2D” /f
REG DELETE “HKEY_LOCAL_MACHINE\SOFTWARE\Microsoft\Windows\CurrentVersion\Installer\UpgradeCodes\11BB99F8B7FD53D4398442FBBAEF050F” /f
REG DELETE “HKEY_LOCAL_MACHINE\SOFTWARE\Microsoft\Windows\CurrentVersion\Installer\UpgradeCodes\1F69ACF0D1CF2B7418F292F0E05EC20B” /f
takeown /f “%ProgramData%\Microsoft\Microsoft Antimalware” /a /r
takeown /f “%ProgramData%\Microsoft\Microsoft Security Client” /a /r
takeown /f “%ProgramFiles%\Microsoft Security Client” /a /r
REM Delete the MSE folders.
rmdir /s /q “%ProgramData%\Microsoft\Microsoft Antimalware”
rmdir /s /q “%ProgramData%\Microsoft\Microsoft Security Client”
rmdir /s /q “%ProgramFiles%\Microsoft Security Client”
REM Stop the WMI and its dependency services
sc stop sharedaccess
sc stop mpssvc
sc stop wscsvc
sc stop iphlpsvc
sc stop winmgmt
REM Delete the Repository folder.
rmdir /s /q “C:\Windows\System32\wbem\Repository”
sc stop
EXIT
4. When the Save As dialog box appears, set Save as type to all files, then type Mseremoval.bat into the File name box, then click on Save.
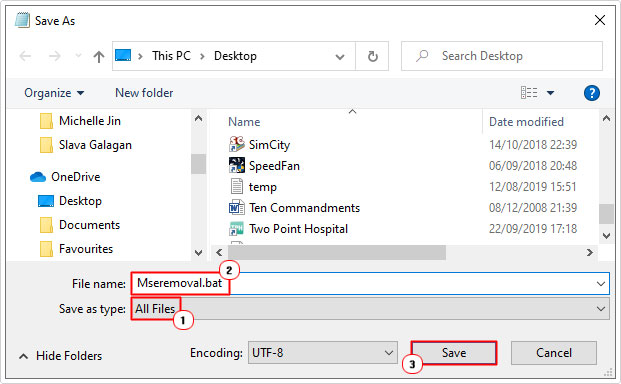
Note: Make sure you make note of where you’ve saved the file.
5. Once completed, simply double-click on the Mseremoval.bat file to start the removal process.
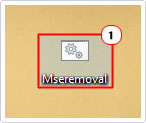
During the removal process, you should see a number of black Windows popups. This is totally normal. Once the process has completed, restart your system. Then verify whether error 0x80040154 has been resolved.
Turn On Windows Defender
Error 0x80040154 is typically the result of a conflict between internet security tools. If Windows Defender is incorrectly configured to run, it can cause error 0x80040154 to flare up. Thus, as a viable solution, you’ll want to ensure that Windows Defender is correctly configured to handle issues of internet security (in the event that it is your preferred security solution).
For step-by-step instructions on how to do that, check out my post on fixing error 0x800704ec.
Note: This solution is primarily for Windows Vista & 7 users.
Use System Restore
If error 0x80040154 occurs unexpectedly, it’s more than likely, its cause is the result of something you installed or downloaded. System Restore as a Windows feature is capable of removing changes made to your system. Essentially, setting your system back to a period, prior to the errors arrival.
Of course, System Restore has its limitations. It generally, does not delete files. But it does revert configuration changes. That said, you can find step-by-step instructions on how to use this tool, from my post on how to use system restore.
Reinstall Windows
If your system is branded, then it’s likely it came with Windows preinstalled. This means, you have no Windows disc. In this particular cases, you can opt to reinstall Windows using a recovery partition.
The instructions on how to do this, should present itself during system boot up. So restart your system, and look for recovery options.
WARNING: If you reinstall Windows from a partition, you will LOSE all of your personal data in the process. If you want to keep your personal data, it’s advisable that you back things up first.
Alternatively, you can use Reimage, which is capable of doing the same thing, without erasing any of your personal data in the process.
Are you looking for a way to repair all the errors on your computer?

If the answer is Yes, then I highly recommend you check out Advanced System Repair Pro.
Which is the leading registry cleaner program online that is able to cure your system from a number of different ailments such as Windows Installer Errors, Runtime Errors, Malicious Software, Spyware, System Freezing, Active Malware, Blue Screen of Death Errors, Rundll Errors, Slow Erratic Computer Performance, ActiveX Errors and much more. Click here to check it out NOW!

