| Attention Before you read this post, I highly recommend you check out my resources page for access to the tools and services I use to not only maintain my system but also fix all my computer errors, by clicking here! |
With Microsoft Outlook, users are given a dynamic interface of which they can use, to send emails in addition to various other business minded activities. However, despite all of that, it’s not uncommon for individuals to encounter errors while using this nifty tool. The vast majority of these errors (like 0x8004060C), occur when a user attempts to send or receive an email, remove a contact, update their calendar etc. If you find yourself in such a position, which is most likely the case, otherwise you wouldn’t be here then I suggest you continue reading for a plethora of viable workarounds.
While using Microsoft Outlook, one of the most common error messages that users may encounter is error 0x8004060C.
However, there are a number of error messages that report the error (0x8004060C):
Task ‘Contact Email – Sending and Receiving’ reported error (0x8004060C): ‘Unknown Error 0x8004060C’
Task ‘Microsoft Exchange Server – Receiving’ reported error (0x8004060C): ‘Unknown Error 0x8004060C’
What Causes Outlook Error 0x8004060C?
The most common reasons why error 0x8004060C may occur are as follows:
- The PST file is corrupt.
- Microsoft Exchange connectivity or synchronisation issue has rendered the OST file inaccessible.
The reasons why the PST file may have become corrupted are as follows:
- Oversized PST file exceeded its default maximum file limit.
- Microsoft Exchange crash.
- Virus/Malware attack.
When it comes to the PST file size reaching its limit, this can occasionally lead to file corruption. The maximum size for the PST file varies from Microsoft Outlook version to version. A synopsis of all the various size limits is as follows:
| Outlook 2002 and earlier versions | 2 GB |
| Outlook 2003 – 2007 | 20 GB |
| Outlook 2010 | 50 GB |
The default maximum PST file limit for Microsoft Outlook 2002 and earlier versions is no more than 2 GB. Whenever the PST file of outlook starts to reach 2 GB in size, the application will start blocking the acceptance of new email messages, which will inadvertently prevent other options from being performed. The PST file will usually contain a maximum of 1.82 GB of data at any one time, which is actually less than the official 2 GB figure.
Sometimes, when users attempt an operation on Outlook with a PST file fast approaching its limit (such as add a calendar entry or contact email), they will receive a notification message, which will indicate to the user that the PST is nearing its limit and needs to be reduced. This notification message will usually look something like the following:
The message has reached its maximum size. To reduce the amount of data in this message store, select some items that you no longer need, then permanently (SHIFT + DEL) delete them.
The PST reaching its limit will begin to hamper the overall performance of Outlook, in the various ways previously mentioned. However, over time the oversized PST file may become susceptible to corruption and even become inaccessible, in severe cases, resulting in total or partial data loss.
How to Fix It
As previously explained, the primary reason why the Outlook error 0x8004060C occurs is because of an oversized or corrupted PST file. Despite all of that, there are many things that you can do to combat it, such as compact, split or archive the file. Below are a number of methods, plus step by step instructions, that you can use to fix this nagging issue.
Use Outlook PST Repair
When it comes to error 0x8004060C, the first thing you’ll want to do is look into using specialised software, such as Outlook PST Repair; a tool which is capable of repairing corruption to the PST file. The best part about using this software is that you get to keep all of your original data without losing anything in the process, as it restores your contacts, emails, attachments, calendar entries etc. The software will also allow you to appropriately back everything up.
A quick synopsis of the key features of this nifty tool is as follows:
- Identifies and removes corrupted PST files from your computer.
- Automatically restores your PST file, enabling you to add additional data to the file, without losing anything in the process.
- Repairs a plethora of Outlook object based errors.
- Gives you the option of picking and choosing which Outlook folders you want to recover.
- Allows you to recover previously deleted emails and files.
With all of that said, you can access this powerful tool from the following link:
CLICK HERE TO CHECK OUT OUTLOOK PST REPAIR
 The solution(s) below are for ADVANCED level computer users. If you are a beginner to intermediate computer user, I highly recommend you use the automated tool(s) above! The solution(s) below are for ADVANCED level computer users. If you are a beginner to intermediate computer user, I highly recommend you use the automated tool(s) above! |
Delete Some Emails
In the event that your problem isn’t that severe, you could simply just delete redundant emails from your inbox. Of course, the success of this method depends greatly on whether or not your PST file is corrupted, which is typically the case, in situations like this.
Deleting an email is as simple as highlighting them using SHIFT and pressing DEL.
Compact the Files
Another method that you can use to reduce the size of the PST file is to use the compact feature. Again, the success of this method depends greatly on the severity of the error 0x8004060C. In the vast majority of cases, Outlook PST Repair should be more than enough to fix this error.
However, if you’re certain that the error isn’t too bad then you should give this feature a try. For more information on how to compact the PST file, check out my post on error 0x800ccc92.
Use the Truncation Utility
Another method that you can use, though somewhat complicated, involves using a truncation utility to split your large PST file up into several smaller files.
For more information on how to do this, along with access to the truncation utility, visit the following link: http://www.microsoft.com/en-us/download/details.aspx?id=12972
Use Microsoft Patch
If you’re running Microsoft Outlook on a Windows XP based system and receiving this error, then one effective method of fixing it entails downloading the latest Microsoft Office XP service pack.
For more information on this, I suggest you visit the following link: https://support.microsoft.com/EN-US/kb/307841
Increase PST File Size
If the error 0x8004060C is due to an exceeded PST file, then you can manually increase the size of the PST file, correcting the error and maintaining your current Outlook data in the process. To do this, you will need to edit your registry, so it can be pretty complicated, especially for beginners to intermediate users.
WARNING: When editing the registry, it’s extremely important that you do not edit or delete a wrong registry entry, as it could render your system inoperable.
To increase the PST file, do the following:
1. First, boot into your computer with full administrative rights.
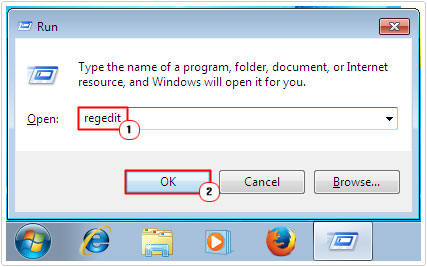
2. Then Press  + R type regedit and click on OK.

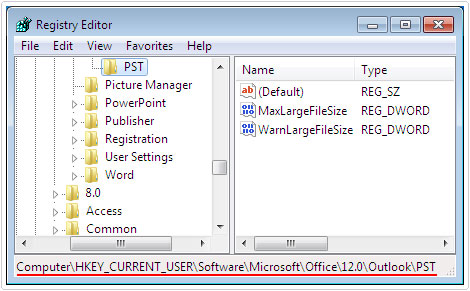
3. This will load up the Registry Editor, from here, navigate to the following path:

| Outlook 2003 | HKEY_CURRENT_USER\Software\Microsoft\Office\11.0\Outlook\PST |
| Outlook 2007 | HKEY_CURRENT_USER\Software\Microsoft\Office\12.0\Outlook\PST |
| Outlook 2010 | HKEY_CURRENT_USER\Software\Microsoft\Office\14.0\Outlook\PST |
| Outlook 2013 | HKEY_CURRENT_USER\Software\Microsoft\Office\15.0\Outlook\PST |
Note: If the PST key doesn’t exist in your registry, then you should create it, by right clicking on Outlook, then selecting New -> Key and naming it PST.
3. From the PST key, locate the following values:
MaxLargeFileSize
WarnLargeFileSize
Note: If the two values do not exist, then you will need to create them, by right clicking on the right plane and selecting new -> DWORD Value. Then give the new DWORD value the MaxLargeFileSize name and press Enter.
Then repeat the above steps, but this time name the new DWORD value WarnLargeFileSize.
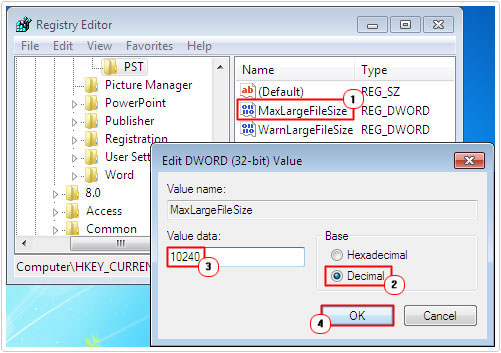
4. From here, double click on the MaxLargeFileSize value and select Decimal and then type the new maximum size limit in the Value data box and then click on OK.

Note: Make sure the maximum size limit is set above its default value, so if it’s 2 GB, then set it above 2 GB.
1 GB = 1024, 10 GB = 10240, 20 GB = 20480, 40 GB = 40960, 80 = 81920, etc
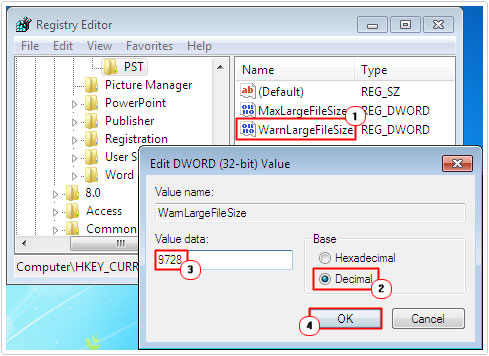
5. Then double click on the WarnLargeFileSize value and select Decimal. In the Value data box, select the new warning size limit and then click on OK.
The warning size should be set to 95% of the value in the MaxLargeFileSize value.

Note: So if you entered the value 40960 in MaxLargeFileSize, then you should set WarnLargeFileSize to 40960 X 95% = 38912.
6. Lastly, close the Registry Editor.
Are you looking for a way to repair all the errors on your computer?

If the answer is Yes, then I highly recommend you check out Advanced System Repair Pro.
Which is the leading registry cleaner program online that is able to cure your system from a number of different ailments such as Windows Installer Errors, Runtime Errors, Malicious Software, Spyware, System Freezing, Active Malware, Blue Screen of Death Errors, Rundll Errors, Slow Erratic Computer Performance, ActiveX Errors and much more. Click here to check it out NOW!

