| Attention Before you read this post, I highly recommend you check out my resources page for access to the tools and services I use to not only maintain my system but also fix all my computer errors, by clicking here! |
Have you had any problems trying to install a Windows 10 update? Have you tried and tried to install the update(s) only for you to be greeted with the unfortunate error 0x800700c1? If so, then you’ll definitely want to know what you can do about it. Windows 10 has had so many issues with updates over the past couple of years.
The Windows 10 Anniversary update went well for most, but there was that minority that had a few problems. Error 0x800700c1 isn’t exclusively tied to the Anniversary update, but that’s where most people have encountered it. The exact error message, looks something like the following:
2018-04 Cumulative Update for Windows 10 Version 1709 for x64-based Systems (KBXXXXXXX) – Error 0x800700c1
I know just how frustrating this error can be, which is why I put together this tutorial. So, continue reading for the many solutions available to you.
What Causes Error 0x800700c1?
Like with any Windows error, there are a number of things responsible for error 0x800700c1. However, if I were to focus on the most common causes, I’d say it is the following:
- Internet connection issue.
- Conflict between Windows Update and your internet security suite.
- Corruption of important system files.
How to Fix It
There have been many different errors, specifically related to the Windows 10 Anniversary upgrade. Which is why I initially stated that error 0x800700c1 isn’t exclusive to that particular upgrade. That said, we need our systems to run as fast and as proficiently as possible, which is why we can’t wait around for these problems to hopefully solve themselves.
Below are a number of methods that people in your position have used to rectify this problem. The method that works for you may depend greatly on the cause of the error, which is why you may have to try multiple solutions.
Anyway, continue reading for those much needed solutions.
Run Windows Repair Tool to Fix Error 0x800700c1
One of the most common causes for error 0x800700c1 and Windows update issues in general is the corruption of integral Windows files. Your operating system is made up of many different files, EXE files, Sys files, DLL files, and if any one of these gets corrupted or deleted, it can result in a multitude of problems for your system.
Thus, as your first viable solution, I’d recommend you ran a full scan of your system using Reimage. Reimage is a Windows repair tool that comes with the capability of repairing or replacing your Windows files. It does this, by sourcing the appropriate file(s) from its repository of 25+ million Windows files.
With that said, you can learn more about this powerful tool, and how it can help you, from the link below:
CLICK HERE TO CHECK OUT REIMAGE
 The solution(s) below are for ADVANCED level computer users. If you are a beginner to intermediate computer user, I highly recommend you use the automated tool(s) above! The solution(s) below are for ADVANCED level computer users. If you are a beginner to intermediate computer user, I highly recommend you use the automated tool(s) above! |
Disable Your Internet Security Software
There were a number of users that were getting error 0x800700c1 while attempting to update their operating system, only to fix the problem simply by disabling their internet security software. Some of the brands of internet security suites known to cause this error include the following:
- Trend Micro
- Comodo
- Sophos
So if you have any internet security software installed on your system from any one of these brands, it is possible that it’s the culprit. Thus, you may want to consider temporarily disabling the software. Then you can run the Windows update again.
To disable your internet security tool depends on the brand. But the generic method typically entails right-clicking on its icon in the Windows Notification Area (bottom, right hand corner). Then selecting Disable.
Note: Most internet security tools prohibit you from indefinitely disabling them. So you’ll likely have to disable the tool for a predetermined time, depending on your options.
Restart Windows Update
This is probably one of the first things you’ll want to do when confronted with error 0x800700c1. Ultimately, you have two ways of achieving this objective. You can either, restart your system, in its entirety, or you can restart the specific Windows Update component.
I’m pretty sure you already know how to restart your system, so I’ll outline below just how to restart the Windows Update component.
1. First, ensure you’ve booted into your computer with full administrative rights.
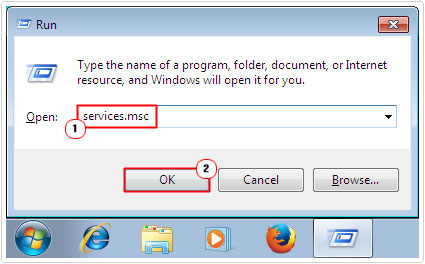
2. Then press  + R, type Services.msc and click on OK.
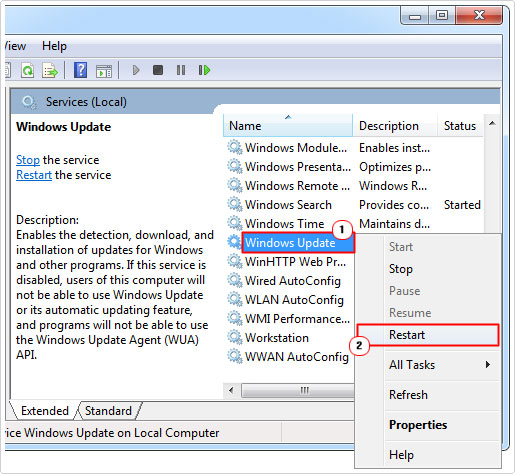
3. When Services loads up, right click on Windows Update and select Restart.
Reset Windows Firewall
If the solutions above, fail to fix error 0x800700c1, then you may want to look at Windows Firewall as a culprit for this error. If you have your own third-party firewall tool, then I’d recommend you disabled that, then attempted to run Windows update.
However, if you use the built-in Windows Firewall tool then I recommend you follow the instructions below:
1. First, you have to boot into your computer with administrative rights.
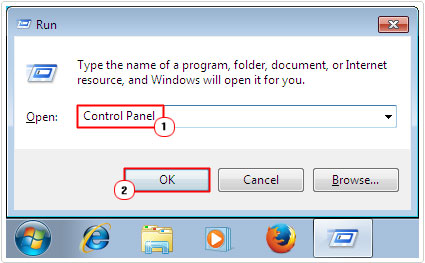
2. Then press  + R, type Control Panel and click on OK.
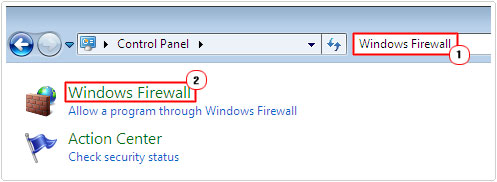
3. When Control Panel loads up, type Windows Firewall into the Search Control Panel box and click on Windows Firewall.
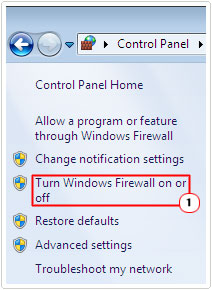
4. This will take you to the Windows Firewall screen, from here, click on Turn Windows Firewall on or off.
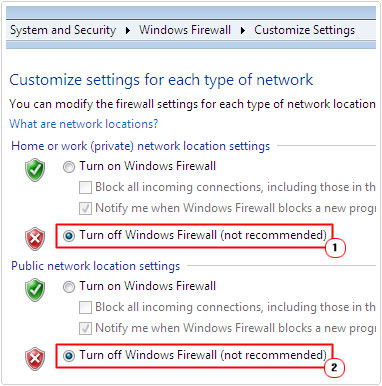
5. The Customize Settings page will load up, select Turn off Windows Firewall for both Home or work (private) network location settings and Public network location settings, and click on OK.
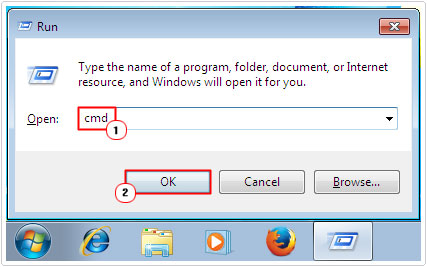
6. Once you’ve done that, press  + R, type cmd and press Ctrl + Shift + Enter. Alternatively, you can right-click on the Windows button and select Command Prompt (Admin).
7. Once Command Prompt loads type the following commands, followed by Enter, after each line.
regsvr32 wuapi.dll
regsvr32 wuaueng.dll
regsvr32 wucltui.dll
regsvr32 wups.dll
regsvr32 wups2.dll
regsvr32 wuweb.dll
8. Once complete, re-enable the Windows Firewall, and then attempt to run Windows Update again.
Run DISM Command to Fix Error 0x800700c1
DISM stands for Deployment Image Servicing and Management, and is a series of commands used for repairing Windows update related issues. However, unlike Reimage, DISM doesn’t have a repository of Windows files. Which means, corrupted files will need to be replaced using your Windows Media CD.
If you don’t have that CD, you can still run the tool, but it won’t be nearly as effective without it.
For those who do have their Windows Media CD, I recommend they check out my post on error 0x80240017 for step-by-step instructions on how to run the appropriate command.
For everyone else, you can try the commands below:
1. First, boot into Windows, with the correct administrative rights.
2. Once in Windows, press  + R, type cmd and press Ctrl + Shift + Enter. Alternatively, you can right-click on the Windows button and select Command Prompt (Admin).

3. From Command Prompt, type the following commands, while pressing Enter, after each line.
DISM /Online /Cleanup-Image /ScanHealth
DISM /Online /Cleanup-Image /CheckHealth
DISM /Online /Cleanup-Image /RestoreHealth
4. Once complete, you can try running Windows Update again.
Run System File Checker
System file checker is another built in Windows tool that works very similar to DSIM. The main difference with this tool is that it exclusively checks the Windows system files and repairs and/or replaces where applicable.
This tool uses a Windows cache to replace system files, so ordinarily you won’t need your Windows Media CD.
Anyway, you can find step-by-step instructions on how this tool works and how to use it, from my post on how to run SFC Scannow.
Are you looking for a way to repair all the errors on your computer?

If the answer is Yes, then I highly recommend you check out Advanced System Repair Pro.
Which is the leading registry cleaner program online that is able to cure your system from a number of different ailments such as Windows Installer Errors, Runtime Errors, Malicious Software, Spyware, System Freezing, Active Malware, Blue Screen of Death Errors, Rundll Errors, Slow Erratic Computer Performance, ActiveX Errors and much more. Click here to check it out NOW!

