| Attention Before you read this post, I highly recommend you check out my resources page for access to the tools and services I use to not only maintain my system but also fix all my computer errors, by clicking here! |
When a Windows update fails to complete, typically, it’ll revert your system back to its previous state. This is done to forestall any potential problems that may occur during normal Windows use. Error 0x80092004 is no exception, in this regard.
All the updates released by Microsoft are essential to your Windows usage. If you’ve used Windows for any real length of time, then you should be able to appreciate what this brings. These updates may be packed with new security fixes, stability and bug fixes, along with new drivers, for new hardware components. The vast majority of computer users have their Windows set to automatic updates, so they install these updates without much thought to their importance. However, there are those circumstances, when your system fails to update, and in so doing, leaves your system vulnerable to a whole host of viruses, and security vulnerabilities.
What Causes Error 0x80092004?
Like the vast majority of errors that occur on your system, error 0x80092004 can occur for a number of reasons. The most common of which, are highlighted below:
- Corrupted update file(s).
- Software Distribution folder is corrupted.
- Windows compatibility issues.
- Corrupted Windows (system) files.
System files are integral to the smooth functionality of Windows operating systems. So a great many issues can manifest from the corruption of these files.
That said, in most cases, error 0x80092004, just like most Windows update errors, can be fixed by using several common methods.
How to Fix It
Now that you’re aware of the error, and its potential causes, what can you do to fix it? Well, there are several viable solutions. All of which are outlined in this tutorial.
That said, the first thing you’ll want to do, when you get any sort of update error. Is run the Windows Update Troubleshooter.
If you’re on an earlier version of Windows, then you can find step-by-step instructions on how to run the troubleshooter from my post on fixing error 0x80004005.
For Windows 10 user, simply do the following:
1. First, ensure you’ve booted into your system as a full administrator.
2. Then press  + I (to open Windows 10 Settings), then click on Update and Security.
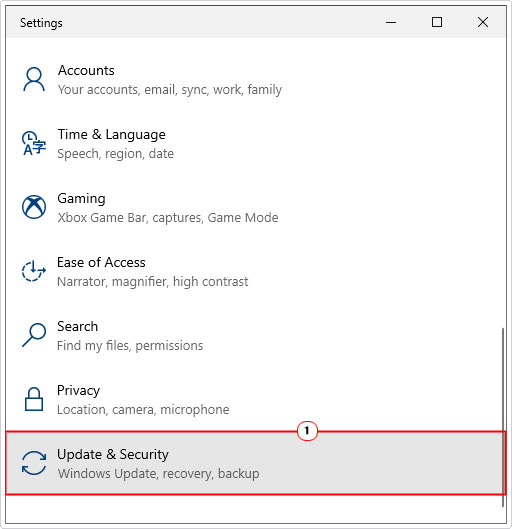
3. This will bring up the Update and Security screen, from here, click on Troubleshoot.
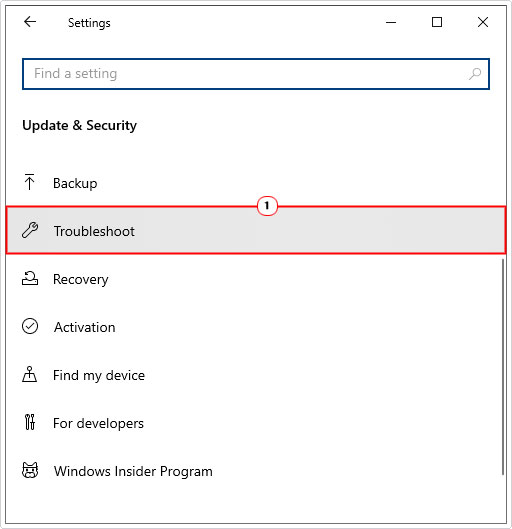
4. Then click on Additional troubleshooters.
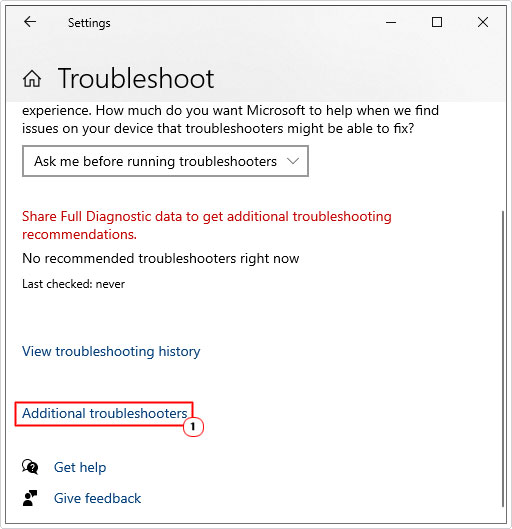
5. From the Additional troubleshooters screen, click on Windows Update, then click on Run the troubleshooter.
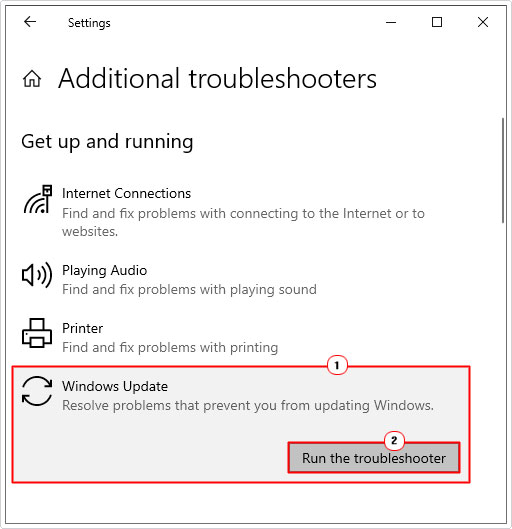
If the troubleshooter fails to rectify the Windows Update error 0x80092004, then I recommend you attempt the many methods below.
Run a Registry Scan to Fix Error 0x80092004
One of the main causes of a great many issues that occurs on your Windows operating system is the corruption of the registry. The registry, if you’re unfamiliar with it, is a large database, used to stored sensitive data for both the software and hardware components that make up your system.
Despite the importance of the registry, due to its repeated use, it has become a highly susceptible area of the operating system. Issues such as corruption and clutter can result in error 0x80092004, as well as countless other error types. Fortunately, it is possible to repair the registry, by using a specialised tool, such as Advanced System Repair Pro.
This tool will run, detect and repair, not just the registry, but your entire system. Ultimately, rectifying the error, as well as any lingering issues you may be dealing with.
For more information on this tool, please check the link below:
CLICK HERE TO CHECK OUT ADVANCED SYSTEM REPAIR PRO
 The solution(s) below are for ADVANCED level computer users. If you are a beginner to intermediate computer user, I highly recommend you use the automated tool(s) above! The solution(s) below are for ADVANCED level computer users. If you are a beginner to intermediate computer user, I highly recommend you use the automated tool(s) above! |
Download Servicing Stack Updates
The Servicing Stack Updates is basically the component used by Microsoft Update. Essentially the Update service requires this component to update your operating system.
There can be many reasons why your update failed, as previously highlighted. However, the Servicing Stack Updates, is integral to the smooth functionality of Windows Update. Which means, you can’t rule it out, as a root cause of error 0x80092004, in this case.
Thus, you’ll want to download the lasted Servicing Stack Update (SSU) for your Windows version. However, before you can do that, you will need to disable automatic updates. To do that, follow the instructions below:
1. First, follow steps 1 – 2 from How to fix it.
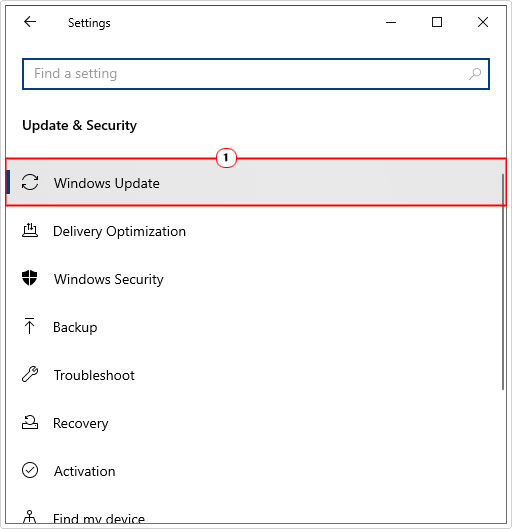
2. From Update & Security, click on Windows Update.
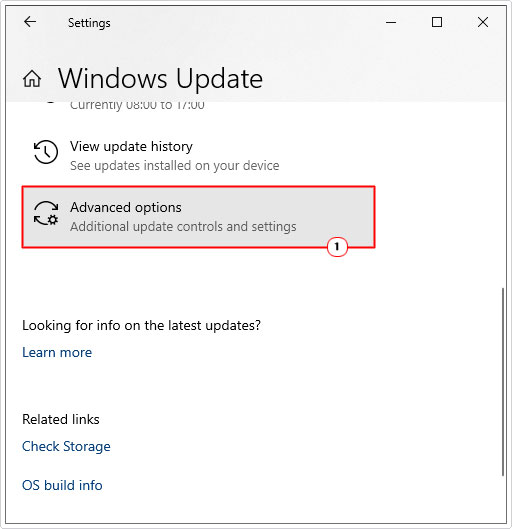
3. Then click on Advanced Options.
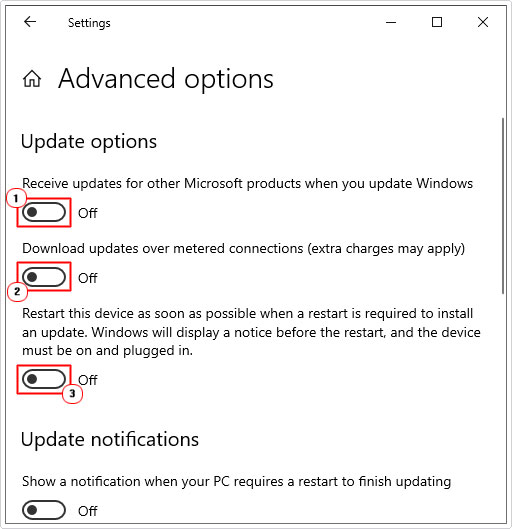
4. On Advanced Options screen, make sure all Update Options are set to off, then close and restart your system.
5. Now download the latest Servicing Stack Updates for your operating system here: https://msrc.microsoft.com/update-guide/en-us/vulnerability/ADV990001
Once you have successfully installed the latest Servicing Stack Updates, you can then go back and re-enable your Update Options.
Clean Software Distribution Folder
Another method you can use to fix error 0x80092004 is to erase all the files in the Software Distribution folder. Once you’ve done that, you can retry the Windows Update. For step-by-step instructions on how to erase the contents of this folder, check out my post on fixing error 0x80244010.
Manual Update Removal
Whenever a Windows Update fails, typically it’ll roll the system back, cleaning out any residue of the update. However, there are those circumstances when this does not occur. In this particular situation, you are forced to remove said package(s) manually.
Before you can remove an Update package, you must first establish the Package Identity for the update that failed to install. To do that, follow the instructions below:
1. First, boot into your computer as an administrator.
2. Then press  + R, type press CTRL + Shift + Enter, then click on Yes.
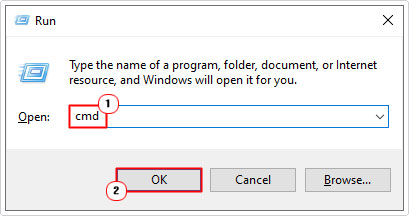
3. When Command Prompt loads up, type the following, and then press Enter.
Dism.exe /online /Get-Packages
Note: This will give you a list of all the recently successful and unsuccessful Windows Update installations. You’ll want to locate the most recent, and jot down its Package Identity.
4. Next, type the following and press Enter.
Dism.exe /online /remove-package /packagename:[PACKAGE IDENTITY]
Note: Where PACKAGE IDENTITY is the identity/name of the update that failed to install.
5. Now restart your system.
6. Then load Command Prompt again, and type the command below, followed by Enter.
Dism.exe /online /Cleanup-Image /StartComponentCleanup
7. Now you can try downloading the update again.
Install Update Manually
If after attempting all the solutions below, you’re still having problems installing the update. Then you can try doing it manually. In order to do that, you must identify the update that you wish to install. Then go to Microsoft Update Catalog, and manually download it from there.
Using the get-package command in Manual Update Removal, you can find out which update failed to install. Once you’ve done that. You can find further instructions on my post on fixing error 0x80096004.
Use System File Checker
If Windows Update still fails to install the update(s), then the error 0x80092004 may be the result of corruption within the operating system. To rectify this problem, you can use the built-in System File Checker tool. This tool is designed to scan, detect and repair or replace any missing and/or corrupted system files.
A relatively helpful and thorough tool. You can learn more about how it works, and how to use it, from my post on how to run SFC Scannow.
Are you looking for a way to repair all the errors on your computer?

If the answer is Yes, then I highly recommend you check out Advanced System Repair Pro.
Which is the leading registry cleaner program online that is able to cure your system from a number of different ailments such as Windows Installer Errors, Runtime Errors, Malicious Software, Spyware, System Freezing, Active Malware, Blue Screen of Death Errors, Rundll Errors, Slow Erratic Computer Performance, ActiveX Errors and much more. Click here to check it out NOW!


such a great and useful info