| Attention Before you read this post, I highly recommend you check out my resources page for access to the tools and services I use to not only maintain my system but also fix all my computer errors, by clicking here! |
Error 0x80240034 occurs when an end user attempts to update Windows and the process fails.
This error occurs primarily on Windows 10 and will usually take place after the update process has remained stagnant at 1% for a significant amount of time. You can usually find the error code 0x80240034 when you take a peek at the View Installed Update History. This issue has a tendency to continuously rear its ugly head, every time you attempt to use the Windows Update component. And there’s no specific Windows 10 build that this error happens most frequently on.
Additionally, there are certain situations where the error code will not appear in the initial Windows update failure message. In situations like that, the end user can find the error code 0x80240034 when they view the update history (as previously mentioned).
Based on most recent research, most end users report encountering this error, while trying to install the Cumulative Update KB4048955. So if you’re in that boat, let it be known, that you are not alone.
With update KB4048955, it will seemingly complete. The update will download, and install, then request a restart. But when it gets to the last few steps of the process, after system restart, the update will fail, and roll back the changes.
If error 0x80240034 is causing you a whole load of grief, preventing you from updating your operating system, there are a number of immediate steps that you can take. All of which, I intend to outline to you, towards the end of this post.
Update Error 0x80240034 Messages
When error 0x80240034 manifests itself, it can appear in many different forms. The most common being the following:
WU_E_DOWNLOAD_FAILED 0x80240034 Update failed to download.
Error 0x80240034 Update failed to download.
All signify the same ailment.
What Causes Error 0x80240034
There are several circumstances that can cause error 0x80240034 to occur. The most common causes are however, the following:
- The Windows registry is damaged and/or corrupted.
- Incompatible or outdated device drivers are installed on your system.
- A malicious file has infiltrated your system.
- A hardware component is faulty.
- An application has been corrupted.
How to Fix It
There are a number of processes that you should consider, when attempting to troubleshoot an issue with the Windows Update component. The very first thing you should always do, is retry the update. That of course, goes without saying, as it is most likely what you did do.
However, in addition to that, there are other things for you to consider, like resetting components, scanning your OS files, and verifying the Windows registry.
All of these particular methods, I hope to elaborate on, in the many solutions outlined below. So be sure to read them.
Run a Registry Scan to Fix Error 0x80240034
The very first thing you’ll want to try, before attempting any of the more complex solutions above, is to run the Windows repair tool, Advanced System Repair Pro. As the name states, it is a highly advanced tool, adept at scanning, detecting and repairing a plethora of issues on your system, including Windows Update related issues.
Advanced System Repair Pro is highly efficient at scanning and repairing your registry, removing junk files, fixing STOP errors and repairing DLL related problems.
Thus, it’s highly recommended that you, before anything else, carry out a full scan of your system, using this tool. It will conduct a thorough scan, highlighting all the problematic areas of your computer, and proffer the solutions.
Anyway, you can access this tool, from the link below:
CLICK HERE TO CHECK OUT ADVANCED SYSTEM REPAIR PRO
 The solution(s) below are for ADVANCED level computer users. If you are a beginner to intermediate computer user, I highly recommend you use the automated tool(s) above! The solution(s) below are for ADVANCED level computer users. If you are a beginner to intermediate computer user, I highly recommend you use the automated tool(s) above! |
Clear SoftwareDistribution Folder
Clearing the SoftwareDistribution folder has proven highly effective at repairing Windows Update issues. There are several steps that goes into clearing this folder. The first aspect of it, entails removing the contents of the SoftwareDistribution folder.
This is necessary, because of the operating systems inability to clear the contents of this folder, once it has become corrupted. Thus, clearing this folder, will ensure that Windows re-downloads the update, which in turn, should resolve error 0x80240034.
To do this, simply follow the instructions below:
1. First, ensure you’ve booted into your computer with the correct administrative privileges.
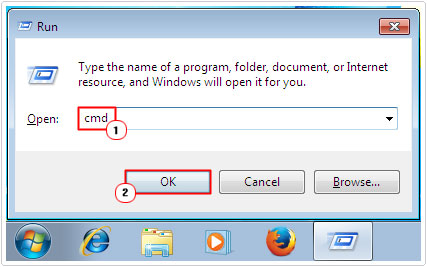
2. Then press  + R, type cmd and press Ctrl + Shift + Enter. Or you could simply Right-click on the Start button and select Command Prompt (Admin).

3. Once Command Prompt loads up, type the following commands, press Enter after each line:
Net stop wuauserv
Rmdir %windir%\SoftwareDistribution /S /Q
Net start wuauserv
4. Once finished, you can now try running Windows Update again.
Verify Windows Registry
If error 0x80240034 continues to persist, after attempting all the solutions below, you may want to try this registry modification.
WARNING: Editing the registry is very dangerous as it can very easily render your system inoperable if done incorrectly.
1. First, boot into your computer with administrative rights.
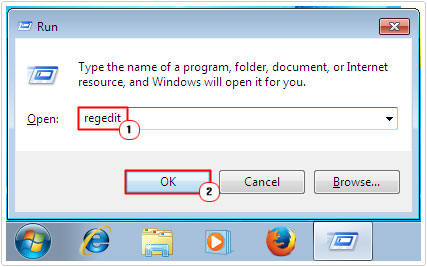
2. Then press  + R, type regedit and click on OK.

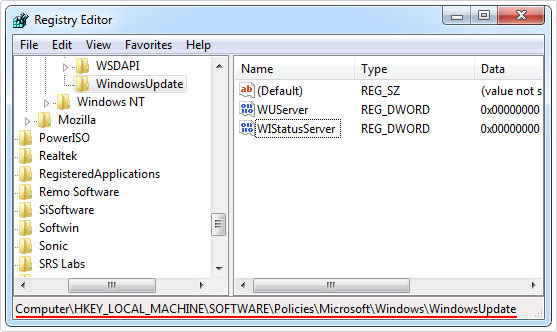
3. When Registry Editor loads up, navigate to the following path:
HKEY_LOCAL_MACHINE\SOFTWARE\Policies\Microsoft\Windows\WindowsUpdate

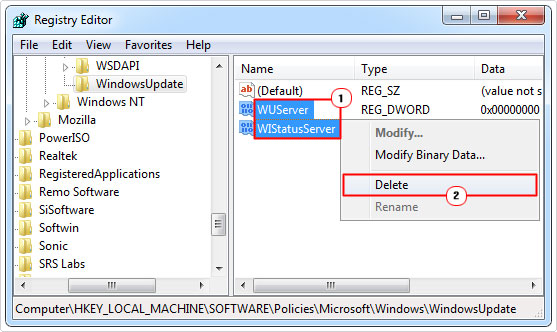
4. Now, locate entries WUServer and WIStatusServer (in the right pane) and right click on them and select Delete.

5. Once complete, restart your system, and retry Windows Update.
Update Windows Using Media Creation Tool
If all the methods above failed to fix error 0x80240034, then you should try updating the operating system using the Media Creation Tool.
The media creation tool will, essentially reinstall the operating system, along with all the latest updates, in the process. However, the downside to this method is that you could lose your old Windows settings in the process. The tool typically gives you the option to choose, but in most cases, attempting to keep your old settings, can cause the whole process to fail.
Fortunately, as a viable alternative, you could use the Windows repair tool Reimage, which works very similar, in many instances. It scans your system, for viruses, registry conflicts and OS corruption. Then repairs and/or replaces all of your Windows files, using it’s repository of over 25+ million Windows file. End users needn’t worry about losing any data or settings in the process, as everything is saved.
You can learn more about Reimage, from the link below:
CLICK HERE TO CHECK OUT REIMAGE
Alternatively, if you want to try the Media Creation Tool, then I suggest you check out my post on repairing error 0x800704c7 for step-by-step instructions.
Note: If you opt for a clean install, you should also not forget to backup all your data. You can find additional help on this topic, by checking out my post on how to back up files.
That said, it’s highly recommended that you go with Reimage, as it mitigates any risks that would otherwise exist, if you didn’t use it.
Are you looking for a way to repair all the errors on your computer?

If the answer is Yes, then I highly recommend you check out Advanced System Repair Pro.
Which is the leading registry cleaner program online that is able to cure your system from a number of different ailments such as Windows Installer Errors, Runtime Errors, Malicious Software, Spyware, System Freezing, Active Malware, Blue Screen of Death Errors, Rundll Errors, Slow Erratic Computer Performance, ActiveX Errors and much more. Click here to check it out NOW!

