| Attention Before you read this post, I highly recommend you check out my resources page for access to the tools and services I use to not only maintain my system but also fix all my computer errors, by clicking here! |
Have you recently encountered the error 0x80240fff while attempting a Windows Update? Windows errors can be quite cryptic, as no explanation, outside of an error code, is given.
Fortunately, you’ve come to the right place. In this tutorial, we’ll be tackling the infamous update error 0x80240fff, covering the various ways you can combat it.
There’s nothing extraordinary about error 0x80240fff, as is typical with Windows Update errors. When it occurs, it prevents you from either searching on available updates or downloading and installing available updates.
The error message for 0x80240fff will appear within the Windows Update notification window, and usually looks something like the following:
There were some problems installing updates, but we’ll try again later. If you keeping seeing this and want to search the web or contact support for information, this may help (0x80240fff)
So what can you do, to counter this problem? Continue reading for a full breakdown of how to put this issue to bed.
What Causes Update Error 0x80240fff?
Error 0x80240fff has a wide range of possible causes, like most errors you encounter in Windows. However, the most common of these causes, is what you want. Read below for that much desired list:
- A conflicting or corrupted Windows firewall program.
- The Windows Update service(s) is corrupted.
- Integral system files have been erased and/or corrupted.
- Your internet connection is currently taxed by other users accessing the same connection (via your local network).
Additionally, if you access the internet via a Wi-Fi adaptor, it’s possible an unreliable connection, due to poor signal strength, is causing the error.
These are the most common reasons error 0x80240fff occurs on Microsoft Windows platforms. Below you will find a list of possible solutions. So continue reading for that.
How to Fix It
Generally speaking, when faced with a Windows issue, it’s always best to start simple. So, before anything else, I’d recommend you carried out a simple system restart. Hopefully, this will remove any corrupted temporary files that may be causing this error.
Once your computer finishes rebooting, you’ll want to ensure it is properly connected to the internet. If you visit your ISP website, you should be able to run a test on your line (from there), to verify that there’s nothing wrong with your connection.
If the error persists, after carrying out these simple steps, then I recommend you try the solutions below.
Run Windows Repair Tool to Fix Error 0x80240fff
When it comes to fixing Windows errors like 0x80240fff, there are several methods you can adopt. There are the manual, more complex solutions, and there’s the easier automated solutions.
As your first viable solution, I’d recommend you attempted the easier method, using the Windows repair tool Advanced System Repair Pro. This is a multifaceted, maintenance and repair tool, capable of fixing a plethora of issues on your system.
So, there is a good chance this tool will suitably fix error 0x80240fff.
However, in addition to fixing this error, it is also equally adept at fixing application errors, malware infections, BSOD errors, DLL errors, and much more. Another advantage of using this tool, is its ability to speed up your system.
So if you have a system that has started to run slow, then this tool is a must.
You can learn more about this tool, from the link below:
CLICK HERE TO CHECK OUT ADVANCED SYSTEM REPAIR PRO
 The solution(s) below are for ADVANCED level computer users. If you are a beginner to intermediate computer user, I highly recommend you use the automated tool(s) above! The solution(s) below are for ADVANCED level computer users. If you are a beginner to intermediate computer user, I highly recommend you use the automated tool(s) above! |
Disable Windows Firewall
It’s not uncommon for Windows Firewall to conflict with the Windows Update service(s), preventing the end user from downloading and/or installing new updates to their system.
In situations like this, the most effective solution is to switch off Windows Firewall, at least temporarily.
So, go ahead and do that.
Note: If you don’t know how to switch Windows Firewall off, then I recommend you check out my post on fixing 0x8007003b, for additional help.
After you have successfully turned Windows Firewall off, then you should run Windows Update again, and verify that the error code 0x80240fff is no longer appearing.
If the error has been fixed, then I recommend you re-enable Windows Firewall. Just follow the same steps as before, only you’re turning it on, instead of off.
That aside, if installing a Windows Update means disabling Windows Firewall every time. Then you have two possible solutions. The first is to invest in a third-party Firewall tool, and the second is to follow the next solution below.
Defer Windows Updates
One method that has proven very effective at fixing error 0x80240fff, entails deferring your updates for several days. This is a feature of Windows Update that allows you to pause Updates temporarily. This can be very handy, when you don’t want your system randomly restarting, or you don’t want any significant changes to occur while working on your computer.
Originally, this feature was only available on Windows 10 Pro systems, however now it’s accessible on both Pro and Home versions of Windows 10.
To utilise this feature, simply follow the instructions below:
1. Boot into your system as a full administrator.
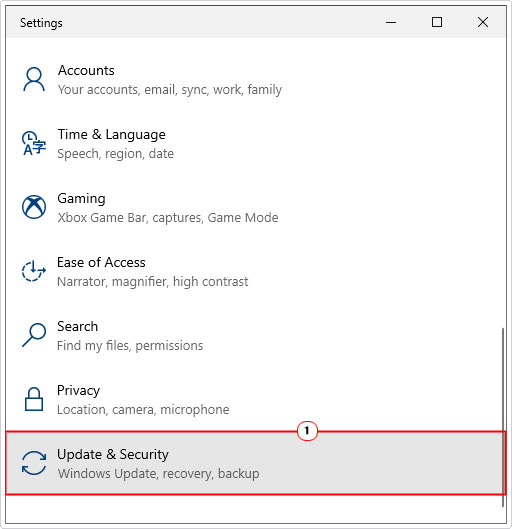
2. Then press  + I, then click on Update & Security.
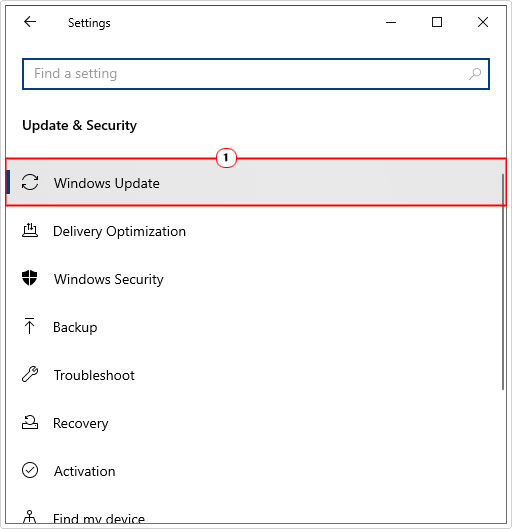
3. This will bring up the Update & Security menu, from here, click on Windows Update.
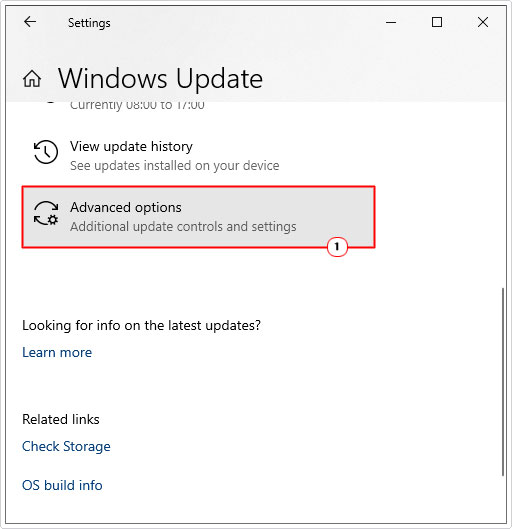
4. From Windows Update, click on Advanced Options.
5. On the Advanced Options menu, scroll down to Pause Updates, then click on Select Date, and choose a time you’d like the update to be installed on.
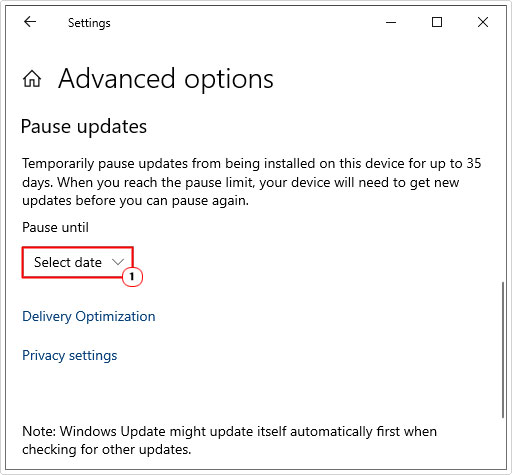
If done correctly, this should allow the update to be installed without any error 0x80240fff notifications appearing and halting the process.
Note: When deferring updates, for best practice purposes, you don’t want the delay to be any longer than 5 days. As you do not want to compromise the security of your system.
Run DISM Tool
This is a built-in Windows tool, designed to recover or restore the integrity of your Windows operating system. It works by replacing corrupted or missing Windows files.
You can learn more about this tool, and how to run it, from my post on fixing logonui.exe errors.
Reset Windows
A Windows reset is the recommended solution for end users who do not have much confidential data on their systems. This is because the backup process, can be quite painstaking, especially if you have a lot of files to back up.
Anyway, the simplest way to reset your OS, is to do the following.
Note: Windows reset is a feature of Windows 10 (& 11) systems.
1. First, ensure you’ve booted into your system as a full administrator.
2. Then type Reset into the Type here to search box, then click on Reset this PC.
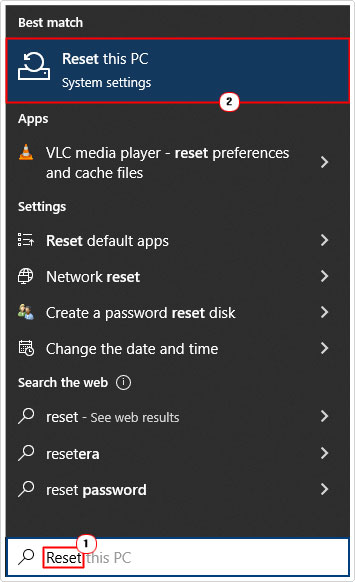
3. This will bring up the Recovery Menu applet. From here, click on Get Started under Reset this PC.
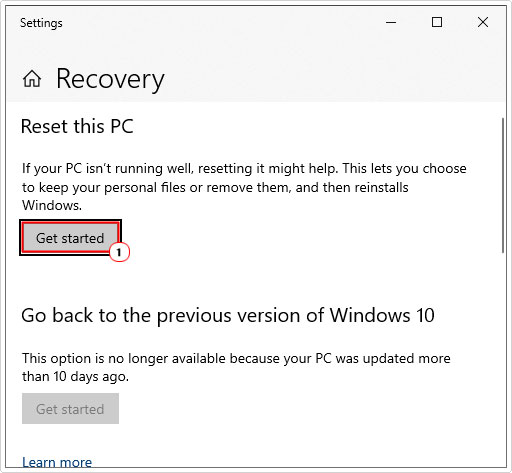
4. This will bring up an additional Reset this PC applet. Here you will be given two options. Which are, to Keep my files or Remove everything. Click on Remove everything, to create a clean installation of Windows 10 (or 11).
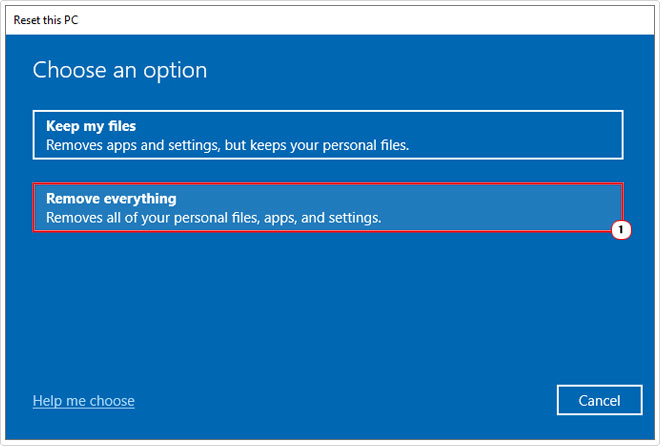
Note: Make sure you have fully backed up all your confidential files, before you begin this process. This means, downloads, files, documents, images, everything.
After the Windows reset is complete, you’re system should be free of all issues. Allowing you to freely update it without error 0x80240fff.
Are you looking for a way to repair all the errors on your computer?

If the answer is Yes, then I highly recommend you check out Advanced System Repair Pro.
Which is the leading registry cleaner program online that is able to cure your system from a number of different ailments such as Windows Installer Errors, Runtime Errors, Malicious Software, Spyware, System Freezing, Active Malware, Blue Screen of Death Errors, Rundll Errors, Slow Erratic Computer Performance, ActiveX Errors and much more. Click here to check it out NOW!

