| Attention Before you read this post, I highly recommend you check out my resources page for access to the tools and services I use to not only maintain my system but also fix all my computer errors, by clicking here! |
Did you encounter error 0x80246017 while attempting to update your Windows operating system? If yes, then I recommend you read this tutorial, as it will round up with a variety of verifiable fixes.
Microsoft is constantly releasing new patches and updates for their various iterations of Windows. However, the component which makes this possible (Microsoft Update), is not without its issues; which can be quite numerous. The first end users to encounter error 0x80246017, did so, while attempting to install KB4020102. The primary issue with this update was its refusal to automatically install. Windows update would download the update, but would refuse to initiative the installation process.
For Windows 10 Fast Ring users, error 0x80246017 is known to occur for other updates as well. The download process does not complete, instead, freezing part way through the process, which, ultimately results in the following error message:
There were some problems installing updates, but we’ll try again later. If you keep seeing this and want to search the web or contact support for information, this may help: (0x80246017).
What Causes Error 0x80246017?
According to information provided by Microsoft, the Windows Update error 0x80246017, is actually related to the Windows 10 build 9926, which was made available to the public in January 2015. Despite the amount of time that has passed since that build, it has been found, that traces of the build can still be found within the Windows Registry, which could quite possibly be causing the error on your system.
Additionally, other p0otential causes, include the following:
- An internet security tool blocking the Windows Update process.
- Corruption of integral system files.
How to Fix It
When it comes to fixing error 0x80246017, there are several approaches you can take. Ultimately, you may find yourself, accessing and editing the Windows registry. The Windows registry (if you’re not aware of what it is), is the location the OS uses to install integral configuration data, for both software and hardware components of your system. Thus, any wrong alterations to this registry can render your system inoperable.
That aside, one way you can get around the potential pitfalls, is to back up your registry, beforehand. To do that, follow the instructions below:
1. First, boot into your system as a full administrator.
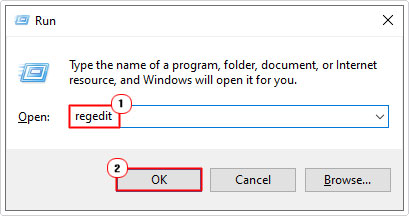
2. Then press  + R, type regedit and click on OK.
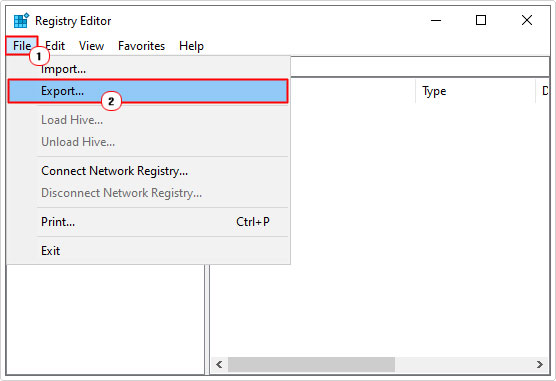
3. This will bring up Registry Editor, from here, click on File -> Export.
4. An Export Registry File applet will appear, choose a location, then type the name of the backup into the File name box, and click on Save.
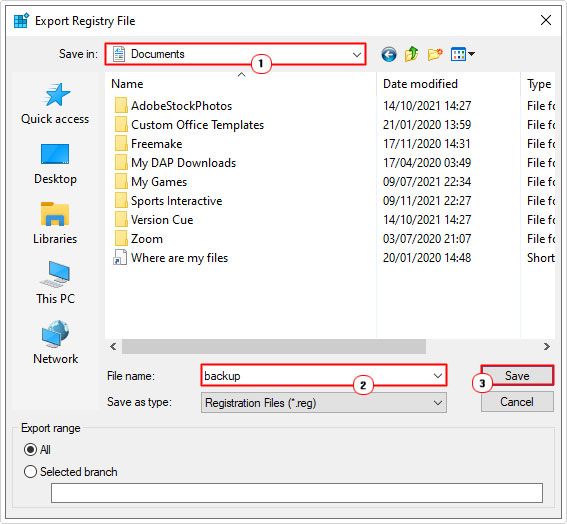
Now you have a backup of your registry, which you can use to restore it, in the event that your system stops functioning as it originally did.
The next cause of action, before attempting any of the more complex solutions, would be to disable any third-party internet security suites, you have installed.
So, if you use a third-party antivirus tool, for example, then you have two options.
You can either, uninstall it, or you can disable it. Usually, these tools, give you the ability to temporarily disable it, for a set period of time. To do this, you may need to right-click on its Icon (in the Taskbar), then click on Disable. But instructions can vary, depending on brand and version.
Once you’ve disabled it, you should now try installing the Windows Update.
In the event that it fails, then I recommend you attempt the various solutions below, in the order that they appear.
Run Windows Repair Tool to Fix Error 0x80246017
Before attempting any of the more complex manual solutions, it’s highly recommended that you consider the automated approach. Which basically entails carrying out a scan of your system using the repair tool Advanced System Repair Pro.
The entire process of using this tool to fix your system is fairly simple. Just, download, install and run the tool, and it will conduct a thorough scan of your system.
Once the scan is complete, it will notify you of all the problematic areas of your system, then give you the option to fix them.
This highly advanced repair tool was created by very experienced system and software engineers that have been solving computer issues for a considerable length of time.
Advanced System Repair Pro is capable of fixing registry, DLL, app, game and BSOD error types, amongst other things. It also has a built-in virus scanner, and an optimiser (to get the most out of your system). For more information on this tool, check out the link below:
CLICK HERE TO CHECK OUT ADVANCED SYSTEM REPAIR PRO
 The solution(s) below are for ADVANCED level computer users. If you are a beginner to intermediate computer user, I highly recommend you use the automated tool(s) above! The solution(s) below are for ADVANCED level computer users. If you are a beginner to intermediate computer user, I highly recommend you use the automated tool(s) above! |
Remove Windows Installation Files
Because error 0x80246017 is caused by an older iteration of Windows. One way you can fix it, is by locating and removing traces of your old Windows installation. To do that, follow the instructions below:
1. Boot into your system as a full administrator.
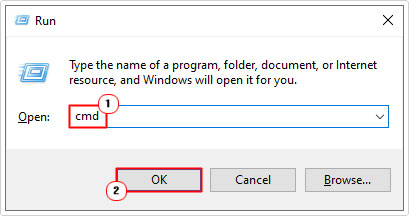
2. Then press  + R, type cmd and press CTRL + Shift + Enter.
3. When Command Prompt loads up, type the following command and press Enter.
rundll32.exe pnpclean.dll,RunDLL_PnpClean /DRIVERS /MAXCLEAN
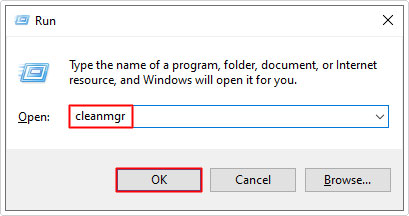
4. Now close Command Prompt, then press  + R, type cleanmgr and click on OK.
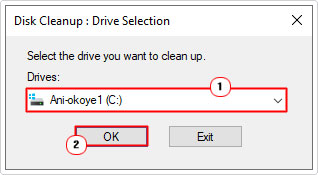
5. This will bring up the Disk Cleanup : Drive Selection applet, from here, select your primary drive (C:) then click on OK.
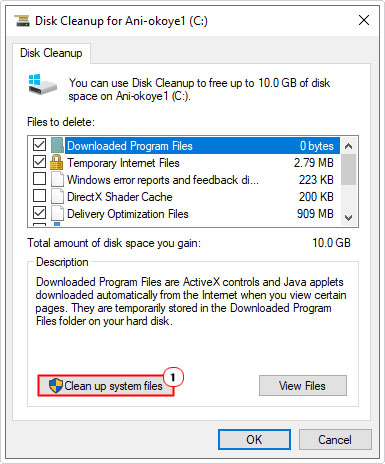
6. Disk Cleanup for C: will now appear, click on Clean up system files.
Note: The Disk Cleanup : Drive Selection applet will reappear, select the same primary drive (C:).
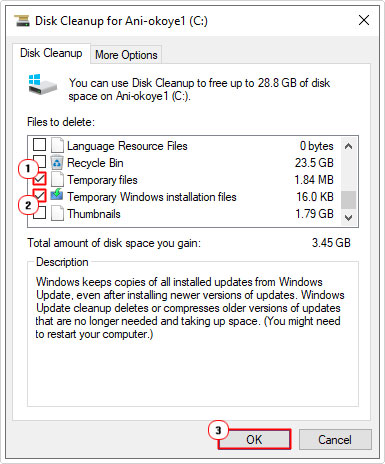
7. On Disk Cleanup for C: check the box next to Temporary files and Temporary Windows installation files and click on OK.
8. Once the process has complete, restart your system.
Now you can verify whether or not it has fixed error 0x80246017.
Delete Windows.old
If an older version of Windows was present on your system while upgrading. Typically, the installation process will keep those old redundant files intact, by renaming the original Windows folder to Windows.old. Because error 0x80246017 has been found to be the result of issues with older Windows iterations, it may be best you removed this folder.
To do that, follow the instructions below:
1. Follow steps 4 – 6 of Remove Windows Installation Files.
2. From the Disk Cleanup for C: applet, check the box next to Previous Windows installation(s) and click on OK.
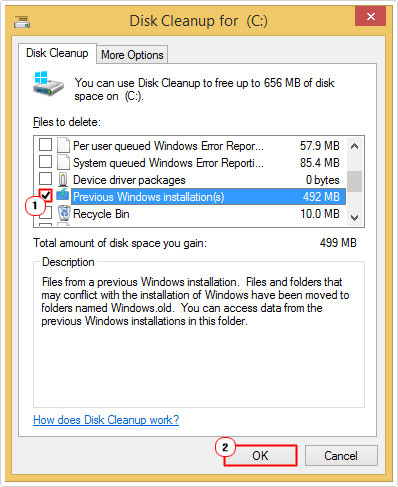
Once the process has completed, you can restart your system and re-try Windows Update.
Note: This is the only workable method of removing the Windows.old folder. The other method (attempting to delete it manually), will lead to access rights issues. Hence the use of Disk Cleanup.
Reset Registry Keys
This next method entails resetting several registry keys that are important to Windows operation. As previously noted, it’s important you back things up prior, before proceeding (instructions available in How to fix it section).
Anyway, follow the instructions below:
1. First, boot into your system as a full administrator.
2. Then press  + R, type regedit and click on OK.

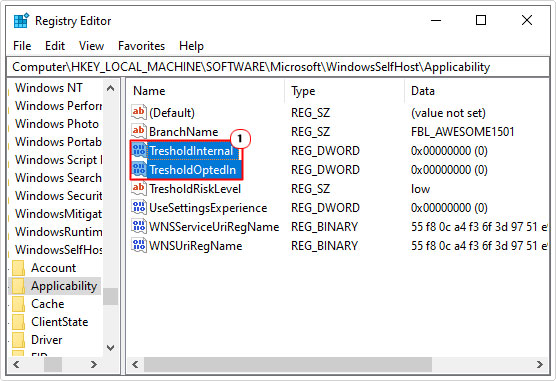
3. When Registry Editor loads up, go to the following path:
HKEY_LOCAL_MACHINE\SOFTWARE\Microsoft\WindowsSelfHost\Applicability
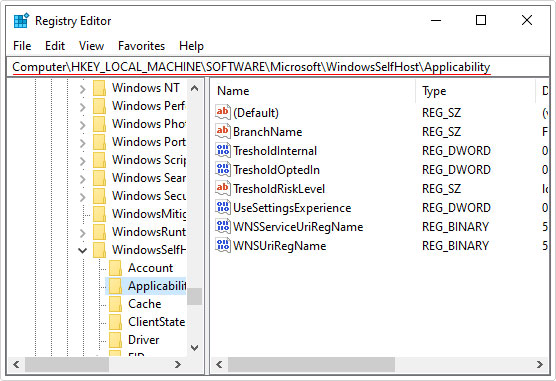
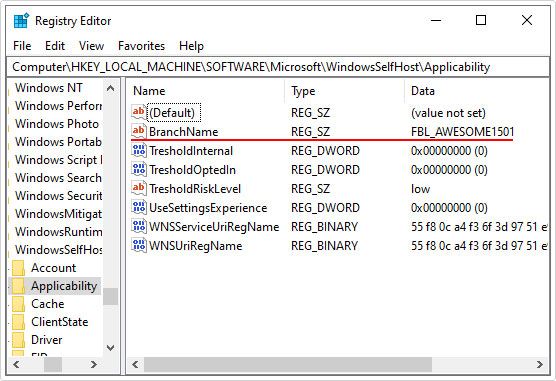
4. On the right pane, double click on BranchName and verify that its Value data is FBL_AWESOME1501, if it is not, then change it to it.
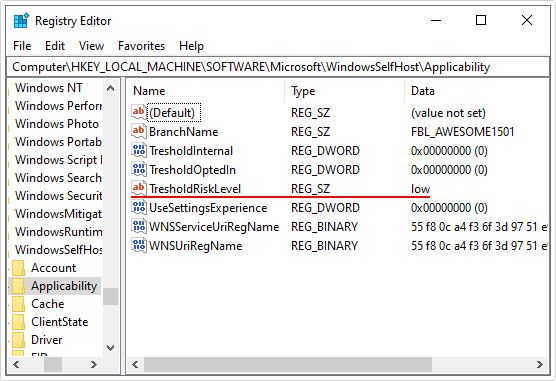
5. Now verify that the TresholdRiskLevel key has its value set to low.
6. Lastly, remove registry keys TresholdInternal and TresholdOptedIn then close Registry Editor.
Restart your system, then check whether or not it has fixed the error.
Are you looking for a way to repair all the errors on your computer?

If the answer is Yes, then I highly recommend you check out Advanced System Repair Pro.
Which is the leading registry cleaner program online that is able to cure your system from a number of different ailments such as Windows Installer Errors, Runtime Errors, Malicious Software, Spyware, System Freezing, Active Malware, Blue Screen of Death Errors, Rundll Errors, Slow Erratic Computer Performance, ActiveX Errors and much more. Click here to check it out NOW!

