| Attention Before you read this post, I highly recommend you check out my resources page for access to the tools and services I use to not only maintain my system but also fix all my computer errors, by clicking here! |
Error 0x80246019 is one of many Windows Update issues that occurs when attempting to install an update in Windows 10 and 11. It can occur in many different circumstances, but update 22H2 in Windows 11 is a particularly common instance when people encounter it.
Of all the various types of errors one can encounter in Windows, Update errors are easily amongst the most common. Windows Updates themselves are very important, as they oftentimes contain updates for known security loopholes, and latest features. This in turn, protects the user’s machine, while adding new functionalities to the system.
When it comes to fixing Windows Update errors, there are several approaches you can take. Some more effective than others – the solution you take, however, will depend greatly on the error cause.
With all of that said, below you will find a list of solutions, all of which have proven effective at fixing error 0x80246019. However, before we get to those, let’s first take a look at its common causes.
What Causes Update Error 0x80246019?
Like with all Windows errors, there are always more than one cause for them. Below you will find the most common causes, specifically for error 0x80246019:
- Antivirus scanner is blocking the Windows Update component: This is a relatively common cause for Windows Update issues. If your internet security suite features real-time protection, then disabling this feature will allow you to determine whether or not it is to blame.
- Too many connected USB devices: There’s a possibility that one or more of your USB devices is interfering with the Windows update component.
- Windows Update is corrupted: Specifically the $WINDOWS.~BT folder. Users have reported that corruption within that folder can and has inhibited the update process in the past.
- Corruption of integral system files: The corruption of important Windows system files can cause a litany of issues to occur on your system. In this particular instance, it could be error 0x80246019.
Now, with all of its common causes out of the way, let’s take a look at the various solutions available to you.
How to Fix It
As previously stated, Windows Update errors are amongst the most commonly encounter issues an end user may face. There occurrence is due to all kinds of situations and circumstances.
However, for this tutorial, we’re focusing exclusively on error 0x80246019. Below you will find a number of solutions – ideally you’d want to attempt them all, in the order that they appear.
Disconnect External (USB) Devices
If you have a lot of peripherals hooked up to your computer then that’s something you definitely do not want to rule out. It’s possible one or more of your USB devices is adversely effecting your system or the operating system itself – essentially inhibiting the update process.
To eliminate your USB devices as a possible cause. I suggest you unplug everything, then retry the update process.
Run Windows Update Troubleshooter
Probably one of the first things you may want to consider doing, when you encounter an update error (like 0x80246019). That is, to run the built-in Windows Update troubleshooter. Initially, it will run a scan, to determine the potential cause, then apply a fix where applicable.
It’s a relatively basic tool, only able to fix, the most common of causes. But it’s still worth a try, nonetheless.
Anyway, you can find step-by-step instructions on how to access and run this tool, from my post on fixing error 0x800f0845.
Run Windows Repair Tool to Fix Update Error 0x800f0845
If the two solutions above fail to fix error 0x800f0845, then there’s an even simpler solution that should interest you. That is, the use of the Windows Repair Tool Advanced System Repair Pro.
This tool is highly advanced and highly proficient at fixing Windows errors, by repairing those areas of your operating system that are common causes for these types of errors. All you need to do is download and run it, and it’ll do the rest.
That aside, in addition to its ability to fix update errors, it’s also capable of fixing registry problems, BSOD errors, DLL errors, runtime errors and much more. Its ability to optimise your systems performance is another cool feature that should have you coming back for more.
With all of that said, you can learn more about this powerful tool, from the link below:
CLICK HERE TO CHECK OUT ADVANCED SYSTEM REPAIR PRO
 The solution(s) below are for ADVANCED level computer users. If you are a beginner to intermediate computer user, I highly recommend you use the automated tool(s) above! The solution(s) below are for ADVANCED level computer users. If you are a beginner to intermediate computer user, I highly recommend you use the automated tool(s) above! |
Disable Windows Defender Real-Time Protection
There are instances when errors, such as 0x80246019 occur as a result of a security outfit blocking its access to the internet. For this solution, we’re going to assume it’s the built-in Windows Defender.
However, it’s possible your third-party security tool could be the culprit. Thus, if you fall into this category, I suggest you consult your software manual on how to disable its real-time protection feature.
For everyone else, simply follow the instructions below:
1. First, boot into your system as a full administrator.
2. Then press  + I (to open the Settings applet), then click on Update & Security.
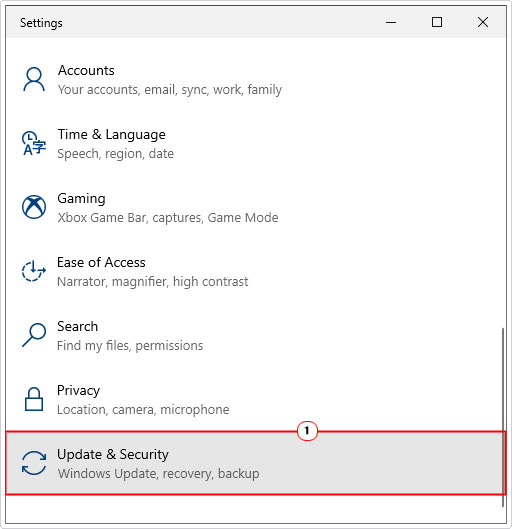
3. From Update & Security, click on Windows Security.
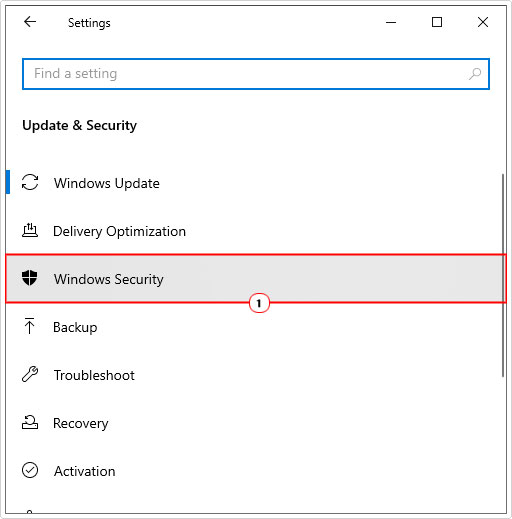
4. This will bring up the Windows Security applet, now, click on Virus & threat protection.
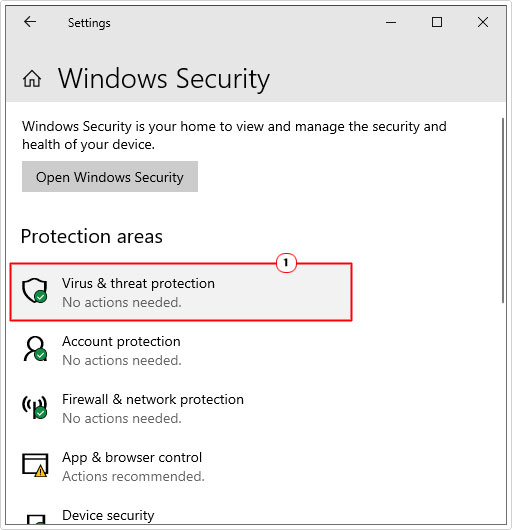
5. When the Virus & threat protection applet loads up, click on Manage settings under Virus & threat protection settings.
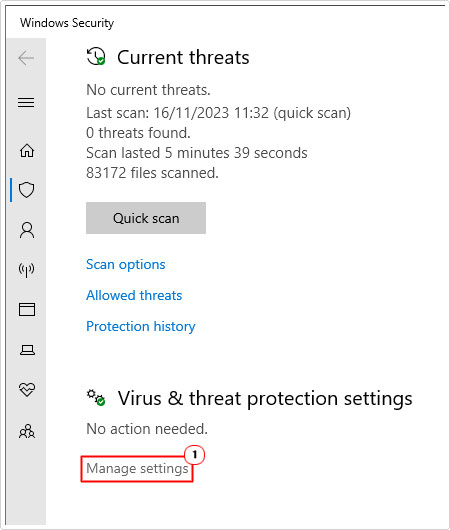
6. Now, on the Virus & threat protection settings page, set Real-time protection to off.
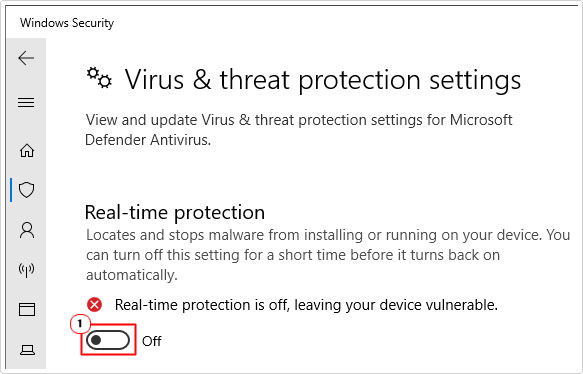
7. Now retry the Windows Update, to see whether or not it has fixed the error 0x80246019.
Manually Install Update
There are times when corruption, during the process of updating your Windows, prevents the process from completing. If the error 0x80246019 occurs when attempting to install a specific update, then you may want to consider downloading and installing it manually. As the issue could be specific to that update.
The whole process is fairly simple. You will of course, need to know the KB number of the update that is failing to install (which Windows Update should state).
1. Once you’ve got that information, visit the Microsoft Update Catalog and download the update from there: https://www.catalog.update.microsoft.com/
2. Type the KB number into the Search Bar and press Enter.
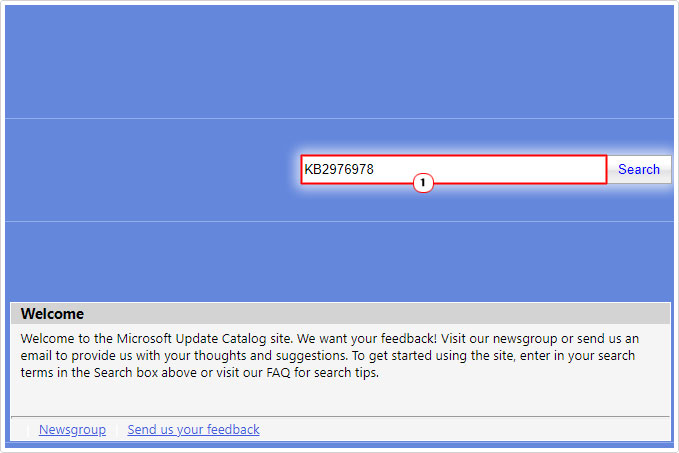
3. The Microsoft Update Catalog should now present you with a list of updates with that exact KB number. Simply click on the Download button for the most appropriate update.
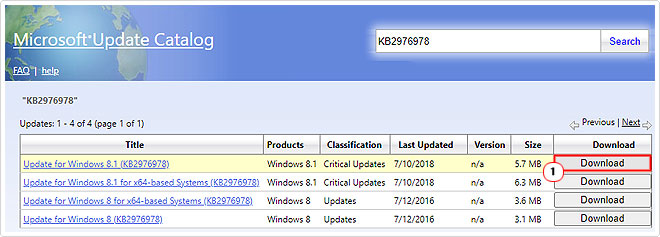
Note: Make sure the Update is compatible with your version (Windows 7 ~ 11) and architecture (x32 ~ x64) of Windows.
4. Once you’ve downloaded the update to your system, double-click on it, and then follow the onscreen instructions, to successful install it.
Remove $WINDOWS.~BT Folder
Another common cause of error 0x80246019 is the corruption of the $WINDOWS.~BT folder. To resolve this problem, the end user need only erase the folder entirely.
For step-by-step instructions on how to do that, check out my post on fixing error 0xc1900107.
Alternatively, you can use the Disk Cleanup tool to achieve the same result. To do that, simply follow the steps below:
1. Boot into your system as a full administrator.
2. Then Press  + R, type cleanmgr and click on OK.
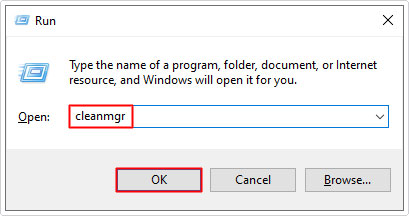
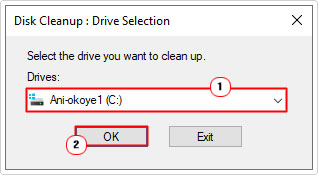
3. This will bring up the Disk Cleanup : Drive Selection applet. Select your primary (C:\) drive, then click on OK.
4. A Disk Cleanup for C: applet will appear, click on Clean up system files.
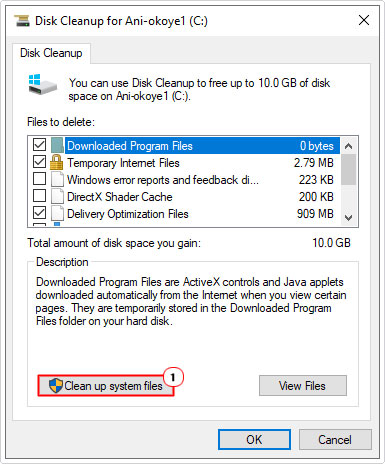
Note: the Drive selection applet will re-appear, be sure to choose the C:\ drive again.

5. Now, tick the box next to Previous Windows Installation and click on OK.
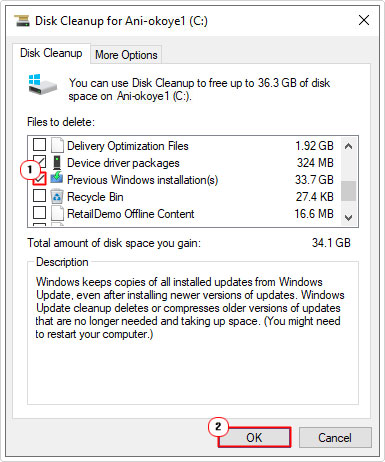
Note: This option is only accessible to users who have upgraded from one OS to another.
Change Insider Program Settings
Another method you can use to fix error 0x80246019 involves altering the Insider Program settings. To do that, follow the steps below:
1. Follow steps 1 – 2 of Disable Windows Defender Real-Time Protection.
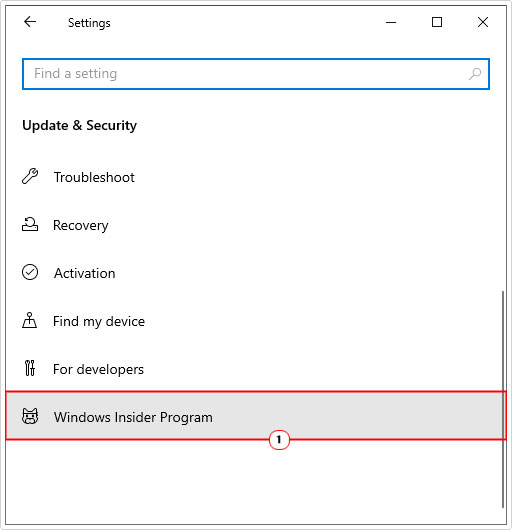
2. From Update & Security, click on Windows Insider Program.
3. When Windows Insider Program screen appears, simply click on the Stop Insider Preview builds button.
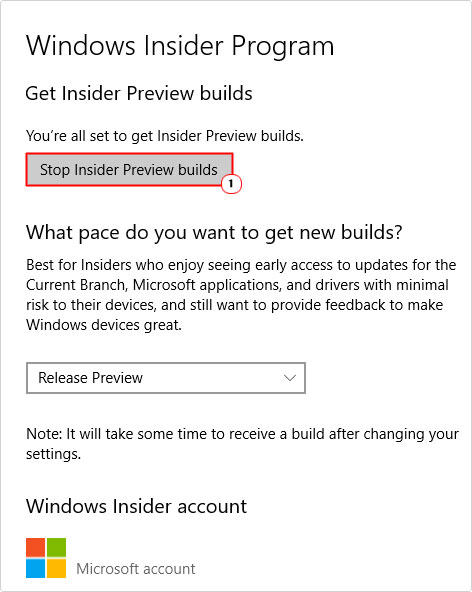
4. Once that’s been confirmed, you can now try Windows Update.
Run SFC & DISM
Another possible cause of error 0x80246019 is the corruption of integral system files. Fortunately, Windows has a built-in tool that is capable of restoring some of these files – in the event that they are erased and/or corrupted.
These tools are System File Checker (SFC) and Deployment Image Servicing and Management (DISM). You can find step-by-step instructions on how to run both of these tools, from my post on fixing D3dx9_43.dll is missing errors.
Are you looking for a way to repair all the errors on your computer?

If the answer is Yes, then I highly recommend you check out Advanced System Repair Pro.
Which is the leading registry cleaner program online that is able to cure your system from a number of different ailments such as Windows Installer Errors, Runtime Errors, Malicious Software, Spyware, System Freezing, Active Malware, Blue Screen of Death Errors, Rundll Errors, Slow Erratic Computer Performance, ActiveX Errors and much more. Click here to check it out NOW!

