| Attention Before you read this post, I highly recommend you check out my resources page for access to the tools and services I use to not only maintain my system but also fix all my computer errors, by clicking here! |
Error code 0xc0000185 is a blue screen of death (BSOD) issue that occurs typically during the boot up sequence of your Windows operating system. It’s most common symptom is preventing you from accessing Windows.
This makes error code 0xc0000185 a critical issue, prompting users to find quick, easy and workable solutions to it.
Error 0xc0000185 occurs on Windows 7, 8, 10 & 11 systems, preventing the boot sequence from successfully completing. Resulting in an inability to access your operating system.
For those of you bogged down with this issue; please do not fret. As there are many things you can do. All of which, I hope to outline in this tutorial.
What Causes Error Code 0xc0000185?
For those of you battling error code 0xc0000185, there are a number of scenarios that are known culprits for its happenstance. The most common of which are outlined below:
- A recent OS alteration: It’s possible a recent Windows Update or a driver installation was corrupted and is in some way interring with your Boot Configuration Data (BCD).
- Kernel Issue: Corruption to one of several Windows Kernel files can, effectively break your Windows boot up sequence. Given the importance of this area of the operating system.
- Corruption of Integral System Files: If important system files are corrupted, it can result in a plethora of symptoms and error types. Error code 0xc0000185 is just one of a possible litany of error codes.
- Corrupt Boot Configuration Data File(s): One of the more common causes of error code 0xc0000185 is the corruption of data belonging to the BCD.
Other possible causes of this error includes more subtle things, such as loose or missing cable connections, or a faulty or failing hard drive.
How to Fix It
Depending on the severity of the error, you may or may not be able to boot into Windows. As a workaround, you should be able to access Windows Safe Mode. Using a bootable Windows Creation file.
That said, the first thing you should consider are your connections. Make sure everything is connected properly.
To do this, you may need to open up your case. Don’t worry, you won’t be upgrading or changing anything. Just checking to ensure every cable is properly and securely connected and that there isn’t any visible damage to the motherboard.
You will need to examine the CPU, PSU, Memory Modules (RAM) and expansion cards, such as Sound & Graphics card(s).
Boot into Safe Mode
If you’ve checked your system and verified that everything is where it should. Then your next step may be to access Safe Mode. As it’s the one area where you should be able to carry out successful repairs of your OS.
Safe Mode is a streamlined version of your typical Windows session. That means, it lacks access to your typical apps and tools, with minimal hardware drivers loaded.
Anyway, to access Safe Mode, I recommend you follow the instructions outlined below:
Note: In order to access this mode, you will need a Windows Installation media file. If you don’t already have one, you will need to create one for your specific version of Windows. My post on fixing error 0xc000000f will show you how.
1. Once you have created and successfully used your Windows Media Installation file to boot into Windows Recovery Environment (RE), click on Startup Settings.
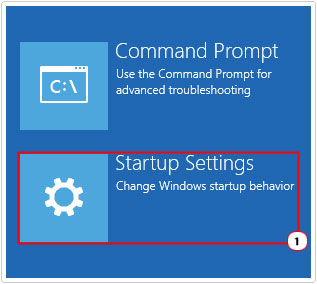
Note: This will bring up the Startup Settings page, from here, click on Restart.
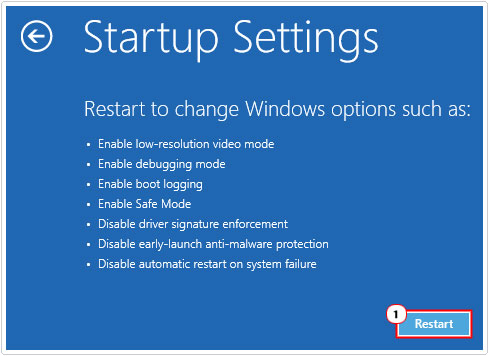
2. This will take you to the Startup Settings page, from here, press 5 for Enable Safe Mode with Networking.
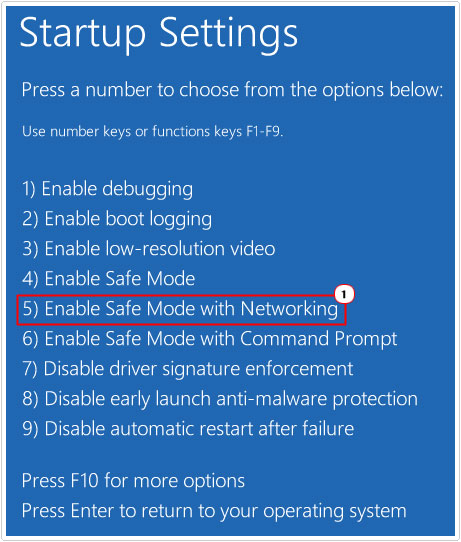
Note: The exact number for Safe Mode with Networking may vary.
Run Windows Repair Tool
If giving your system a physical diagnostic check failed to yield any tangible results, then you should definitely try a Windows Repair Tool, as your next viable solution.
The recommended tool for this task is called Advanced System Repair Pro. Which is capable of scanning, detecting and fixing a plethora of PC error types. Such as Windows registry errors, DLL errors, BSOD errors, driver errors and much more.
It’s very easy to use, which means, no expertise is required on your part. Simply download, install and run the tool, and it will do the rest.
Anyway, you can learn more about this tool, including, how it can help you, from the link below:
CLICK HERE TO CHECK OUT ADVANCED SYSTEM REPAIR PRO
 The solution(s) below are for ADVANCED level computer users. If you are a beginner to intermediate computer user, I highly recommend you use the automated tool(s) above! The solution(s) below are for ADVANCED level computer users. If you are a beginner to intermediate computer user, I highly recommend you use the automated tool(s) above! |
Use Automatic Repair
If error code 0xc0000185 appears, literally every time you attempt to boot into your system, and you were able to track this occurrence right after a particular incident. Maybe an improper shutdown or an error within Windows itself. Its possible kernel files were damaged during this eventuality.
In the event that, that is the actual case, then you may be able to use the tool Automatic Repair, within the Windows Recovery Environment (RE) to fix error code 0xc0000185.
Note: As previously noted, to access the RE, you will need a Windows Installation Media file. My post on fixing error 0xc000000f will show you how to create one.
1. Once you’ve booted into the Windows Recovery Environment (RE) a Troubleshoot menu will appear, click on the Troubleshoot option.
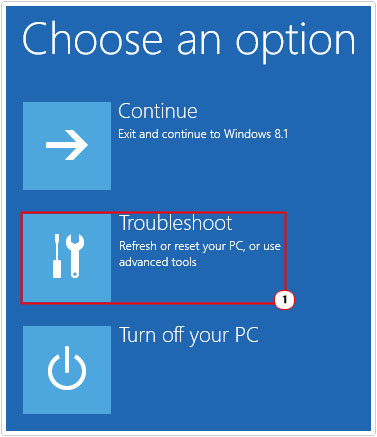
Note: This submenu may vary.
2. This will take you to the Advanced Options menu, from here, click on Startup Repair.
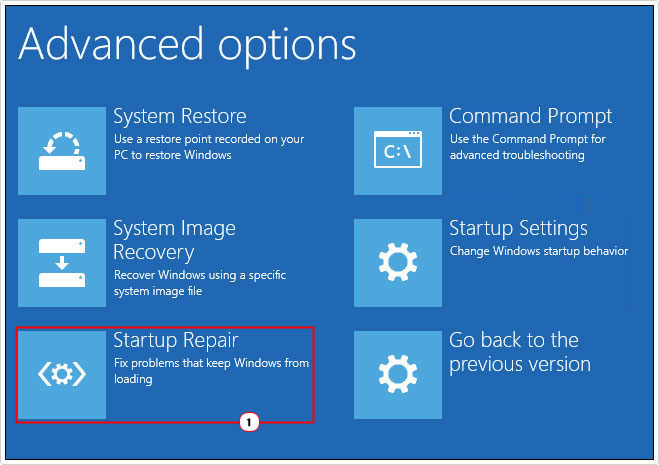
The Startup repair feature will start to diagnose and possibly repair your operating system. Depending on the severity of the error.
Once the whole process has been completed, you will need to reboot your system. Be sure to disconnect the installation media from your system (otherwise, it’ll just boot back into the RE)
Anyway, if this fails to fix error code 0xc0000185, then I recommend you attempt the next solution below.
Rebuild BCD
As I have noted, in possible causes (above), error code 0xc0000185 can occur as a result of corruption or erasure of Windows kernel files. In situations like this, it has been proven, that by rebuilding the Boot Configuration Data (BCD), it is possible to undo (or repair) the damage done to your Windows boot up sequence.
Note: You will need your installation media – which you should already have created.
Once you have that, you can rebuild your BCD by following the instructions mapped out on my post titled fixing bootmgr is missing errors.
Use System Restore
Did error code 0xc0000185 occur right after a recent change you made to the operating system? Are you able to detail that change? If that’s so, and all the solutions up to this point were unable to fix this error. Then your next viable cause of action should be to use the built-in Windows System Restore tool.
This is a tool designed to revert your system back to earlier states
System Restore works by creating snapshots of your system over a specific period of time. Maybe several weeks to several months, depending on how it’s configured. If you are fortunate enough to have a snapshot created of your system that dates back prior to error code 0xc0000185 , then you may be able to use it to reverse the damage done to your operating system.
Similar to prior solutions, you can access System Restore via the Windows Recovery Environment (RE). If you need step-by-step instructions on how to do it, check out my post on fixing error 0xc000014c.
Are you looking for a way to repair all the errors on your computer?

If the answer is Yes, then I highly recommend you check out Advanced System Repair Pro.
Which is the leading registry cleaner program online that is able to cure your system from a number of different ailments such as Windows Installer Errors, Runtime Errors, Malicious Software, Spyware, System Freezing, Active Malware, Blue Screen of Death Errors, Rundll Errors, Slow Erratic Computer Performance, ActiveX Errors and much more. Click here to check it out NOW!

