| Attention Before you read this post, I highly recommend you check out my resources page for access to the tools and services I use to not only maintain my system but also fix all my computer errors, by clicking here! |
Microsoft are constantly pushing out new updates for their line of operating systems. Whenever this process occurs, end users are expected to seamlessly download and install these updates. However, there are those times when issues can arise. This was especially true when it came to the Windows 10 anniversary update. For a great many end users who attempted to install this update, they were found unstuck by error code 0xc1900107.
Whenever an end users would try to install this important anniversary update, the installation process would fail, and they would be greeted with the error code 0xc1900107 which would indicate that there’s an issue within the system somewhere.
Fortunately, it is possible to fix this update error, like so many, providing you have the know-how. In this tutorial, we’ll be going through a number of verifiable solutions that you can use today, to fix your system.
So, continue reading for those much desired solutions. But before we get to them, let’s take a deeper dive into what causes this particular error.
What Causes Update Error 0xc1900107?
The Windows Update error 0xc1900107 is usually linked to issues with pending updates. However, in the circumstances highlighted in this tutorial, we mention the anniversary update being the sole update that refuses to install.
That aside, when it comes to possible causes, you’re looking at things such as:
- Corrupted files within the Windows Update folder.
- Disabled or corrupted Windows Update component(s).
There are other possible causes, like intermittent internet connection, virus infection. But if you’re having specific issues with the Windows 10 anniversary update, then it’s likely due to one of the main causes listed above.
That said, continue reading for a variety of solutions that you can use to fix this problem.
How to Fix It
As is the case with the Windows operating system, errors are plentiful. When it comes to the update error 0xc1900107, there are several things for you to consider.
Before attempting any of the more, severe solutions, you may want to consider disabling your third-party antivirus software.
Although your antivirus tool protects your system from malicious threats, it’s not uncommon for it to block or interfere with Windows processes.
Depending on the capabilities of the tool, it may be blocking the Windows Update process specifically, causing error 0xc1900107 to occur.
For this reason, you’ll want to rule out your antivirus scanner by disabling it, then running the Windows Update process. In the event that your virus scanner is found to be the culprit, there may be several workarounds you can attempt.
Anyway, to disable your virus scanner, simply right-click on its desktop Icon and select Disable.
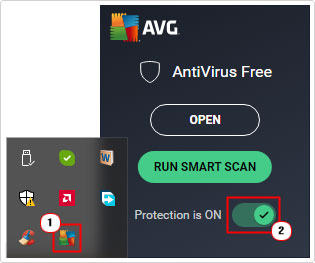
Note: The Icon is usually positioned in the bottom right hand corner of the screen.
Remove Virus Scanner
If the Windows Update process works right after disabling your virus scanner, then you are left with two options. The first is to outright remove the program (which is not recommended). The second is to create an exception.
If your antivirus scanner has a built-in program guard feature, then it’s most likely the culprit. To get around this issue, you will need to create an exception for the process, which in this case is Windows Update.
I suggest you consult the manual of your virus scanner for more information on how to do this.
Alternatively, you can remove your virus scanner by doing the following:
1. First, boot into your system as a full administrator.
2. Then press  + I.
+ I.
3. This will bring up the Settings applet, from here, click on Apps.
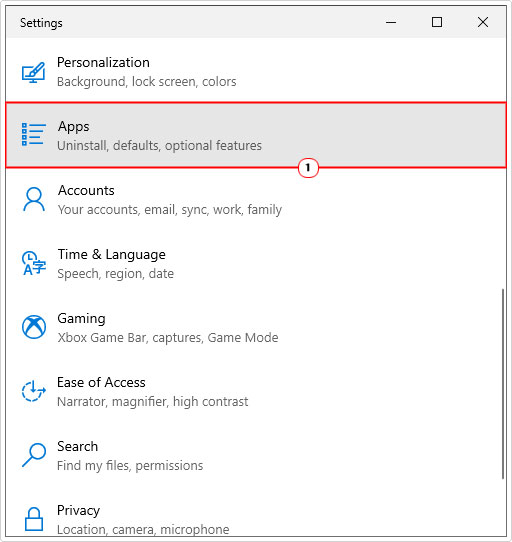
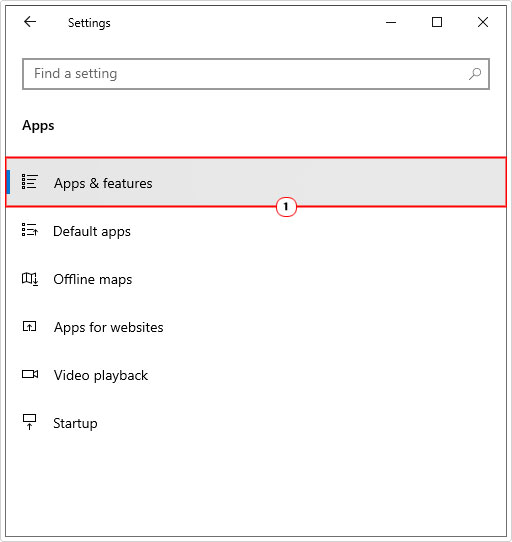
4. Now click on Apps & features from the Apps menu.
4. When Apps & features appears, scroll down to you find your Antivirus Scanner tool, then click on it, and select Uninstall.
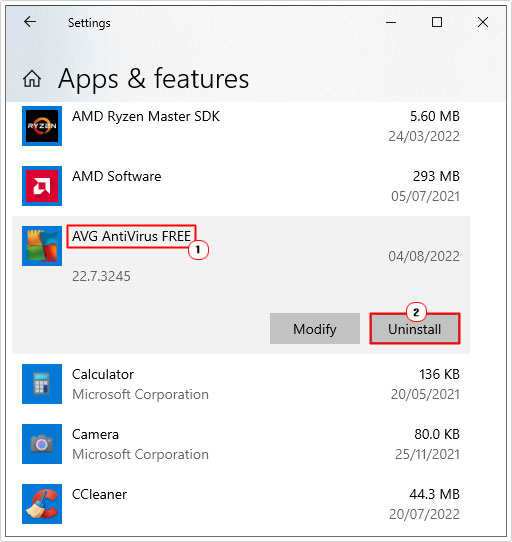
5. After you have successfully removed your antivirus scanner, restart your system, then verify that the problem has been fixed.
Note: Once you’ve removed your third-party antivirus scanner, the operating system should give you the option to enable Windows Defender. Microsoft’s own antivirus solution.
Run Windows Repair Tool to Fix Error 0xc1900107
If you’re looking for a solution that is quick and easy to implement, then I’d suggest you looked no further than this Windows repair tool.
The tool I’m talking about is Advanced System Repair Pro. Which is a multifaceted repair program capable of scanning the entirety of your system, to detect and repair known Windows errors and issues. Which is why it makes sense to give it a go, here.
Advanced System Repair Pro was developed by veterans in the field, to be able to identify and fix a plethora of error types, such as BSOD errors, DLL errors, Windows Update errors, registry problems, game issues, corrupted files and much more.
For more information on this tool and how it can help you, visit the link below:
CLICK HERE TO CHECK OUT ADVANCED SYSTEM REPAIR PRO
Use Windows Update Troubleshooter
If your Windows Update(s) fails to either download or install, then you could try the built-in Windows Update troubleshooter.
This troubleshooter tool is designed to identify the root cause (of the Windows update error) and apply its recommended fix when prompted. The drawbacks of this tool are its obvious limitations. That said, it’s still worth a try.
You can find step-by-step instructions on how to run and use this tool, from my post on fixing error 0x800f0845.
 The solution(s) below are for ADVANCED level computer users. If you are a beginner to intermediate computer user, I highly recommend you use the automated tool(s) above! The solution(s) below are for ADVANCED level computer users. If you are a beginner to intermediate computer user, I highly recommend you use the automated tool(s) above! |
Remove $WINDOWS.~BT Folder
If all available solutions up to this point have failed to fix error 0xc1900107, then you may want to consider removing the $WINDOWS.~BT folder.
This folder is used by the operating system to store data from the previous iteration of Windows. When an end user upgrades from Windows 7/8 to Windows 10, a temporary folder ($WINDOWS.~BT) is created, which is used to store crucial data during the upgrade process.
However, there are instances, when data within this folder interferes with the Windows Update process, preventing it from downloading new updates. In situations like this, you can fix the problem, by erasing the folder, which in turn should eliminate error 0xc1900107.
To delete this folder, simply do the following:
1. First, boot into your system as a full administrator.
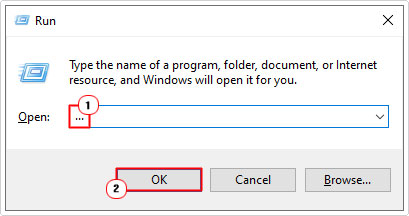
2. Then press  + R, type … and click on OK.
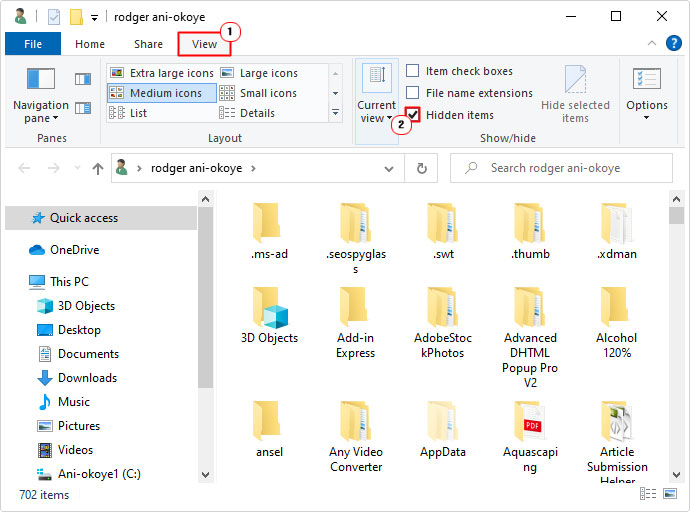
3. When File Explorer loads up, click on View, then check the box next to Hidden items.
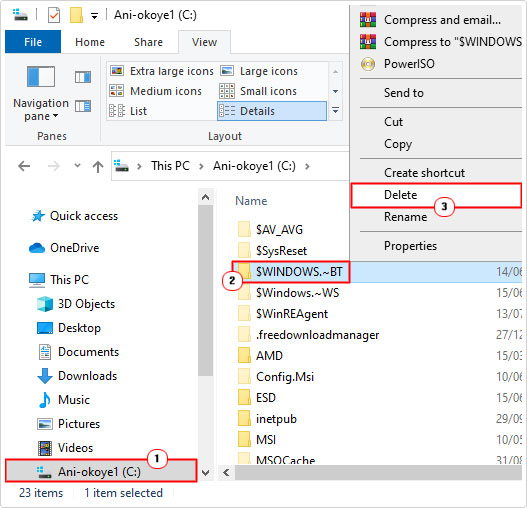
4. Now click on your primary (C:) drive, and it should appear in the right-pane. Simply right-click on it ($WINDOWS.~BT) and select Delete.
Free Up Hard Drive Space
Error 0xc1900107 and Update issues in general can occur when your hard drive has limited free disk space. In situations like this, you can rectify the problem by freeing up space.
There are so many areas of your hard drive that you can look to, if you’re objective is to create more available hard drive space.
Anyway, the best approach to take, is outlined below:
1. First, boot into your system as a full administrator.
2. Then press  + I.
+ I.
3. When the Settings applet appears, click on System.
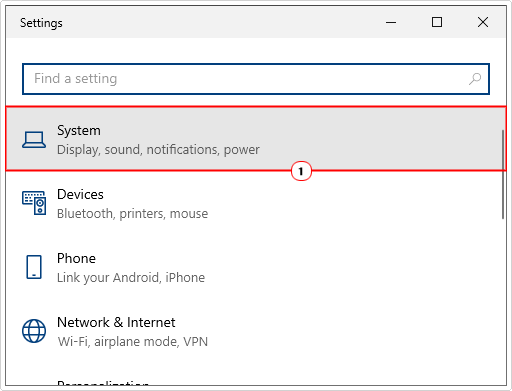
4. From the System menu, click on Storage.
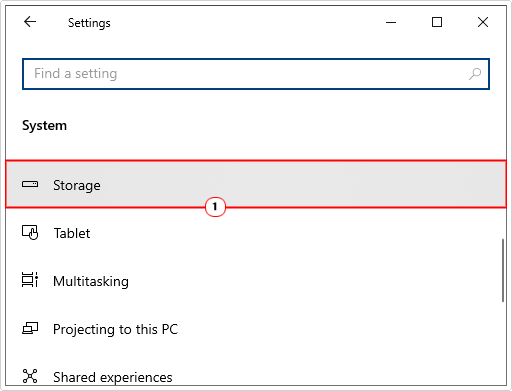
5. When Storage loads up, click on Configure Storage Sense or run it now.
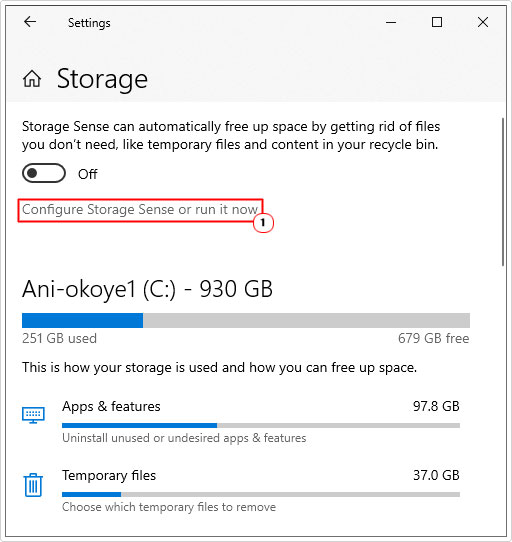
6. This will take you to the Configure Storage Sense or run it now menu, now scroll down and click on Clean now.
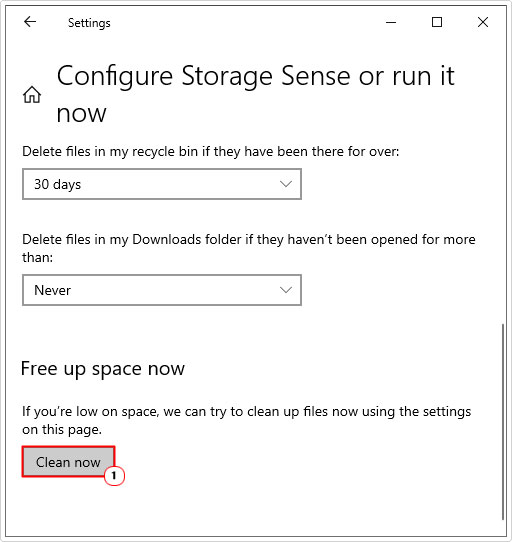
Note: Alternatively, you can click on the various areas of your hard disk drive (from the main window), and remove the files manually.
Reset Windows Update
If issues with your Windows Update components is the reason why you are unable to install your latest update (whether it be the anniversary update or not), then you may want to consider a reset.
Essentially, you are resetting or reconfiguring the various components that belong to the Windows Update feature. For step-by-step instructions on how to do this, check out my post on fixing error 0x8007000d.
Are you looking for a way to repair all the errors on your computer?

If the answer is Yes, then I highly recommend you check out Advanced System Repair Pro.
Which is the leading registry cleaner program online that is able to cure your system from a number of different ailments such as Windows Installer Errors, Runtime Errors, Malicious Software, Spyware, System Freezing, Active Malware, Blue Screen of Death Errors, Rundll Errors, Slow Erratic Computer Performance, ActiveX Errors and much more. Click here to check it out NOW!

