| Attention Before you read this post, I highly recommend you check out my resources page for access to the tools and services I use to not only maintain my system but also fix all my computer errors, by clicking here! |
If you’ve encountered error 0xC19001e2 while updating your Windows 10 operating system, it’s likely the result of a pre-installed scripted failing to execute. Fortunately, it’s possible to fix this error, using one of several solutions outlined in this tutorial. Please continue reading to find out more.
Error Overview
Microsoft are constantly pushing out new updates for their operating systems, which enhance overall performance while improving system security. However, every now and then, one of these updates may fail, resulting in an error the end user is left to tackle.
Error 0xC19001e2 in this particular case is also known as MOSETUP_E_PREINSTALL_SCRIPT_FAILED. It occurs when a pre-installed script either, returns an error or fails to run. There are several reasons why the script may not execute. It could be due to a corrupted OS or an issue with the Windows Update component itself.
Initially, error 0xC19001e2 would occur when the end user attempted to install a particular Feature Update. Error 0xC19001e2 also commonly occurred after the release of Windows 10 version 1903 to 1909. The corresponding error message looked something like the following:
Feature Update to Windows 10, Version 1903 – Error 0xC19001e2
There was a problem running pre-install.cmd scripts.
This error would also occur during the upgrade process, from either Windows 7 or 8 to Windows 10.
Other circumstances where error 0xC19001e2 may occur, include when installing an update for the Insider Preview version of Windows 10. Sometimes the update would reach 100% installed, then freeze and issue the error 0xC19001e2 message.
The most recent incident involving error 0xC19001e2, occurred during Windows 10 version 2004 to 20H2. Many end users were greeted with the typical error message (as highlighted above).
What Causes Windows Update Error 0xC19001e2?
After going through all the different circumstances that error 0xC19001e2 occurs in. It was found that there were a number of situations that are responsible for this particular error. The most common of which are highlighted below:
- BitLocker Conflict: BitLocker is capable of conflicting with the installation process of the feature update. Disabling this feature, has, in the past proven successful at rectifying this particular error.
- Windows Update Corruption: For some end users, they encountered error 0xC19001e2 due to a very specific issue with the Windows Update component.
- Windows Update Freeze: One of more Windows Update components has crashed, causing the installation process to freeze.
- System File(s) Corruption: its possible integral system files have been corrupted or erased unknowingly, by a third-party tool or application. Fortunately, there are methods one can use to restore and/or replace these files.
- Dell Encryption Conflict: If you’re on a Dell system, then it is possible Dell’s propriety encryption tool is conflicting with the Update installation process.
Now that you have a greater understanding of the potential causes. I suggest you continue reading for possible ways that you can fix this issue.
How to Fix It
When the error 0xC19001e2 occurs, it may be accompanied by an error message indicating that you should try the update process later. However, repeated attempts yields the same result. With the same error message appearing again and again.
So what are the options you have available to you? As is typically the case with Windows errors, there are methods you can use to easily fix them. This leads us to the solutions. Below you will find an assortment of repair solutions, all of which proven capable of fixing error 0xC19001e2.
For best results, I recommend you attempt the solution(s) in the order that they appear.
Run Windows Repair Tool to Fix Error 0xC19001e2
Depending on your level of expertise or free time you have available to you. You may find that the best solution is to adopt the quickest and undoubtedly easiest method to fixing error 0xC19001e2.
That is, of course, to run Advanced System Repair Pro, which is a Windows repair tool. This tool is designed specifically to repair a plethora of error types, such as Windows Update, DLL, BSOD, game and registry related issues. It’s also capable of detecting and removing viruses, restoring previously inaccessible files and speeding up your system.
All you need to do is download, install and run the tool to get started. For more information on how to go about doing that, check the link below:
CLICK HERE TO CHECK OUT ADVANCED SYSTEM REPAIR PRO
 The solution(s) below are for ADVANCED level computer users. If you are a beginner to intermediate computer user, I highly recommend you use the automated tool(s) above! The solution(s) below are for ADVANCED level computer users. If you are a beginner to intermediate computer user, I highly recommend you use the automated tool(s) above! |
Uninstall Dell Encryption Tool
If you’re encountering this error on a Dell system, whether it be a laptop of desktop system, then it’s possible the culprit is the Dell Encryption or Dell Data Security program(s).
Based on research, it was found, that a service required by both of these Dell tools has been known to conflict with the Update process, specifically for version 1903 of Windows 10.
Other Dell users also reported that they encountered error 0xC19001e2 during the installation of a feature update, but confirmed that they were able to resolve the problem, simply by uninstalling the above program(s).
So I suggest you uninstall either one or both of these tools. If you don’t know how to do that, then check out my post on fixing uninstall problems for step-by-step instructions.
Run Windows Update Troubleshooter
Before attempting any of the more complex repair solutions, you’ll want to verify whether or not the operating system is capable of resolving the issue by itself.
To do that, you can use Microsoft’s built-in repair tool, the Windows Update Troubleshooter. The troubleshooter is fairly basic, both in usage and its ability to repair Windows issues. But it’s still worth a try.
Many end users were able to resolve error 0xC19001e2 simply by running this tool and applying the specified fix. You can find step-by-step instructions on how to run this tool from my post on fixing error 0x80004005.
Disable BitLocker
As previously noted, a tool that is a known culprit for error 0xC19001e2 is the built-in Windows tool BitLocker.
This feature enables the end user to encrypt some or all of the files on their hard drive. This is done so as to protect sensitive data you don’t want getting into a cybercriminals hands.
Many end users have confirmed that by pausing or disabling BitLocker, they were able to complete the update process without error.
If you use BitLocker, then you may want to try that.
To disable this tool, simply do the following:
1. First, boot into your system as a full administrator.
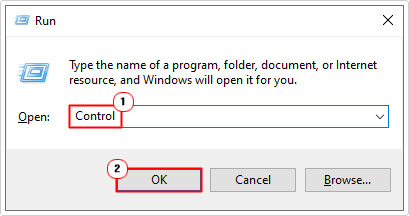
2. Then press  + R, type Control and click on OK.

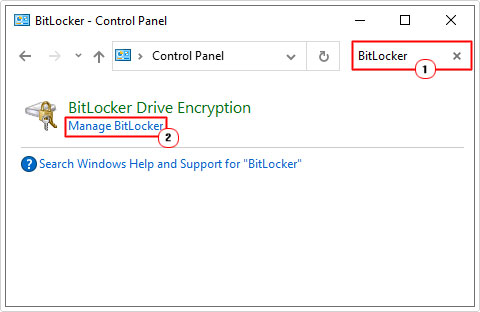
3. When Control Panel loads up, type BitLocker into the Search Control Panel box, then click on Manage BitLocker.

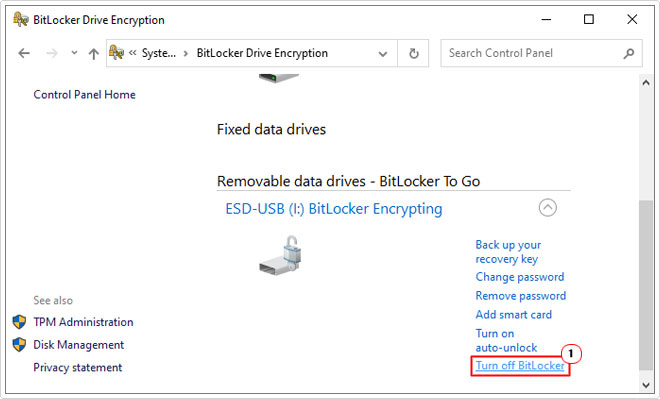
4. When BitLocker Drive Encryption loads up, simply click on Turn off BitLocker, next to the corresponding drive.

Run SFC
If error 0xC19001e2 is as a result of the corruption of integral system files, this tool, should theoretically, be able to fix it. System File Checker is a built-in Windows tool, capable of checking, and replacing missing or corrupted system files.
It’s a relatively basic program, it does replace certain system files, but not all of them. This means, there’s a certain level of uncertainty, when it comes to using this tool.
With that said, you can find step-by-step instructions on how to run this tool, from my post on how to run SFC /Scannow.
Restart Windows Update Services
If none of the above solutions were able to fix error 0xC19001e2, then it’s possible the error is as a result of a stuck or frozen Windows services.
One method that you can use to resolve this issue, is to reset or restart all corresponding services related to the Windows Update component.
Note: Since there’s no way of knowing which service is directly responsible, it’s recommended you restart them all.
There are several ways that you can do this, but the most comprehensive way is outlined in my post on fixing Windows Update error 0x8007000d.
Are you looking for a way to repair all the errors on your computer?

If the answer is Yes, then I highly recommend you check out Advanced System Repair Pro.
Which is the leading registry cleaner program online that is able to cure your system from a number of different ailments such as Windows Installer Errors, Runtime Errors, Malicious Software, Spyware, System Freezing, Active Malware, Blue Screen of Death Errors, Rundll Errors, Slow Erratic Computer Performance, ActiveX Errors and much more. Click here to check it out NOW!

