| Attention Before you read this post, I highly recommend you check out my resources page for access to the tools and services I use to not only maintain my system but also fix all my computer errors, by clicking here! |
This post looks at the DNS lookup error, encompassing solutions, and a general overview of what a DNS is.
The definition of the DNS or Domain Name System is that of a hierarchical setup for services, nodes and resources that are tied to a private network or the internet. Through this system, internetworked information is distributed amongst peers using this domain name system. However, the most important aspect of its functionality is its ability to translate a meaningful domain name into binary or numerical identifiers which is better understood by network devices for the sole purpose of globally finding and addressing these specific devices.
The Domain Name System functions similarly to a phone directory or rather internet directory, in that it translates user created hostnames into IP addresses. An example of this would be the translation of www.example.com into an IP address which is constructed in the following format “XXX.XXX.XXX.XXX” where XXX donates a number from 1 to 255.
If, when attempting to access a site you receive the following message “lookup error” or “webpage is unavailable”, then there’s a good chance it is a DNS lookup error. Due to the constant DNS service halts, misconfigured firewalls and system crashes, DNS servers more often than not become unreachable. A server that is unresponsive typically results in decreased efficiency and increased lookup times. If queries made by the Domain Name System, stop receiving answers, then it can adversely affect your ability to access the internet. Thus, “This webpage is unavailable” is typically the way it manifests itself in your browser window. Anyway, continue reading for a number of techniques that you can use to fix this DNS lookup error.
Check Physical Connections
Before delving into any technical stuff, checking physical connections should be the very first thing that you do. Ensure that the cables that are connected to your modem/router are secure and that all the relevant lights on the device are flashing. There are times when the DNS lookup error is brought upon by loose cable(s), in the event that this is the case in your situation, you should reconnect your cables then immediately restart your computer.
You will also have to restart your router, which can be done through the routers settings screen. To do this, simply do the following.
1. First, ensure you’ve logged into your computer with a user profile that has administrative rights.
2. Then load up your browser windows and type either 192.168.0.1 or 196.168.1.1 into the address bar and press Enter.

Note: If you type the first IP address into your address bar and receive a “The connection has timed out” error message, then you should try the second IP address.
3. When the Authentication Required dialog box pops up, type in your routers User Name: and Password: then click on OK.

Note: If you haven’t already changed your default password then simply type admin into the User Name box and password into the Password box.
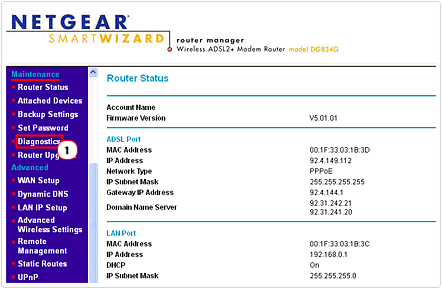
4. Once you’ve logged into your router, click on Diagnostics in the Maintenance section on the left side menu.
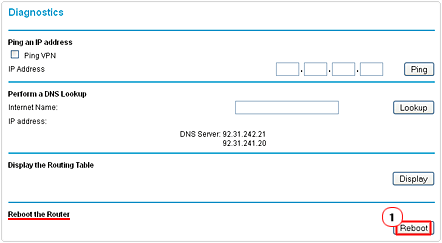
5. From the Diagnostics screen, click on the Reboot button within the Reboot the Router section of the page.
Flush Your DNS Server Cache
If after checking all your cable connections and restarting your router, the problem still persists, then flushing your DNS server cache may be able to do the trick. Additionally, you may want to try this method when you’re having problems accessing specific websites. Flushing your DNS cache is a fairly simple process that you can carry out at any time. Simply follow the instructions below to carry out this function.
1. First, ensure you’ve logged into your computer with administrative rights.
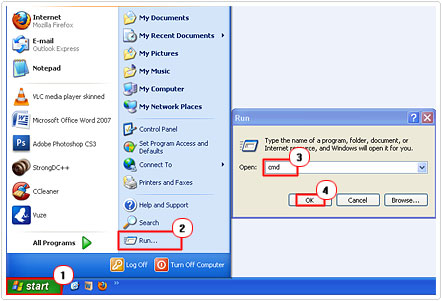
2. Then click on Start -> Run, type cmd and click on OK. [Windows Vista/7: Start -> Type cmd (into the Search programs and files box) and Press CTRL + Shift + Enter, then click on Continue]
3. Once Command Prompt has loaded up, type ipconfig /flushdns and hit Enter.

Renew Your IP
There are a number of reasons why you may want to renew your IP address. The most common reason why you may want to adopt this method is if you’ve lost your connection to the internet. This loss of connection could be due to your routers inability to assign IP address to computers attached to it. On the flip side, you may want to use this command to reset your internet connection as a possible fix for the DNS lookup error you’re currently faced with.
Do You Need To Renew Your IP Address?
Well, if you’ve followed my guide from the beginning and restarted your router, then renewing your IP address would be a pretty pointless endeavour. However, in the event that you opted against restarting your router, you can choose to renew your IP address without having to switch your router off, which would otherwise adversely affect other computers connected to the router. To do this, simply do the following.
1. First, ensure you’ve logged into your computer with administrative rights.
2. Then click on Start -> Run, type cmd and click on OK. [Windows Vista/7: Start -> Type cmd (into the Search programs and files box) and Press CTRL + Shift + Enter, then click on Continue]

3. From Command Prompt type ipconfig /release and press Enter.

4. Then type ipconfig /renew and press Enter.
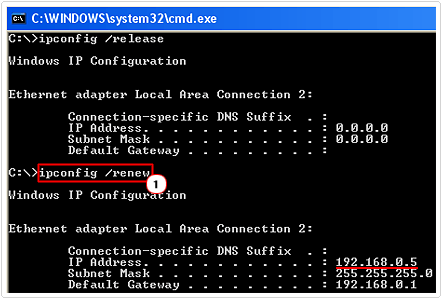
Note: The first command will release your IP address, and the second command will assign you a new one. To double check that you’ve been assigned a new IP address, simply type ipconfig in Command Prompt.
Rebuild Your Connection to Fix DNS Lookup Error
Using the repair feature in network connections is probably a more user friendly approach to carrying out most of the functions outlined above. Anyway, in order to use this feature, simply do the following.
1. First, log into your computer with administrative rights.
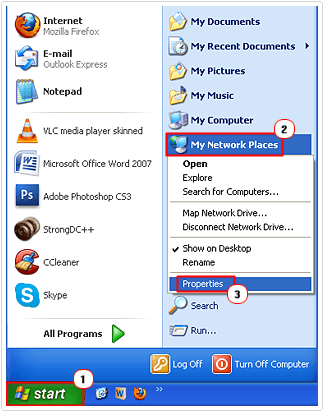
2. Then click on Start, then right click on My Network Places and click on Properties.
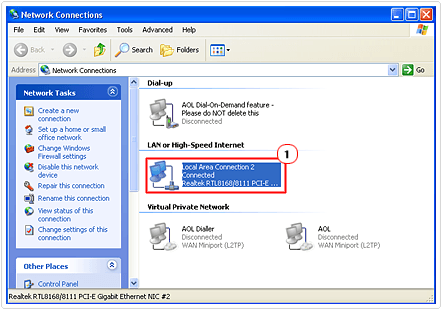
3. From the Network Connections applet, double click on Local Area Connection.
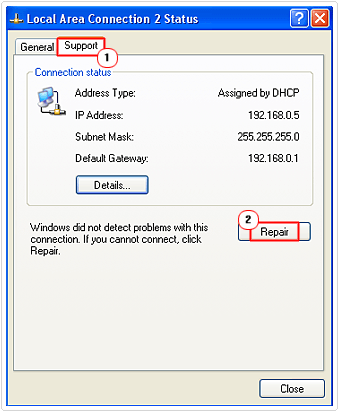
4. This will bring up the Local Area Connection Status dialog box, from here click on the Support Tab, and then click on Repair.
Change Your DNS Servers
In most cases, simply clicking on the reload button in your browser is enough to fix a DNS lookup error. However, if the above mention techniques have seen little success, then you will definitely need to take more drastic action. The error(s) that you’re receiving could be due to the DNS servers of your Internet Service Provider (ISP). The good thing is that there are actually more reliable DNS servers out there that you can use. So changing your DNS server may be all you need to do to fix this problem. To do this, do the following.
1. First, ensure you’ve logged into your computer with administrative rights.
2. Then click on Start, then right click on My Network Places and select Properties.

3. From the Network Connections applet, right click on your Local Area Connection and select Properties.
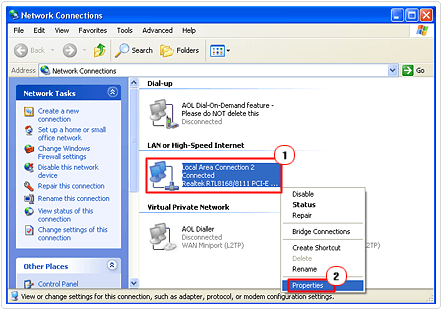
4. This will bring up the Local Area Connection Properties page, click on Internet Protocol (TCP/IP), and then click on Properties.
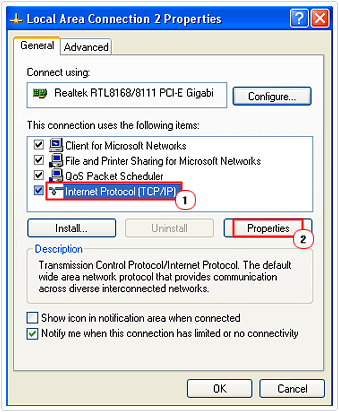
5. From the Internet Protocol (TCP/IP) Properties page, click on Use the following DNS server addresses then type in the following OpenDNS Servers:
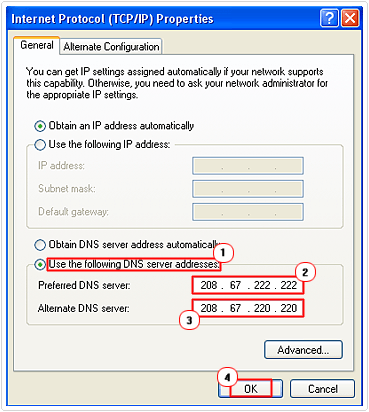
Alternate DNS Server: 208.67.220.220
Alternatively, you could put these DNS server addresses into your router, that way, the servers will be used by everyone that accesses the internet through it. To do this, do the following.
1. First, follow steps 1 – 3 of “Check Physical Connections”.
2. Once logged in, click on Basic Settings, which is in the Setup section.
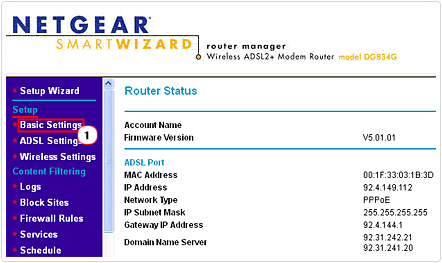
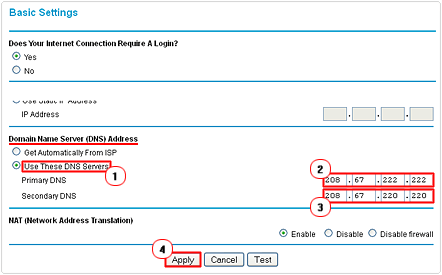
3. From Basic Settings, scroll down to Domain Name Server (DNS) Address and click on Use These DNS Servers, then type the two previously mentioned OpenDNS Server IP addresses above. Then click on Apply.
Are you looking for a way to repair all the errors on your computer?

If the answer is Yes, then I highly recommend you check out Advanced System Repair Pro.
Which is the leading registry cleaner program online that is able to cure your system from a number of different ailments such as Windows Installer Errors, Runtime Errors, Malicious Software, Spyware, System Freezing, Active Malware, Blue Screen of Death Errors, Rundll Errors, Slow Erratic Computer Performance, ActiveX Errors and much more. Click here to check it out NOW!


This is very interesting, You’re a very skilled
blogger. I have joined your rss feed and look forward to seeking more of your
great post. Also, I have shared your web site in my social networks!