| Attention Before you read this post, I highly recommend you check out my resources page for access to the tools and services I use to not only maintain my system but also fix all my computer errors, by clicking here! |
For those of you here, you’re probably asking yourself, how can I see who is on my WiFi network and for one reason in particular, which is because of certain unscrupulous individuals that like to steal peoples bandwidth. It’s a very annoying occurrence that was very rampant in the early days of WiFi technology. However, today people are far wiser, as they are now taking the time to learn a thing or two about WiFi technology and how to properly secure their wireless networks.
The IP and MAC address of a computer are the two most conventional methods of determining who is on your network. The IP address is basically an address assigned to the computer by your router, whereas the MAC address is an address that is unique to the network interface card in your computer.
You should take some time to think about how someone would be able to gain access to the internet through your router, to begin with, because in most cases, it’s due to security issues. It’s very important that you’ve properly configured your router to be secure. There are tons of different things that you can do to secure your network, but before we delve into them, let’s focus on the main topic of discussion.
The answer to the question of how can I see who is on my WiFi network is fairly straightforward, as it can be done by doing the following.
View Router Security Logs (NETGEAR)
When it comes to the question of how can I see who is on my WiFi network, viewing the logs of your router, which is a history of administrator logins, security-related events, denial of service attacks and hacker probes is very important. Depending on the router that you actually own, the method of accessing the logs may vary, however, to access it on a NETGEAR router, simply do the following.
1. First, ensure you’ve logged into your computer with administrative rights.
2. Then click on Start -> Run, type cmd and click on OK. [Windows Vista/7: Start -> Type cmd (into the Search programs and files box) and Press CTRL + Shift + Enter, then click on Continue]
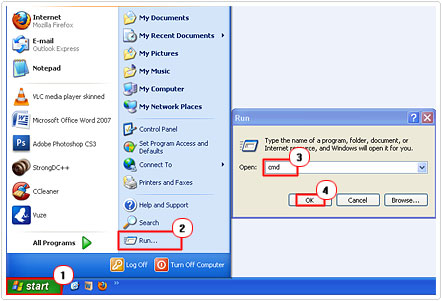
3. Once Command Prompt loads up, type ipconfig and hit Enter.

4. The Windows IP Configuration will show up, from here, jot down the IP address of your Default Gateway (router).
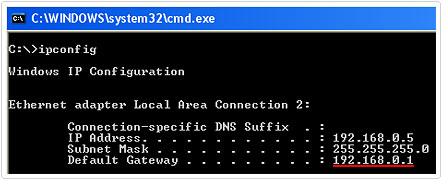
5. Then open up your browser window and type the IP address of your Default Gateway (router) into the address bar and hit Enter.

6. An Authentication Required dialog box should pop up, simply put in your User Name: (default: admin) and Password: (default: password) and click on OK.

7. Once you’re logged into your router, click on Logs, which is in the Content Filtering section.
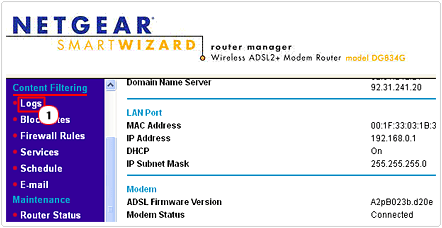
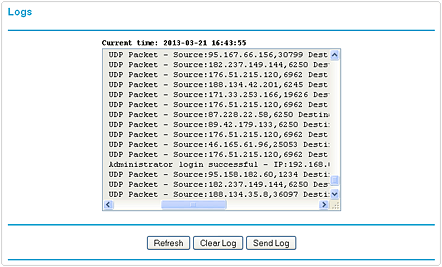
From here you will be able to access the log data, which outlines security events and also shows you who has or is currently logged into the router.
How Can I See Who Is On My WiFi Network, Simply View Attached Devices
How can I see who is on my WiFi network, well from the log data, you will be able to determine who has access or is accessing your router, in addition to the attempted hacker probes. However, if you want to know which computers are currently accessing the internet through your router then do the following.
1. Firstly, follow steps 1 – 6 from “View Router Security Logs”.
2. Once you’re logged into your router, click on Attached Devices, which is in the Maintenance section down the left menu column.
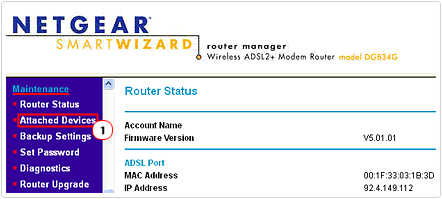
From here you will be able to see the IP and MAC addresses of all the computers that are currently connected to your router.

Prohibiting Unauthorised Access to Your Network
Securing your network is not as complicated as it sounds, as there are a number of ways that you can do it, choosing the best WiFi names for your network is crucial, yet can be a very clever way of disguising your network to the outer world. The fact that people are able to leach off other people’s internet connection is definitely not a mystery, as it’s the result of an unsecure network and is why the question of how can I see who is on my WiFi network is asked so much. If you only have a WEP password on your connection for example, hackers may be able to hack into your network by guessing your password, there are also programs developed by these same individuals that are able to figure out passwords by using possible numeral and alphabetic combinations.
To follow are a number of methods that you can use to secure your network. The good thing is that it’s up to you to decide which techniques you want to implement and which ones you do not. However, it’s always best practice to put as many of these security measures together as you can, knowing how can I see who is on my WiFi network, in essence varies, depending on the security techniques you have deployed.
Close Your Network
If, every time you connect to your wireless network you are not prompted for a passphrase, password or key, then it means your network is open. This means, anyone can find and connect to your network, providing they’re in proximity. To close your network, do the following.
1. Firstly, follow steps 1 – 6 from “View Router Security Logs”.
2. Once you’ve logged into your router, in the Setup section, click on Wireless Settings.
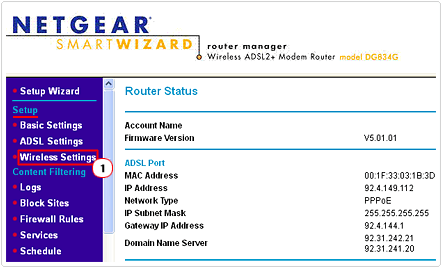
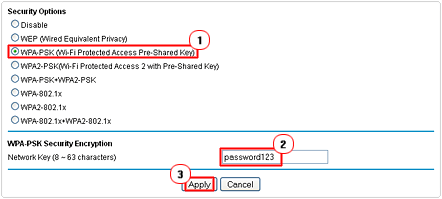
3. This will take you to the Wireless Settings screen, from here, scroll down, and then click on WEP or WPA under Security Options. On the WEP/WPA Security Encryption section type in a Network Key and then click on Apply.
Notes
After enabling this security option, any new device that wants to attach itself to your router will be required to enter the key you created, so be sure to make a note of it. This alleviates the need to know how can I see who is on my WiFi network.
The vast majority of routers that you can purchase today offer two kinds of security encryption, they are WEP and WPA. However, I recommend that you use WPA encryption, and that’s because it’s far more secure. However, if you have an old console or a similar device attached to the router, then WEP may be your only option, in which case, you should use WEP as it is still a highly competent security encryption method.
Change Default Router Password
Its best practice for you to change the default password of your router to something more unique, the default password is very easy for someone to guess which means, your router is potentially vulnerable to unauthorised access. And once someone logs into your router, they can go about altering security keys and connection settings.
To change the router password, do the following.
1. Firstly, follow steps 1 – 6 from “View Router Security Logs”.
2. Once logged in, scroll down to the Maintenance section and click on Set Password.
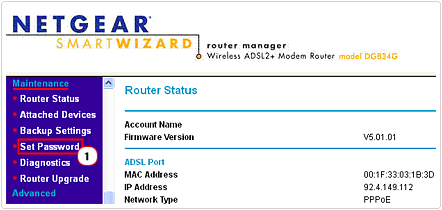
3. On the Set Password screen, type your Old Password in the first box, then enter your New Password in the two corresponding boxes, and then click on Apply.

Disable Remote Management
With remote management enabled, it will allow users online to gain access to your router for the purpose of upgrading, configuring and checking of status. However, if you don’t intend on ever accessing your router remotely, then it’s best that you turn this feature off. To do this, simply do the following.
1. Firstly, follow steps 1 – 6 from “View Router Security Logs”.
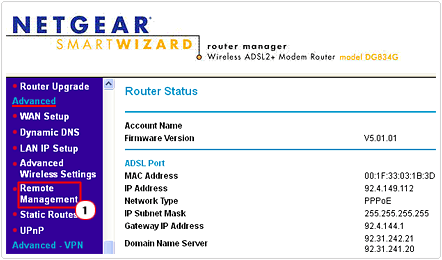
2. Once logged in, on the left side menu, scroll down to the Advanced section, then click on Remote Management.
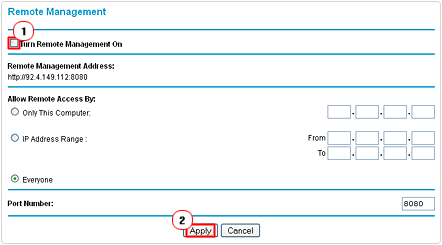
3. On the Remote Management screen, make sure the box next to Turn Remote Management On is unchecked, and then click on Apply.
Create a Unique SSID Name
The SSID is basically the name of your wireless network. In most cases, when you first receive your router (from your ISP), it’ll come with a default SSID name, which uses either the router or ISP name followed by some digits. This can prove to be a huge security risk, as potential hackers will be able to identify the kind of router your using and thus know how to exploit your network. Thus knowing how can I see who is on my WiFi network becomes more crucial, Anyway to change your SSID name, simply do the following.
1. Firstly, follow steps 1 – 6 from “View Router Security Logs”.
2. From the login screen (Router Status), click on Wireless Settings on the left side bar under Setup.

3. From the Wireless Settings screen, enter a new name in the Name (SSID): box.

4. Then scroll down and click on Apply.
![]()
Disable SSID Broadcast
In order to make it possible for wireless network cards discover your network, your router must broadcasts its SSID, this means, anyone who’s looking for a network to connect to can discover your network. To make it increasingly difficult for unauthorised users to discover your network, you can disable broadcasting on your router, however, when disabled, all authorised users will need to know the SSID name of your network, in order to connect to it. Thus, you needn’t ask how can I see who is on my WiFi network, since only those who know the SSID will ever be able to access it. To disable broadcasting, do the following.
1. Firstly, follow steps 1 – 6 from “View Router Security Logs”.
2. From the default login screen, click on Wireless Settings on the left side bar, under Setup.

3. From the Wireless Settings screen, uncheck the box next to Allow Broadcast of Name (SSID).

4. Then scroll down and click on Apply.
![]()
Enable Router Firewall
Most routers today come with their own built-in firewall that you can enable. If your router has this feature, then it’s highly recommended that you enable it as it will provide all the computers on your network with an additional layer of security. On NETGEAR routers, this feature is enabled by default, and when disabled, it prohibits you from accessing the internet.
Setup an Access List
With an access list, only the computers whose MAC address has been entered into this list will be able to connect to the router, I used this method, which is why I never ask how can I see who is on my WiFi network, since I know, no authorised individuals can access it. With this feature enabled, the overall security of your wireless network will be greatly enhanced at the expensive of it being more complicate for you to add new devices to it. To create an access list, simply do the following.
1. Firstly, follow steps 1 – 6 from “View Router Security Logs”.
2. Once logged into your router, click on Wireless Settings in the left side menu, under Setup.

3. From the Wireless Settings screen, click on Setup Access List.
![]()
4. On the Wireless Station Access List screen, check the box next to Turn Access Control On.

5. To add a new device to the access list, simply scroll down and enter a Device Name: which can be anything you want, and the MAC Address: of the device. Then click on Add followed by Apply.

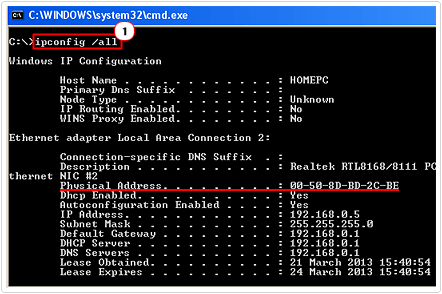
6. To get the MAC Address of your NIC (Network Interface Card), click on Start -> Run, type cmd and click on OK. [Windows Vista/7: Start -> Type cmd (into the Search programs and files box) and Press CTRL + Shift + Enter, then click on Continue]

7. From Command Prompt type ipconfig /all then jot down the Physical Address (which is the MAC Address).
Are you looking for a way to repair all the errors on your computer?

If the answer is Yes, then I highly recommend you check out Advanced System Repair Pro.
Which is the leading registry cleaner program online that is able to cure your system from a number of different ailments such as Windows Installer Errors, Runtime Errors, Malicious Software, Spyware, System Freezing, Active Malware, Blue Screen of Death Errors, Rundll Errors, Slow Erratic Computer Performance, ActiveX Errors and much more. Click here to check it out NOW!


great info. Thanks