

| Attention Before you read this post, I highly recommend you check out my resources page for access to the tools and services I use to not only maintain my system but also fix all my computer errors, by clicking here! |
I think it’s understandable for me to assume you stumbled upon the cryptic “Word could not create the work file” error notification while on Microsoft Word. I’m also going to assume you’d like to know what it is, what causes it, and how to fix it. Well, look no further, as we’ll expand on that in this tutorial.
The full error message reads: “Word could not create the work file. Check the temp environment variable” and typically occurs when previewing, opening or saving a Microsoft Word document. The error message indicates a potential problem with the temporary files, used by the app to save data.
Temporary files are a crucial component of most productivity apps, like Microsoft Word. As they allow the app to incrementally auto-save and to revert changes to work files. However, it’s not uncommon for the temp folder (and all the files within it) to be corrupted or erased, due to a series of eventualities. Such as a faulty hard disc drive, a malware infection etc…
So, what can you do to fix it? Well, let’s take a much deeper look into its potential causes, before we get to the solutions.
What Causes “Word Could Not Create the Work File” Errors?
“Word could not create the work file” is an error notification that occurs in Microsoft Word. It can appear in a variety of circumstances, such as, when creating or saving a new document. But, why does it occur? Well, for a number of reasons. The most common of which are outlined below:
- The system hard disc drive lacks the necessary space to save or create the document file.
- Microsoft Windows has been corrupted due to a malware infection or damaged system files.
- The documents filename contains invalid characters or is too long.
- Windows temporary folder has been changed.
- The end user is attempting to save or open a file from an inaccessible location.
- Your hard disc drive contains damaged sectors.
- Microsoft Word needs to be reinstalled.
Now that we have the potential causes out of the way, let’s take a look at the various ways you can fix it.
How to Fix It
As with any Windows error, I always like to start with the simplest solutions. So, when it comes to “Word could not create the work file” errors, the first thing you must establish, is the integrity of your operating system.
To do that, you have several options, the first, is to run SFC or System File Checker and the second is CHKDSK. Both of which are built-in Windows diagnostic and repair tools. Capable of detecting and fixing the most common OS and hard drive problems.
You can find step-by-step instructions on how to use SFC from my post titled: How to run SFC Scannow.
For CHKDSK, check out my post titled: A device attached to the system is not functioning.
Use Windows Repair Tool to Fix “Word Could Not Create the Work File” Errors
In the vast majority of cases, issues with Microsoft Word (and the various other apps that make up Microsoft Office) are as a result of problems with the operating system itself.
This is why Windows repair tools like Advanced System Repair Pro are so helpful. As they do the heavy lifting for you. Such a tool can, when run, scan, detect and fix DLL errors, registry errors, hard drive errors and much more.
All you need, is the fortitude to download, install and run it.
Anyway, if any of that interests you, then visit the link below:
CLICK HERE TO CHECK OUT ADVANCED SYSTEM REPAIR PRO
 The solution(s) below are for ADVANCED level computer users. If you are a beginner to intermediate computer user, I highly recommend you use the automated tool(s) above! The solution(s) below are for ADVANCED level computer users. If you are a beginner to intermediate computer user, I highly recommend you use the automated tool(s) above! |
Check Temp Folder
As previously highlighted, it’s possible the “Word could not create the work file” error is due to corruption of the temp folder. Thus, you may want to consider cleaning this folder out.
It’s it a fairly simple process, just do the following:
1. First, boot into your system as a full administrator.
2. Then press  + R, type temp and click on OK.

3. This will load up the Windows Temp folder, from here, click on Select All, then click on Delete.

Note: Windows may or may not allow you to delete the entire contents of the folder. As one or more of the files may be in use. To minimise this eventuality. It’s important than all programs are closed first.
4. Finally, restart the computer, then retry Microsoft Word.
Create New Environment Variable
Another notable cause of “Word could not create the work file” errors is the corruption of the Windows profiles, in addition to other things. One way you can tackle this is by doing the following:
1. Boot into your system as an admin.
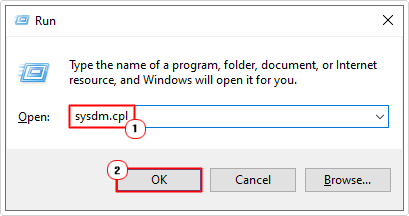
2. Next, press + R, type sysdm.cpl and click on OK.
3. This will bring up System Properties, from here, click on the Advanced Tab, then click on Environment Variables.
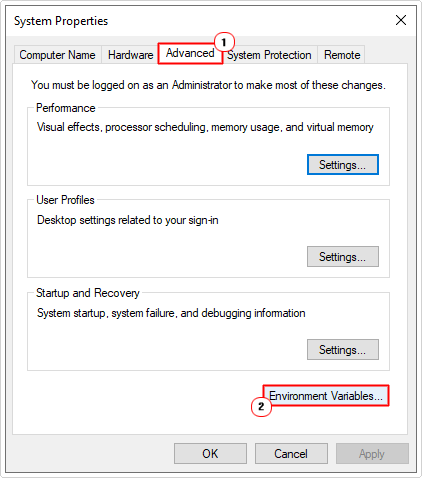
4. Environment Variables will appear, click on New (under User Variables), then type %userprofile% into the Variable name field, then type C:\Users\USERNAME into the Variable value field, and then click on OK.

Note: Replace USERNAME with your profile name.
5. Now you can try running Microsoft Word, to see whether or not this has fixed the problem.
Create New Temp Internet Folder
Another method you can use to tackle “Word could not create the work file” errors, entails creating a new temporary internet files folder. In many instances this method has proven effective.
There are several ways that you can do this, but the quickest and simplest is by using Command Prompt. The instructions are as follows:
1. First, log into your system as an admin.
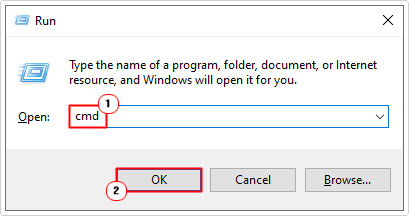
2. Now, press + R, type cmd and press CTRL + Shift + Enter.
3. This will bring up Command Prompt. Now, type the following commands below, pressing Enter after each line.
cd /d %USERPROFILE%\AppData\Local\Microsoft\Windows\INetCache
MD Content.Word
4. You can now verify whether or not this has fixed the error.
Disable Preview Pane to Fix “Word Could Not Create the Work File”
This last solution, is more of a workaround than an actual fix, as it involves disabling the Preview Pane feature in File Explorer.
The method entails disabling the preview feature specifically for Microsoft Word, by making changings to a specific registry subkey.
To do that, follow the steps below:
WARNING: This method requires you to make alterations to the Windows Registry. Which is a very sensitive area of the operating system. Thus, any wrong modification can render your system inoperable. So tread with caution.
1. First, boot into your system as a full administrator.
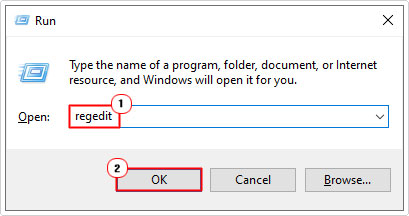
2. Now, press + R, type regedit and click on OK.
3. When Registry Editor loads up, navigate to the following path:
HKEY_CLASSES_ROOT\CLSID

4. From here, locate and click on {84F66100-FF7C-4fb4-B0C0-02CD7FB668FE} then click on Edit -> Delete.

5. Now, close Registry Editor and load up Microsoft Word to check whether or not the error has been fixed.
Note: If the error persists, then you should erase the following registry keys:
PowerPoint Preview:	{65235197-874B-4A07-BDC5-E65EA825B718}
Excel Preview: {00020827-0000-0000-C000-000000000046}Are you looking for a way to repair all the errors on your computer?

If the answer is Yes, then I highly recommend you check out Advanced System Repair Pro.
Which is the leading registry cleaner program online that is able to cure your system from a number of different ailments such as Windows Installer Errors, Runtime Errors, Malicious Software, Spyware, System Freezing, Active Malware, Blue Screen of Death Errors, Rundll Errors, Slow Erratic Computer Performance, ActiveX Errors and much more. Click here to check it out NOW!