| Attention Before you read this post, I highly recommend you check out my resources page for access to the tools and services I use to not only maintain my system but also fix all my computer errors, by clicking here! |
If the amount of memory that your computer has at its disposal runs out, then you will be confronted with one of those out of memory errors. Before we delve deeper into ways of countering this issue, let’s first discuss briefly the various kinds of memory in computer systems.
The term memory is used to refer to Random Access Memory (RAM), which is a component on the computer that is used for storing data temporarily. During the execution and running of a program, segments of the application are loaded into system memory so that they can be accessed faster by the processor. When the application is then shut down, all data related to that program is erased from system memory. Shutting your entire computer down will result in all data in system memory being erased.
Inserting larger memory modules into your computer, will increase the amount of data that the computer can store within it, thus increasing the amount of applications you can run simultaneously, in addition to the speed at which they operate.
Common Causes Of Out Of Memory Errors
An out of memory error refers primarily to the amount of memory it has available to perform specific tasks. Thus, one common cause of these out of memory errors is running too many programs simultaneously.
Each program that you have running on your computer uses a certain amount of RAM, the amount of memory it uses varies, but if you were to use up all available RAM, then it would prohibit the computer from carrying out additional tasks, whether it be saving changes to a document or accessing a website. In such a situation, your immediate reaction should be to attempt to ration the amount of programs you have running on your computer at any one time. However, the reasons why you may be receiving one of those out of memory errors are plentiful, so you will have to take a number of measures to ensure it never re-emerges.
Check Your Memory
If you’re confronted with one of those out of memory errors, then there is a good chance that it could be the result of faulty memory modules. To ensure that your memory is running as it should, you will need to run a memory test. There are a number of memory tests available online, but the most reputable one is Memtest86. To use this powerful memory diagnostic tool, follow the steps below.
1. First, visit the Memtest86 home page by clicking here: http://www.memtest86.com/
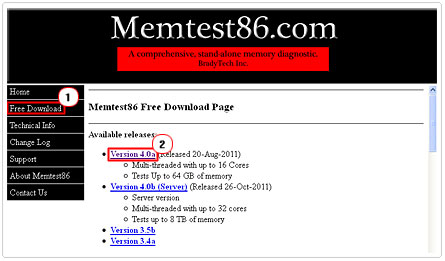
2. Then click on Free Download -> Version 4.0a.
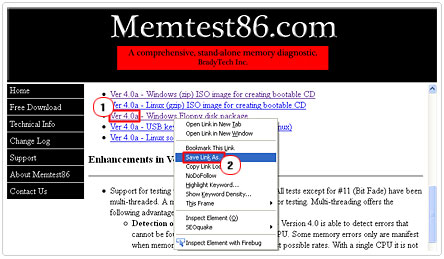
3. Then right click on Ver 4.0a – Windows Floppy disk package and save to your desktop.
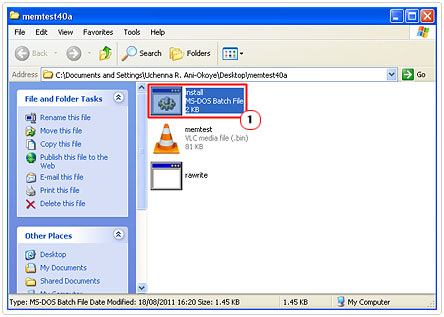
4. Once the zip file has been downloaded to your desktop, open it, extract its content to a folder and double click on install.
5. Command Prompt will load up, asking you to Enter target diskette drive, type in “a:” and press Enter. It will then ask you to Please insert a formatted diskette into drive A: and Press –ENTER-, do so, and press Enter when ready.
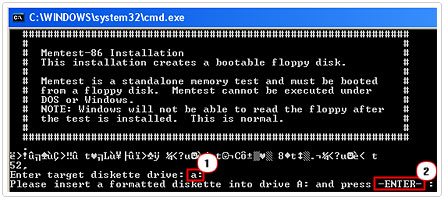
It will then proceed to copy the program to your floppy disk. Once it’s complete, simply restart your computer (with the floppy disk still inside the drive) and follow the onscreen instructions to use the program.
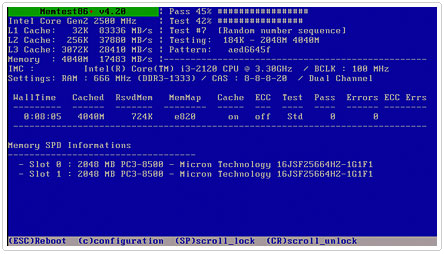
Note: If after testing your memory modules using Memtest86 you find that there’s nothing wrong with them. Then you should consider the following methods as a means of lowering the amount of memory you’re using and in turn minimising any out of memory errors within a Windows environment.
Adjust Visual Performance
The interface for Windows is very elaborate and intricate, with drop down shadows, fading icons, transparent menus and fancy animations. However, all of these features use portions of your system memory in order to function. Thus, cutting down on the amount of unnecessary Windows visual effects will help free up memory which can otherwise be used for more important tasks, like running applications.
To switch these visual effects off, simply follow the instructions below.
1. First, ensure you’ve logged into your computer with administrative rights.
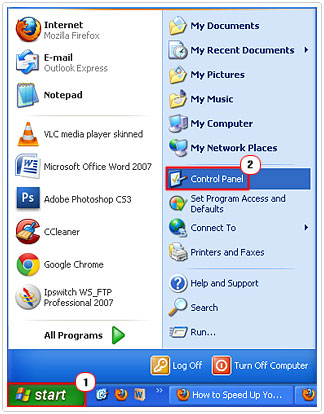
2. Then click on Start -> Control Panel.
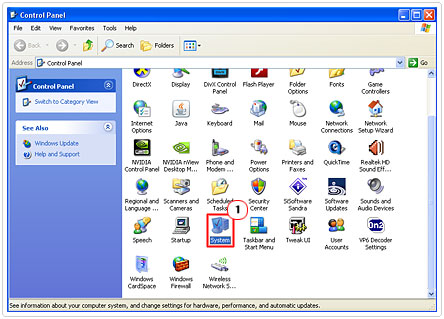
3. Once Control Panel loads up, double click on System.
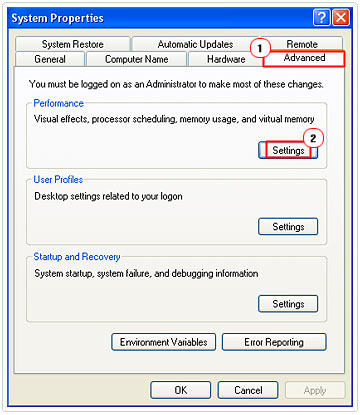
4. From System Properties, click on the Advanced Tab, followed by Settings Button under Performance.
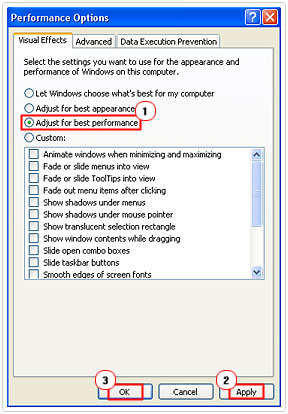
5. This will load up the Performance Options, from the Visual Effects Tab, click on Adjust for best performance, and then click on Apply and OK.
Enable Virtual Memory
Through the use of virtual memory, it’s possible for you to free up system RAM. Virtual memory works by creating a temporary storage file on hard drive and using it as a Prefetch that holds data between the system memory and the hard drive itself. With this feature enabled, the computer can better optimise its management of memory, by only sending pertinent data to the system memory and keeping the rest on the hard drive, within the temporary storage file. To activate this feature, follow the steps below.
1. First, ensure you’ve logged into your computer with a user profile that has administrative rights.
2. Then follow steps 2 – 4 from “Adjust Visual Performance”.
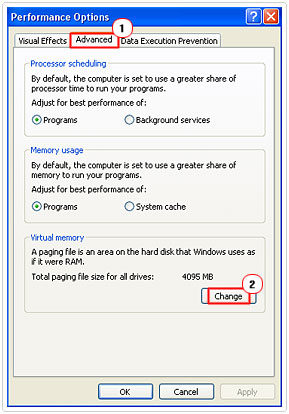
3. From Performance Options, click on the Advanced Tab, and then click on the Change button under Virtual Memory.
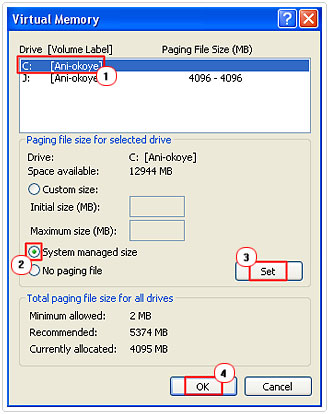
4. From the Virtual Memory screen, ensure that your C: drive is highlighted under Drive [Volume Label], then click on System managed size, followed by the Set Button, then OK.
Note: This will turn virtual memory on, but it’s important you understand exactly how it works, and how to get the most out of this feature. Thus, I highly recommend you read my tutorial on virtual memory.
Do Not Use Wallpaper
Desktop wallpaper has been around for decades, and has evolved considerably, from the days of pixelated green tiles to more intricate high definition imagery of today. This has led to rapid growth in the creation of desktop wallpaper and people’s usage of them.
However, the thing that many people are unaware of is the fact that, though they may be appealing to look at, they do take up a noticeable amount of system memory, memory that could better serves some other purpose. Thus, it’s recommended that you do not use any wallpaper, especially if you’re battling with out of memory errors. To remove your desktop wallpaper, simply follow the instructions below.
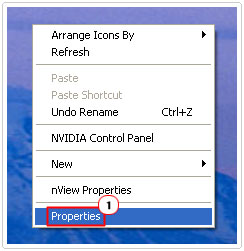
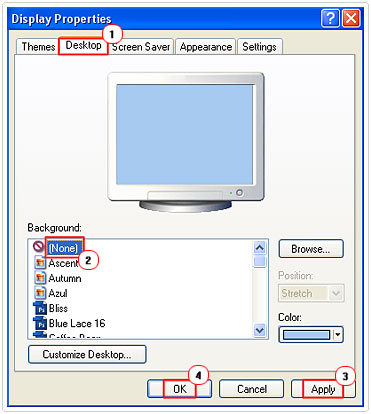
1. First, right click on your desktop and select Properties.
2. This will load up your Display Properties, from there, click on the Desktop Tab. Then scroll to the top of the Background Images and select (None), then click on Apply and OK.
Disable Your Screen Saver
The screensaver was originally created to protect monitors from the effects of burn-in; this is when images viewed for prolonged periods of time leave a faint imprint on the monitor’s surface.
While, the effects of burn-in are perceived as being negligible today, it’s still looked at as good practice to have one, as it can also serve the purpose of protecting your system from unauthorised access.
However, despite all that, the screensaver does consume system memory (primarily when in use), so it may work out to be more beneficial if you just disabled the feature altogether, especially if you’re faced with out of memory errors. However, that depends entirely on what you use your screensaver for; whether it’s for security purposes or cosmetic reasons. Anyway, to disable your screensaver, simply follow the instructions below.
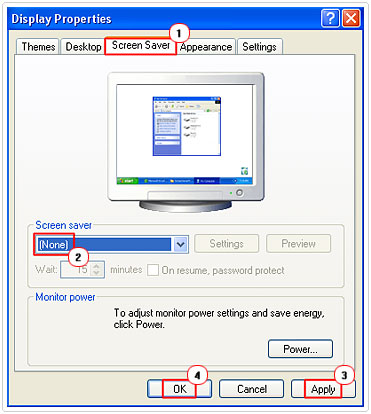
1. First, right click on your desktop and select Properties.

2. Once the Display Properties loads up, click on the Screen Saver Tab, then select (None) from the Screen Saver drop down menu. Then click on Apply and OK.
Close Nonessential Programs
By closing all nonessential programs and services you can free up a substantial amount of memory. It’s a very simple process to carry out, but it’s very important that you do not close any programs that are vital to the integrity of your Windows environment and only those you do not need to fix any out of memory errors.
1. First ensure you’ve logged into your computer with administrative rights.
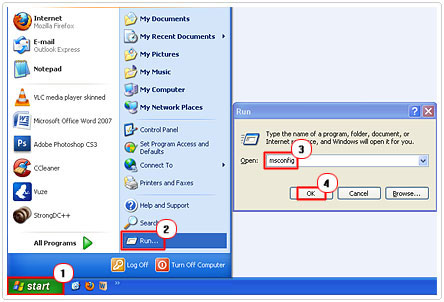
2. Then click on Start -> Run [Windows Vista/7: Press  + R], and type msconfig and click on OK.
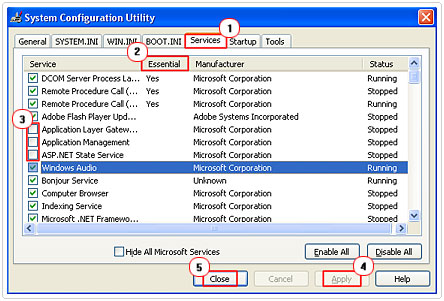
3. Once the System Configuration Utility loads up, click on the Services Tab, and then click on the Essential heading. This will arrange all the Services on the basis on their essentiality. Then uncheck a couple of the nonessential Services, then click on Apply and Close, and restart your computer.
Are you looking for a way to repair all the errors on your computer?

If the answer is Yes, then I highly recommend you check out Advanced System Repair Pro.
Which is the leading registry cleaner program online that is able to cure your system from a number of different ailments such as Windows Installer Errors, Runtime Errors, Malicious Software, Spyware, System Freezing, Active Malware, Blue Screen of Death Errors, Rundll Errors, Slow Erratic Computer Performance, ActiveX Errors and much more. Click here to check it out NOW!

