| Attention Before you read this post, I highly recommend you check out my resources page for access to the tools and services I use to not only maintain my system but also fix all my computer errors, by clicking here! |
The ati2dvag.dll is an integral component of the drivers for ATi Radeon graphics cards; however it is also a file that is heavily prone to conflicts. There are a number of reasons why it can and may cause an error in your system, but the most common reasons are due to incompatibility and accidently erasing the file.
When you encounter the ati2dvag.dll error, it will represent itself in a number of different ways. The most common ways that you are likely to come face to face with this error are as follows:
“Ati2dvag.dll Not Found or Missing”
“This application failed to start because ati2dvag.dll was not found. Re-installing the application may fix this problem.”
“Cannot find [File Directory]\ati2dvag.dll”
“Ati2dvag.dll is missing.”
The error messages highlighted above typically appear when the user is carrying out a specific function, whether it is running a specific application, uninstalling a program or watching a movie. It’s also known to occur as soon as the computer finishes booting up.
The “when” in this equation is very important, as it’s vital in finding a suitable solution to this problem.
What Causes This Error?
Unusually, the ati2dvag.dll error is accompanied by a blue screen; this indicates that the error is so serve that the current Windows session must be terminated in order to prevent any additional damage to the operating system. The exact words, (as described above); will differ from OS to OS, as the perpetuation of this error depends a great deal on the current applications and drivers running on your system.
Errors of this magnitude typically occur as a result of the dependency that the operating system places on a certain file to execute specific functions; in this case, it’s the ATi graphics card drivers. This is why its occurrence tends to be unique from system to system. File corruption and accidental deletion of this file, are the two most common causes for the error, and so, should be the first things that you consider looking at.
Therefore, you’ll want to think about updating your system, whether it’s through downloading the latest drivers, or reinstalling windows. File corruption issues on the other hand, are typically resolved by either running a registry scanner or an antivirus program. With that said, I provided you with a number of methods, which I recommend you attempt until the issue has been resolved.
Use Registry Cleaner
A corrupt registry database is one of the main reasons why this particular error may occur. The registry is basically the operating systems database system that stores all the most important data, like your personal settings, options, and driver configurations. It’s fairly common for certain registry settings to become corrupted over time; it’s this corruption that can result in system instability, manifesting itself in a number of different ways.
Therefore, you’ll want to ensure that your registry is always in tip top condition. To do this, you’ll need to use a registry cleaner program.
There are many of these programs out there, but I personally recommend Advanced System Repair Pro, and that’s because of its effectiveness. You can check out this tool here:
CLICK HERE TO CHECK OUT ADVANCED SYSTEM REPAIR PRO
Run a Virus Scanner
If you don’t already know, an antivirus/virus scanner program is a tool that is designed to scan your system for viruses, malware and spyware and remove them, therefore preventing them from doing any further damage to your system. It’s not uncommon for individuals to make viruses that target the DLL files of a system, since these files are integral to the proper operation of a system. So to ensure a virus isn’t the root cause of the error on your computer, you should consider running a full virus scan of your system.
With that said, if you don’t have a virus scanner on your system or are unsure of the effectiveness of your current virus scanner, I suggest you use SpyHunter, alternatively you can check out my post on the best antivirus tools.
For more information on SpyHunter, please visit the following link:
CLICK HERE TO CHECK OUT SPYHUNTER
Repair Installation
If the ati2dvag.dll error is due to the operating system having missing or corrupt file(s), then you may want to consider a repair installation. You won’t lose any data if you attempt it, so it’s definitely worth a try.
For more information on repair installations, I suggest you check out my post on speeding up your system.
Alternatively, you could use the Windows repair tool called Reimage, which is capable of repairing your Windows installation, without the requirement of your Windows CD; which the user would ordinarily require if they attempted a manual repair installation.
Anyway, you can find out more about this powerful tool here:
CLICK HERE TO CHECK OUT REIMAGE
 The solution(s) below are for ADVANCED level computer users. If you are a beginner to intermediate computer user, I highly recommend you use the automated tool(s) above! The solution(s) below are for ADVANCED level computer users. If you are a beginner to intermediate computer user, I highly recommend you use the automated tool(s) above! |
Check Recycle Bin
The first thing you’ll want to do is check your recycle bin, to ensure that you haven’t accidentally deleted the file. This can be done, by doing the following.
1. Log into your computer with administrative rights.
Note: If you’re unable to boot into Windows, then you’ll have to boot into Safe Mode, this can be done, by pressing the F8 key after the POST. For a detailed step by step tutorial on how to do this, I suggest you check out my post on removing Trojan horses.
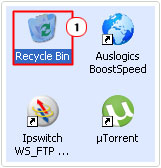
2. Once you’ve booted into your system, simply double click on the Recycle Bin.
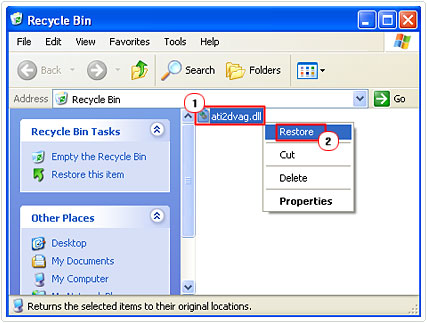
3. This will load up the Recycle Bin, from here, right click on ati2dvag.dll and select Restore.
Note: If you’re unable to locate the file in your Recycle Bin, then it’s possible it’s already been emptied. If you’re confident the file has been deleted then you’ll need to use a professional recovery tool in order to retrieve it. There are a number of different programs out there that can carry out this task, however, I recommend Stellar Photo Recovery, and that’s primarily because it’s a multifaceted program, providing both recovery and backup functions and also it’s efficiency. Anyway, you can check it out here:
CLICK HERE TO CHECK OUT STELLAR PHOTO RECOVERY
Update ATi Graphics Drivers
This goes without saying that you should ensure that you always have the most up-to-date graphic drivers running on your system. ATi are constantly rolling out new drivers, which tackle various issues, such as gaming performance, multimedia functions and the ati2dvag.dll error. Anyway, to update your graphics drivers, I suggest you do the following.
1. First, you’ll need to boot into your system with administrative rights.
2. Once you’ve logged in, navigate to the following site and download the latest drivers for your graphics card: http://support.amd.com/en-us/download
3. Once you’ve downloaded the latest drivers, you’ll need to boot into Safe Mode, this is so you are not greeted with the BSOD (Blue Screen of Death) when you attempt to uninstall your old drivers. To get into Safe Mode follow step 1 from ‘Check Recycle Bin’
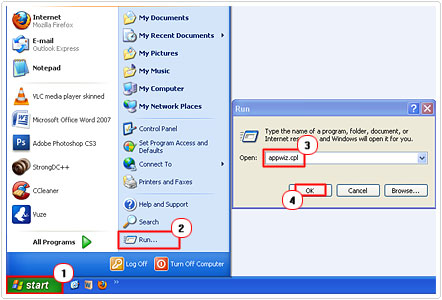
4. Once in Safe Mode, click on Start -> Run [Windows Vista/7: Press  + R], and then type appwiz.cpl and click on OK.
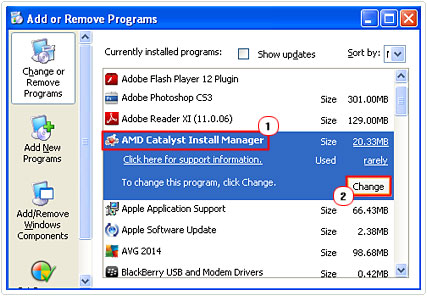
5. The Add or Remove Programs [Windows Vista/7: Uninstall or change a program] applet will load up, simply find your ATi drivers, which should be called “AMD Catalyst Install Manager”, click on it, then click on Change and follow the onscreen instructions.
6. Once you’ve removed your old drivers, you’ll be required to restart your system, do that, and then install the new drivers you just downloaded.
Manually Replace Ati2dvag.dll File
This is a trickier method aimed at intermediate computer users. So if you’re a novice, I wouldn’t recommend you did this, just incase you accidently delete something you shouldn’t. Anyway, to replace the file, do the following.
1. First, ensure you’ve logged into your system with full administrative rights.
2. Then download the ati2dvag.dll file from here: http://goo.gl/kV34xA
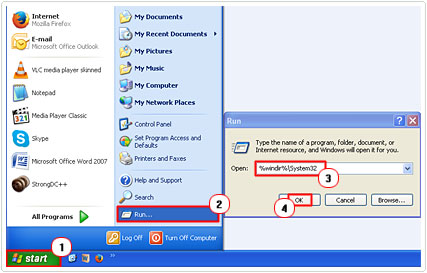
3. Once you’ve downloaded the file, click on Start -> Run [Windows Vista/7: Press  + R], then type %windir%\System32 and click on OK.
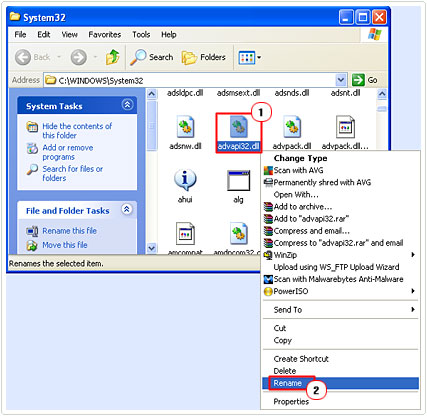
4. This will bring up the System32 folder, locate the ati2dvag.dll file, then right click on it and select Rename.
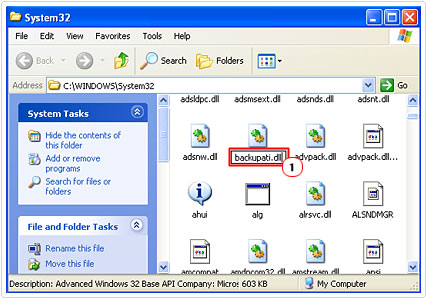
5. This will enable you to alter the name of the file, do so, by renaming it to “backupati.dll“.
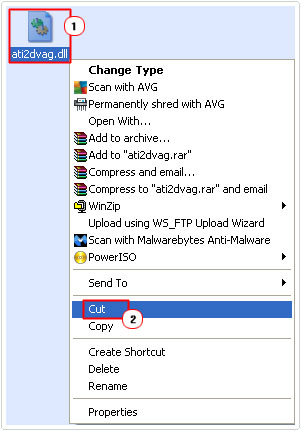
6. Go to the downloaded (ati2dvag.dll) file, right click on it and select Cut.
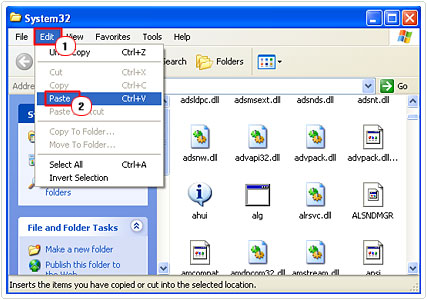
7. Then go to the System32 folder, and click on Edit and then Paste.
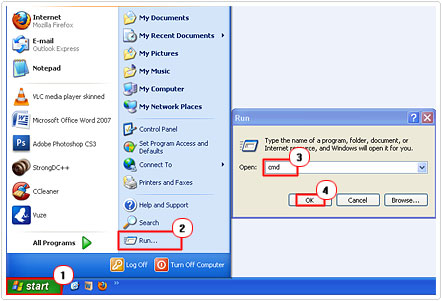
8. From here, open up Command Prompt by clicking on Start -> Run, typing cmd and clicking on OK. [Windows Vista/7: Start -> Type cmd (into the Search programs and files box) and Press CTRL + Shift + Enter, then click on Continue]
9. From the Command Prompt applet, type “regsvr32 ati2dvag.dll” and press Enter.

Use System Restore
System Restore is a tool that you can use to undo any recent changes to your system. Thus, in order for this method to be effective, you’ll need to know exactly when your computer started to exhibit these symptoms, that way, you’ll be able to set the system back to a time when it was working correctly.
This is not a full proof method, by any means, though it’s still worth a try. With that said, for more information on using this tool, I suggest you check out my post on how to effectively use System Restore.
Reinstall Any Program(s)
If the error occurs whenever you try to use a particular program, then it may be a good idea for you to consider reinstalling that program.
I’ve written intensely about removing applications on my post on uninstall problems. So I recommend you check that out, just to ensure you properly remove the program, before reinstalling it.
Rollback Graphics Drivers
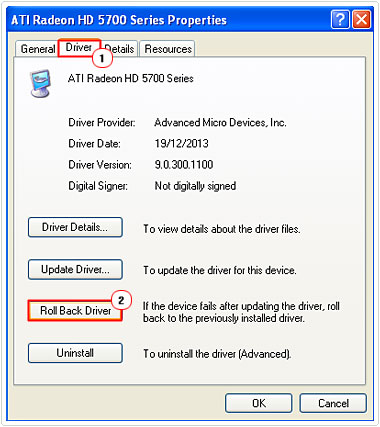
If the error began as soon as you installed a new device driver, then you may want to consider rolling back to a previously install version. This can be done, by doing the following.
1. First, ensure you’ve logged into your computer with full administrative rights.
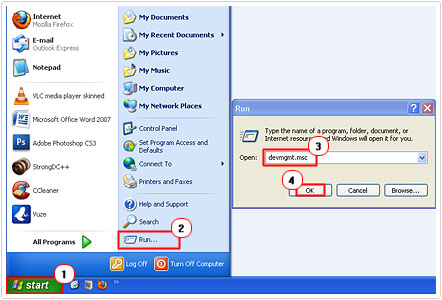
2. Then load up Device Manager, by clicking on Start -> Run [Windows Vista/7: Press  + R], then typing devmgmt.msc and clicking on OK.
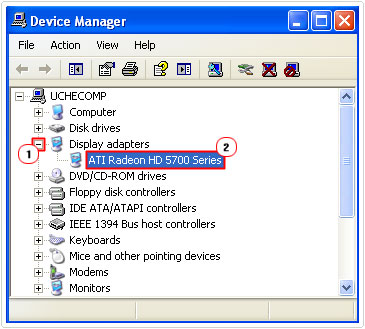
3. Once Device Manager loads up, double click on the + under the category of the device in question, and then double click on the device.
4. From Properties applet, click on the Driver Tab, and then click on Roll Back Driver and follow the onscreen instructions.
Are you looking for a way to repair all the errors on your computer?

If the answer is Yes, then I highly recommend you check out Advanced System Repair Pro.
Which is the leading registry cleaner program online that is able to cure your system from a number of different ailments such as Windows Installer Errors, Runtime Errors, Malicious Software, Spyware, System Freezing, Active Malware, Blue Screen of Death Errors, Rundll Errors, Slow Erratic Computer Performance, ActiveX Errors and much more. Click here to check it out NOW!


Wow that was unusual. I just wrote an incredibly long
comment but after I clicked submit my comment didn’t show up.
Grrrr… well I’m not writing all that over again. Anyhow, just wanted to
say fantastic blog!