| Attention Before you read this post, I highly recommend you check out my resources page for access to the tools and services I use to not only maintain my system but also fix all my computer errors, by clicking here! |
If you’re reading this post, then it means you have encountered the Windows 8.1 exclusive BSOD CRITICAL_PROCESS_DIED error. BSOD or blue screen of death errors can be very scary, when first encountered, but despite the names and appearances, most BSOD errors tend to be temporary in nature. This means, irrespective of the error you encounter, it can be fixed, through the deployment of various repair remedies.
In previous versions of Microsoft Windows, BSOD errors were typically accompanied with a STOP error code and a description, which would give the user the heads up, on what they needed to do to effectively diagnose to problem. Unfortunately BSOD errors on Windows 8.1 aren’t so descriptive, so the onus is on you to do the necessary research.
What Causes CRITICAL_PROCESS_DIED Errors?
To put it simply, CRITICAL_PROCESS_DIED errors occur when a process required by the operating system dies. A process is like a task, with single applications able to run multiple processes, if required. Processes interact directly with the processor, hence their name. The worst thing about this error is the general nature of it, as a process dying could be caused by a number of different things in your computer, such as the memory modules, hard drive, and in some cases the processor itself.
With that said, below is a synopsis of the common causes of this error:
- The operating system fails to read or write a process within system memory.
- The hard drive or RAM is either faulty or damaged.
- Certain drivers installed in your system are corrupted, faulty or incompatible.
Symptoms of This Error
When it comes to CRITICAL_PROCESS_DIED errors, they have a tendency to manifest themselves in a number of different ways, with the most common being as follows:
- The computer crashes and presents you with the following error message when attempting to run a particular program.
- The computer fails to boot up, instead presenting the user with the BSOD error message.
- The computer freezes periodically, for a couple of seconds at a time.
- The operating system is slow to respond to keyboard or mouse input.
How to Fix It
Microsoft has failed to provide the user with the appropriate solutions to fix this error, which is a common situation for much of the errors you may encounter while using Microsoft Windows. This is one of the things that leave people feeling frustrated.
With that said, I have provided you with a number of solutions, all of which have proven, sometime in the past, to be effective at fixing the CRITICAL_PROCESS_DIED error, so follow the methods outlined below, just be careful to implement them correctly.
Update Device Drivers
Depending on the severity of the CRITICAL_PROCESS_DIED error, you may or may not be able to boot into Windows. Either way, you must boot into Safe Mode before attempting to update your device drivers. This can be done, by doing the following:
1. First, boot into your computer with full administrative rights.
2. From here, click on the Start Button.

3. On the Start menu, click on Power Options, then hold down the SHIFT key and click on Restart.
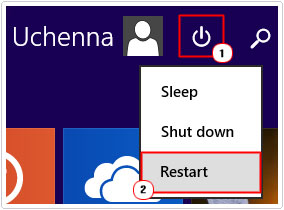
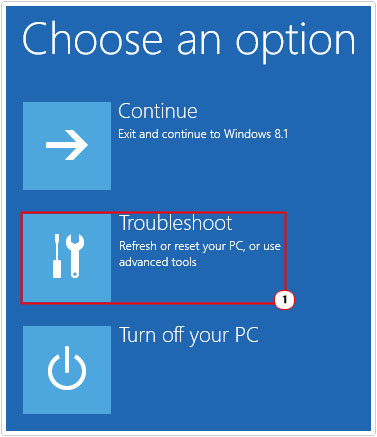
3. This will take you to the Choose an Option screen, from here, click on Troubleshoot.
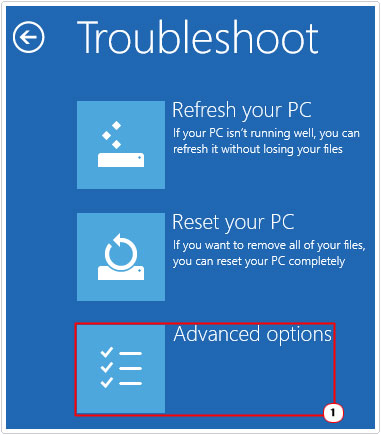
4. On the Troubleshoot screen, click on Advanced Options.
5. On the Advanced Options screen, click on Startup Settings.
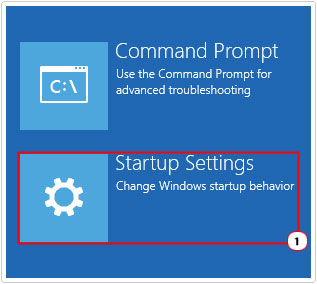
6. On the Startup Settings screen, click on Restart.
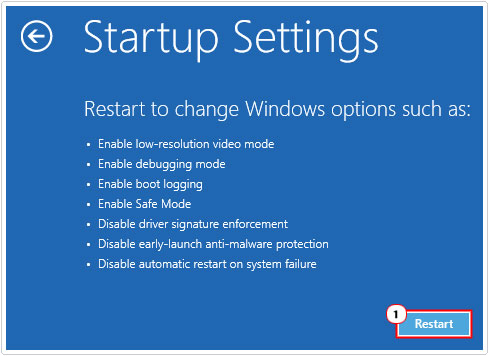
7. The computer will restart, then a Start Settings screen should appear, from here press 6, to Enable Safe Mode with Networking.
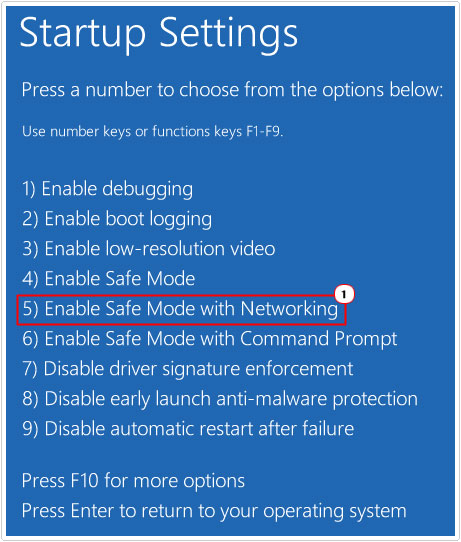
When the computer loads up Safe Mode, because there is no way of determining which driver is to blame for the error, you will need to up update the drivers for all of the devices attached to your computer.
To do this, you have two options; the first option involves manually searching the internet for all the most up-to-date drivers for your devices, then downloading and installing them. This is a method that can prove to be quite time consuming and complicated, depending on your level of expertise.
The second option involves using the driver updater tool called DriverFinder, to automatically search the internet and find the most up-to-date drivers for all the devices attached to your computer and install them. This is the much faster and easier method, and the option I recommend most individuals should take.
Anyway, you can download this powerful tool from the following link:
CLICK HERE TO CHECK OUT DRIVERFINDER
Reinstall Chipset Drivers
If you have utilised the method above, then you shouldn’t need to do this. However, in the event that you haven’t, then this method can prove, in some instances to be an effective workaround.
Before you can reinstall your chipset drivers, the first thing you will need to do is uninstall them. To do this, I recommend you use the uninstall tool called Express Uninstaller, because it will not only remove the driver files, but will also remove associated redundant registry entries and lingering files and folders. You can acquire this powerful tool from here:
CLICK HERE TO CHECK OUT EXPRESS UNINSTALLER
Note: It is very important that you remove the chipset drivers before installing them, so that the reinstallation doesn’t inherit the attributes from the previous install.
Once you have removed the drivers, you should be able to find your chipset drivers from the website of your computer, assuming it is a brand name. In the event that it is not, be sure to take note of the driver name and version, before uninstall them.
Uninstall Security Software
One method that users have utilised to rectify this error involves uninstalling their security software. Certain security software has been known to cause issues with Windows 8.1 based systems, resulting in a plethora of problems, such as this one. Removing the software is fairly simple, just do the following:
1. First, boot into your computer with full administrative rights.
2. Then click on  + X, then select Program and Features.
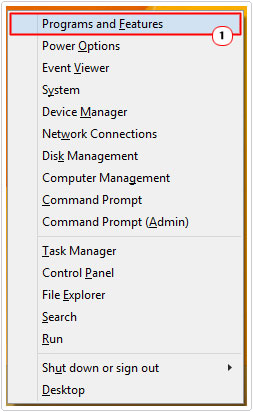
3. This will bring up Uninstall or change a program, from here simply click on your Security Software, then click on Uninstall.
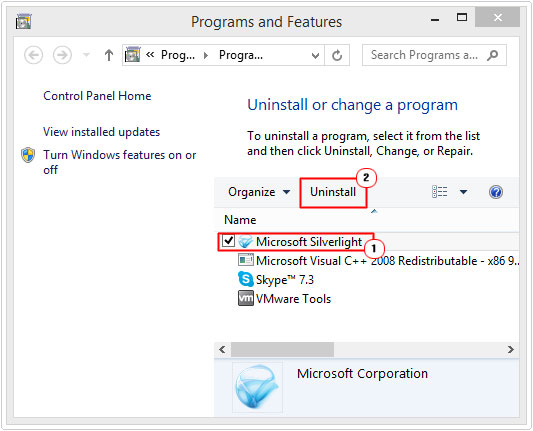
Note: For additional help on removing an application, I recommend you check out my post on uninstall problems.
Alternatively, you could try updating the application, as opposed to removing it.
Use System File Checker
Using System File Checker to fix the CRITICAL_PROCESS_DIED error has proven to be quite effective for many users. To utilise this nifty built-in Windows tool, simply do the following:
1. First, boot into your computer with full administrative rights.
2. Then click on  + X, then click on Command Prompt (Admin).
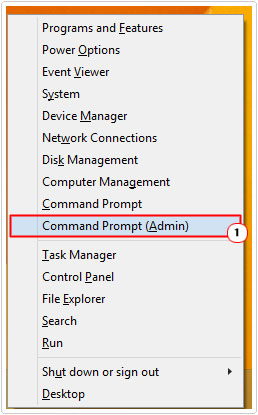
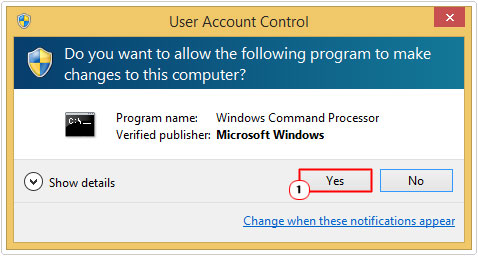
Note: A notification box should appear asking you do you want to allow the following program to make changes to this computer, simply click on Yes.
3. Once Command Prompt loads up, type sfc /scannow and press Enter.

Update Firmware
If you are using a solid state drive, then you may want to consider installing a new firmware for it. Firmware issues are fairly common with the later versions of Windows and SSD drives.
For more information on downloading and installing the new firmware for your drive, I recommend you visit your hard drive website.
Reinstall Windows
If all of the above methods failed to fix this error, then you should consider this more drastic step, as it is guaranteed to repair the error, providing it’s not hardware related.
When it comes to reinstalling Windows, you have three options. The first option entails reinstalling Windows from scratch, which means loss of all your personal data. To do this, simply do the following:
1. First, boot into your computer with full administrative rights.
2. Then click on  + I, then on the Settings menu, click on Change PC Settings.
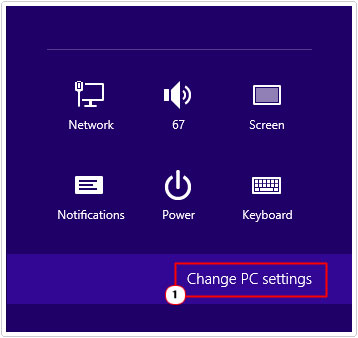
3. This will take you to the PC Settings screen, from here click on Update and recovery.
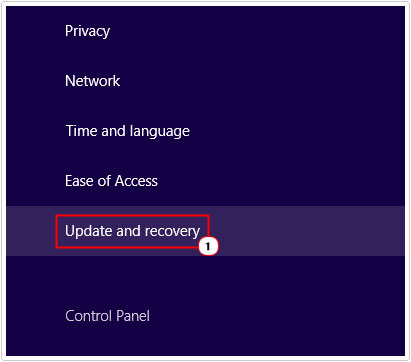
4. This will load up the Update and recovery option, from here click on Recovery.
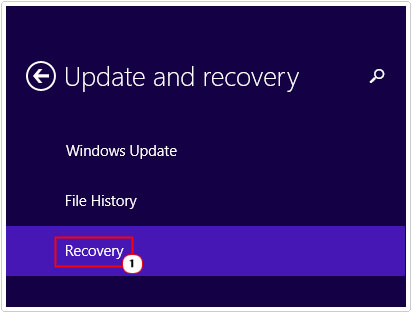
5. Lastly, click on Get Started under Remove everything and reinstall Windows, then follow the onscreen instructions.

The second option involves refreshing the system. You will not lose any of your personal data during the process, but the likelihood of it repairing your computer is fairly slim. To utilise this option, do the following:
1. First, follow the previous steps 1 – 4.
2. Then click on Get Started under Refresh your PC with affecting your files and follow the onscreen instructions.

The last option, which is the one I personally recommend, involves using the Windows repair tool called Reimage. This tool will reinstall your operating system, fixing the error in the process, but without deleting your personal files; a solution that combines the best aspects of both of the previous methods. Anyway, you can acquire this powerful tool from here:
CLICK HERE TO CHECK OUT REIMAGE
Are you looking for a way to repair all the errors on your computer?

If the answer is Yes, then I highly recommend you check out Advanced System Repair Pro.
Which is the leading registry cleaner program online that is able to cure your system from a number of different ailments such as Windows Installer Errors, Runtime Errors, Malicious Software, Spyware, System Freezing, Active Malware, Blue Screen of Death Errors, Rundll Errors, Slow Erratic Computer Performance, ActiveX Errors and much more. Click here to check it out NOW!

