| Attention Before you read this post, I highly recommend you check out my resources page for access to the tools and services I use to not only maintain my system but also fix all my computer errors, by clicking here! |
I’m guessing you recently encountered the ERR_FILE_NOT_FOUND error message while attempting to access a site (or file) via Google Chrome? If so, you could be trying to access an inaccessible resource, or your browser may have a fault.
Google Chrome, originally introduced in 2008, is one of the most popularly used internet browsers today. Its main attraction is its sleek, user-centric design, its speed, and its wide support for an array of extensions and add-ons. However, despite the many features and capabilities of this browser, it’s not without its problems.
ERR_FILE_NOT_FOUND is one of many such error messages end users may encounter while using this browser. To put it simply, the error message indicates an inability to locate the specified file or resource. An error message that should look something like the following:
Your file was not found
It may have been moved or deleted.
ERR_FILE_NOT_FOUND
The first thing you’d want to do, when you encounter this particular error, is to verify that the URL you’re attempting to access is actually correct.
It’s possible, you’re attempting to access a file that has either been moved (to a different location) or erased, totally. In which case, the resource is inaccessible.
ERR_FILE_NOT_FOUND is most commonly associated with the extensions component of the web browser. However, there are numerous elements, all capable of triggering this error.
We’ll take a closer look at its probable causes, next.
What Causes ERR_FILE_NOT_FOUND Errors?
In the vast majority of cases, ERR_FILE_NOT_FOUND errors are the result of the browser (Google Chrome) itself, rather than an issue with the site you are attempting to access. This makes this error rather unique.
As previously reiterated, the error message indicates an inability to access a specific file or resource. Thus, based on my research, I discovered that the most common cause for this error, are as follows:
- Chrome extension(s): It’s possible an extension is conflicting with the website you’re attempting to access.
- Cache problems: You could have inadvertently picked up a malicious file, while surfing the web.
- Inaccessible resource: The file or website you’re attempting to access is no longer available.
Rectifying this error may involve the reinstallation of a contentious browser extension, for starters.
Ultimately, there are many solutions you can adopt. So I suggest you continue reading, for them.
How to Fix It
In the vast majority of cases, users have discovered that the ERR_FILE_NOT_FOUND error was as a result of an extension. However, it’s for you to determine which extension is at odds.
That aside, before we get into any of that. Let’s start with the most basic solutions – as the answer to this issue, may be simpler than you think.
Is the resource available? When you encounter an ERR_FILE_NOT_FOUND error notification, the first thing you must establish is the accessibility of the resource. It’s possible the link is outdated, in which case, the error notification is correct. The file has been erased or moved.
If the error has arisen from a link that was sent to you (either by a friend or colleague), then you should definitely double-check things with them. If you encountered the error while surfing the web, then you can check the validity of the URL, by simply typing it into the search engine.
In much rarer cases, it’s possible the ERR_FILE_NOT_FOUND error is the result of a typo. If the browser is unable to find the resource at the specified location, then it’ll display the error message. You can verify the accuracy of an URL by doing the following:
- Double-checking the URL you are attempting to access.
- Looking for any misplaced characters, such as 0 and O – which can easily get mixed up.
- Retyping the URL, with corrections, in an attempt to load the resource.
If all of that fails, then I suggest you attempt the most sophisticated solutions below.
Run Windows Repair Tool to Fix ERR_FILE_NOT_FOUND Errors
If your Windows based system is bogged down by stubborn errors (such as ERR_FILE_NOT_FOUND) or running significantly slower than when you first purchased it. Then you definitely want to scan your system using a Windows repair tool.
The tool for the task in this particular instance is Advanced System Repair Pro. This tool is multifaceted, capable of fixing a plethora of problems on your system. From a single scan, you can expect it to locate and fix BSOD errors, runtime errors, DLL errors, malware (virus) infections, registry corruption, and much more.
It’s also capable of restoring the integrity of your operating system, ultimately, making it run faster.
Anyway, you can learn more about this powerful tool, from the link provided below:
CLICK HERE TO CHECK OUT ADVANCED SYSTEM REPAIR PRO
 The solution(s) below are for ADVANCED level computer users. If you are a beginner to intermediate computer user, I highly recommend you use the automated tool(s) above! The solution(s) below are for ADVANCED level computer users. If you are a beginner to intermediate computer user, I highly recommend you use the automated tool(s) above! |
Remove Old Extension Files
It’s not uncommon, for previously removed Chrome extensions to leave behind remnant files. Over time, this can build up, and manifest itself in numerous ways. To get around this problem, you will need to locate and remove these excess files. To do that, simply follow the instructions outlined below:
1. First, boot into your system as a full administrator.
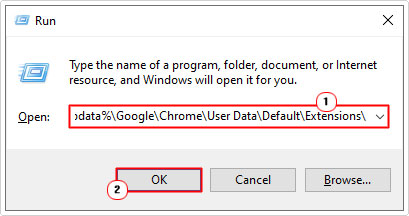
2. Now, press  + R, type %localappdata%\Google\Chrome\User Data\Default\Extensions\ and click on OK.
3. This will bring up the Extensions folder. Each folder belongs to an installed extension. The objective is to delete the folder belonging to an extension that is no longer installed on your web browser.
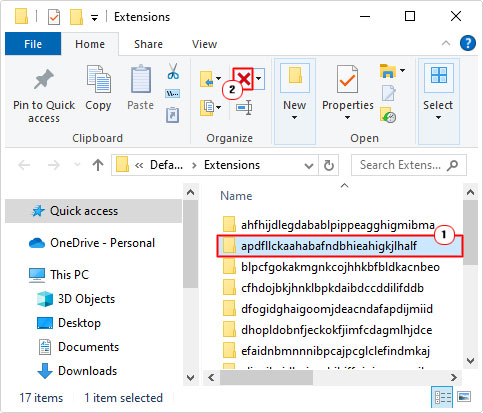
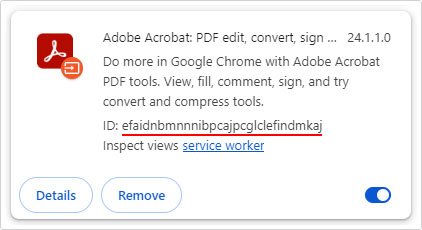
Note: The folders have their own unique ID name. You can cross reference that, with the ID of the extension. Simply type chrome://extensions into the URL box, and press Enter. You should be able to find the ID, on the last line of each Extension box.
Use Add or Remove Programs to Remove Extensions
Depending on the size of the extension, there are some that require a full installation, with their own InstallShield. These particular extensions, can only be removed by using the built-in add or remove programs applet.
The use of this tool is very simple. But if you need help using it, then check out my post on fixing caa70004 errors.
Note: There is a particular extension called Default Tab. This extension is known to cause problems with the Google Chrome browser, resulting in ERR_FILE_NOT_FOUND error messages. Thus, if you have this extension installed on your system, I’d recommend you removed it.
Disable Google Chrome Extensions
Whenever you experience a problem with your web browser, it’s always a good idea to examine the various extensions installed on it, as any one of them could be to blame. Corrupted or badly coded add-ins are capable of adversely effecting your web browser. In this case, causing an ERR_FILE_NOT_FOUND error.
To determine whether or not an installed extension is to blame. You will need to go through all the extensions currently installed. Enabling one at a time, and examining its behaviour on your browser.
It’s a relatively simple process, which can be done, by doing the following:
1. First, ensure you’ve booted up and logged into your system as a full administrator.
2. Then open up Google Chrome and type chrome://extensions into the URL field, then press Enter.

3. This will take you to the Extensions page. From here, disable all your Extensions, but one. Then examine its behaviour.
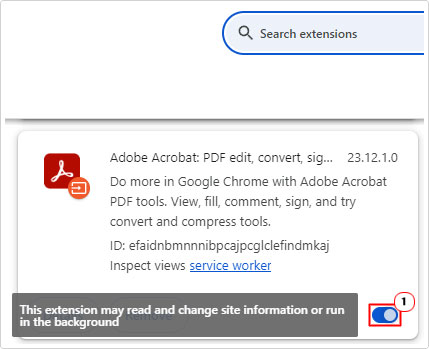
4. Repeat step 3 until you’ve isolated the problematic extension.
Once you’ve found the culprit browser, you can choose whether to remove or update it.
Reset Google Chrome
Another method you can use to fix ERR_FILE_NOT_FOUND errors, involves resetting your browser back to its default settings. A reset is a nifty way of fixing a great many problems that could or may occur on your browser. A reset is a relatively simple process. Just follow the steps below:
Note: When you reset the browser, you will lose all your cookie and cache data. Your default search engine will be reset and all your installed extensions will be disabled.
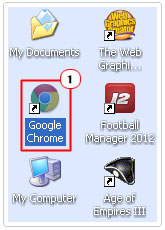
1. Boot into your system as an admin, then load up Google Chrome.
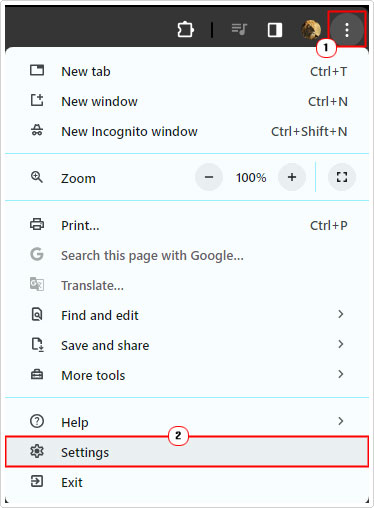
2. Now, click on the Three-Dots button, followed by Settings.
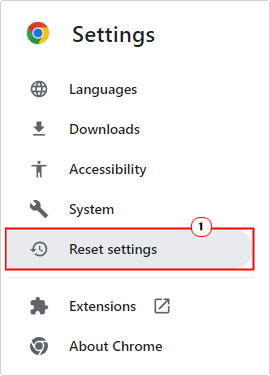
3. On the Settings screen, click on Reset Settings (on the left hand side).
4. Lastly, click on Restore settings to their original defaults, then follow the onscreen instructions.

Once complete, restart the web browser, and the ERR_FILE_NOT_FOUND error should be fixed.
Reinstall Google Chrome
If ERR_FILE_NOT_FOUND continues to persist, even after attempting all the solutions above, it’s possible the Google Chrome installed on your machine is corrupted. This could be as a result of a virus you picked up, while surfing the web.
Either way, you can get around this problem, simply by reinstalling Google Chrome. You can start by downloading the browser from here: https://www.google.com/intl/en_uk/chrome/
Are you looking for a way to repair all the errors on your computer?

If the answer is Yes, then I highly recommend you check out Advanced System Repair Pro.
Which is the leading registry cleaner program online that is able to cure your system from a number of different ailments such as Windows Installer Errors, Runtime Errors, Malicious Software, Spyware, System Freezing, Active Malware, Blue Screen of Death Errors, Rundll Errors, Slow Erratic Computer Performance, ActiveX Errors and much more. Click here to check it out NOW!

