| Attention Before you read this post, I highly recommend you check out my resources page for access to the tools and services I use to not only maintain my system but also fix all my computer errors, by clicking here! |
A significant number of end users have reported receiving an esrv.exe error message during Windows start up. This error initially came to the fore on the Windows 10 preview build, but over time, more and more users have reported experiencing it on both Pro and Home builds of Windows 10. The error message itself does vary, with one constant, the circumstances in which it occurs, during boot up.
That said, the error dialog box, should read something like the following:
Esrv.exe – Application Error: The application was unable to start correctly (0xc0000142). Click OK to close the application.
Note: If you click on the OK button, the error will go away, but will return when you restart your system. 0xc0000142, however, is a broad application error code.
From general knowledge, most end users report encountering the error right after they either, upgraded their operating system or installed a significant Windows Update.
Esrv.exe Error Overview
When it comes to fixing the esrv.exe error, there are several things you can do. In most instances however, updating the Intel Driver Update Utility will do the trick. But I’ll delve deeper into that solution further on in this tutorial.
The esrv.exe error commonly occurs as a result of an improper removal or reinstallation of the Intel Driver Update tool during a Windows Update, which may or may not have been initiated automatically.
The Intel Driver Update utility was updated and renamed to Intel Driver & Support. The objective of this utility, is as the name states, to deliver the latest Intel updates for your Intel based machine. However, one thing to note is that the utility is a third-party tool, and thus, not integral to the operating system. When it comes to usefulness, Windows Update, in most instances is equally as capable at updating the drivers for the various components within your system, so it’s not a deal breaker if you don’t keep the utility on your computer.
When the esrv.exe process is improperly removed, typically, references to the file are left behind, usually within the registry. These references exist in the form of run once keys and start up keys. Since the operating system is unable to locate the file, an esrv.exe application error is display as a result of it.
Esrv.exe is an .exe (executable file), with a security rating of 30%, which means it’s not uncommon for hackers to conceal their viruses by using the same filename.
As a result, a potential virus is something you shouldn’t rule out, as a possible cause of this error.
Is Esrv.exe Safe?
Esrv.exe, for all intents and purposes is a file that you can trust. Originally, it is a part of the Intel System Usage Report, developed by Intel, and is digitally (certified) signed. Esrv.exe usually runs in the background of your Windows session, and consumes minimal system resources. However, associated errors are not uncommon.
Additionally, because esrv.exe is an .exe file, that doesn’t rule out the possibility of it being a virus (as I previously touched on). The quickest way to verify whether or not the file is legitimate is by its location. The default storage location is usually one of the following:
C:\Program Files\Intel\SUR\WILLAMETTE\ESRV\
C:\Program Files\Intel\SUR\QUEENCREEK\
Another thing to note is the files digital signature. If the file on your system does not have one, then it’s most likely a virus.
How to Fix It
If your system is currently bogged down with an esrv.exe error, then the steps outlined below should help you get your system back to full strength.
Below you will find a number of methods, all of which have proven very effective at fixing esrv.exe errors. They have been arranged in order of effectiveness and ease of execution. So it’s recommended that you attempt them in the order that they appear.
Update Intel Utility
As previously noted, the Intel Driver Utility has since been renamed to Intel Driver & Support Assistant. If you have the old version of this program running on your system, then it’s highly recommended that you update it.
You should have received more than one notification telling you that a newer version of the program exists. That said, you should be able to find the most up-to-date version from the official Intel website here: https://downloadcenter.intel.com/download/24345/Intel-Driver-Support-Assistant
Just download and run the installation shield. It should detect the older version of the program on your system, and update it automatically.
Once that’s done, restart your system, and verify whether the esrv.exe error has been fixed.
Uninstall Intel Utility
The easiest and simplest solution to the esrv.exe application error is to remove the program the file is associated with. It’s possible for you to remove the Intel Driver Update utility using the conventional Add or Remove Programs applet.
Note: If you downloaded and install the latest version of the Intel Utility tool, then naturally, you won’t need to remove the older version, as the installation process should automatically remove and/or update it.
Anyway, when it comes to removing the esrv.exe file, the process is very simple. Just follow the instructions below:
1. Boot into your system, as a full administrator.
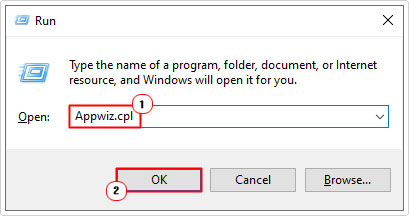
2. Then press  + R, type Appwiz.cpl and click on OK.
3. When Add or Remove Programs loads up, click on Intel Driver Software, then click on Uninstall.
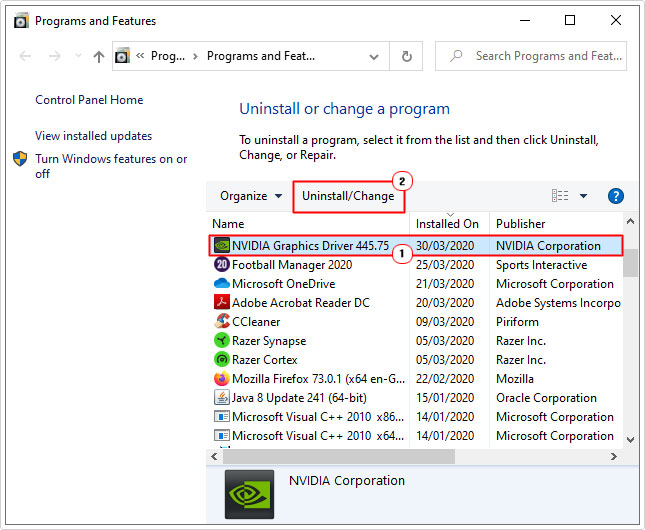
4. Follow the onscreen instructions to successfully remove the program.
Once the removal process has completed, restart your system. On start-up, verify that the error has been fixed.
Run a Virus Scan to Fix Esrv.exe Errors
Another possibility is that the esrv.exe file is in fact, a virus. In the event that it is a virus, the removal or update of the legitimate Intel Update tool will not fix the error.
Either way, it’s likely a virus got onto your system, either while surfing the internet, downloading an email attachment or through the installation of a suspect application.
Fortunately, what you can do, as the end user is run a full scan of your system, using whatever internet security solution you have. Assuming you do have one.
Alternatively, if you don’t have a virus scanner or you’re simply interested in using a more assured solution, then I recommend you go with SpyHunter.
SpyHunter is without a doubt, the most thorough and efficient antimalware tool in the marketplace. With a full range of capabilities, I leave it up to you, to visit the following link for more information on how this powerful tool can help you:
CLICK HERE TO CHECK OUT SPYHUNTER
 The solution(s) below are for ADVANCED level computer users. If you are a beginner to intermediate computer user, I highly recommend you use the automated tool(s) above! The solution(s) below are for ADVANCED level computer users. If you are a beginner to intermediate computer user, I highly recommend you use the automated tool(s) above! |
Remove Esrv.exe File References
If all the methods up to this point have failed to fix the esrv.exe error, then you may want to consider manually removing references to the file. Specifically in the start-up keys. There are several ways that you can do this, but the most effective way is by using the Windows tool Autoruns.
Because the error occurs every time you start your system, it’s likely the error was caused by a corrupt/incomplete installation. To remove those references, simply follow the instructions below:
1. First, ensure you’ve booted into your system, as a full administrator.
2. Then, download Autoruns, from the official Microsoft website, here: https://docs.microsoft.com/en-us/sysinternals/downloads/autoruns
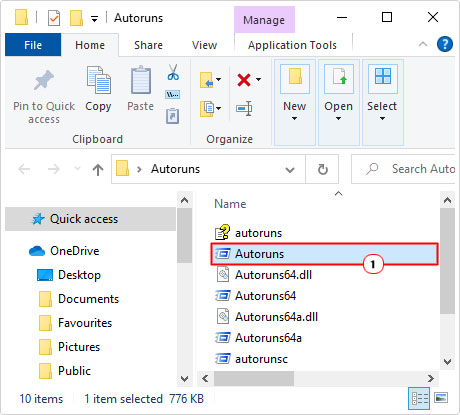
3. Extract the contents of Autoruns.zip to a (newly created) folder and run it, by clicking on Autoruns.
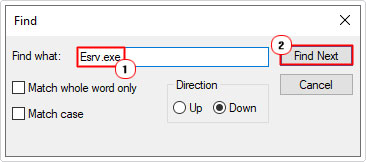
4. When Autoruns loads up, press Entry -> Find, to open the Find applet.
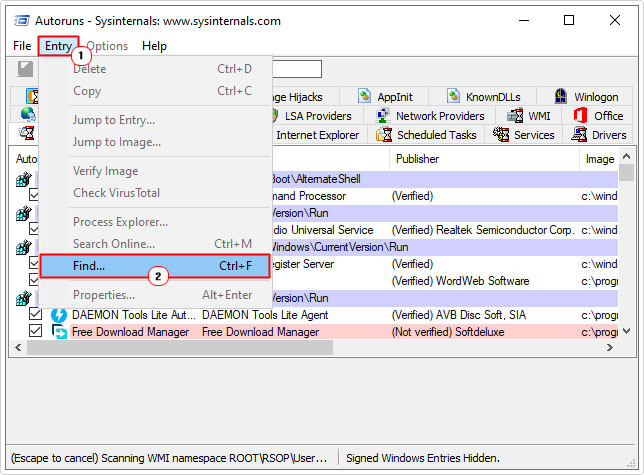
5. Then type Esrv.exe into the Find what box, then click on Find Next.
6. If it finds an instance of Esrv.exe, it will highlight it. Simply right-click on it and select Delete. Repeat steps 4 – 6, until it no longer finds any instances of the Esrv.exe file.
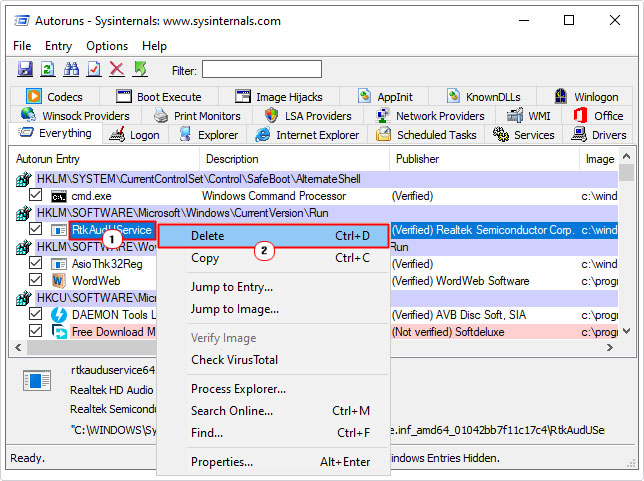
7. Lastly, close Autoruns, and restart your system.
Rename Esrv.exe
Some end users have managed to fix the esrv.exe error on their system, simply by renaming every instance of the esrv.exe file on their system. In theory, this can work, but it may prevent you from running its associated program (Intel Update Utility). So bear that in mind:
1. Anyway, first ensure you’ve booted into your system as a full administrator.
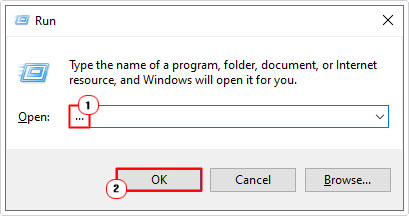
2. Then press  + R, type … and click on OK.
3. When File Explorer loads up, click on your C:\ drive, then type Esrv.exe into the Search box and press Enter.
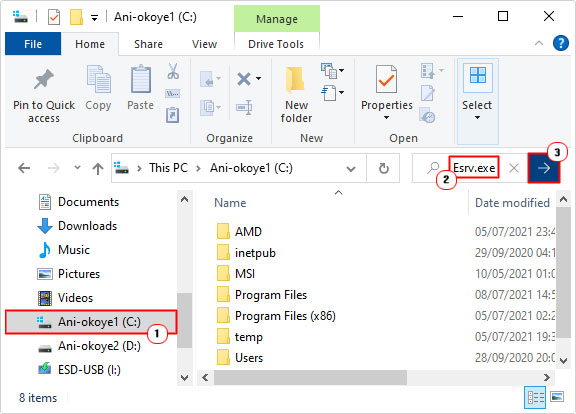
4. If it finds an instance of Esrv.exe, it will list it. From here, simply right-click on the file and select Rename. Then change the file extension from Esrv.exe to Esrv.old.
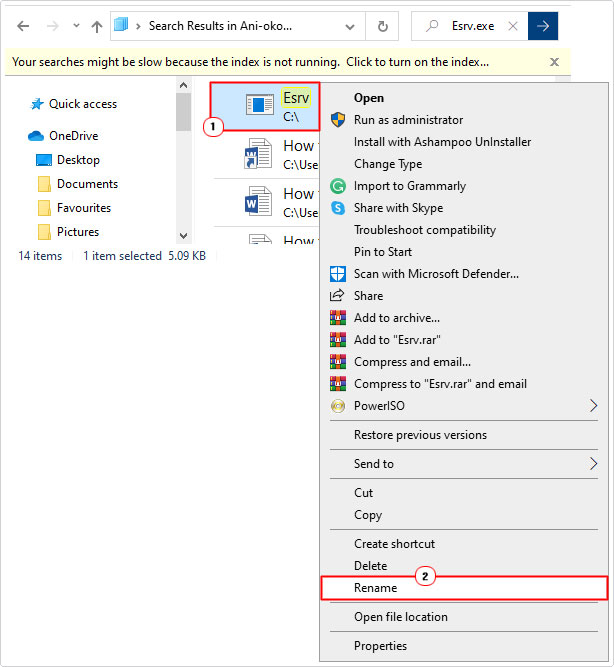
Note: A notification prompt may appear, simple click on Yes, to bypass.
5. Repeat step 4 for all instances of the Esrv.exe file, then restart your system.
Are you looking for a way to repair all the errors on your computer?

If the answer is Yes, then I highly recommend you check out Advanced System Repair Pro.
Which is the leading registry cleaner program online that is able to cure your system from a number of different ailments such as Windows Installer Errors, Runtime Errors, Malicious Software, Spyware, System Freezing, Active Malware, Blue Screen of Death Errors, Rundll Errors, Slow Erratic Computer Performance, ActiveX Errors and much more. Click here to check it out NOW!

