| Attention Before you read this post, I highly recommend you check out my resources page for access to the tools and services I use to not only maintain my system but also fix all my computer errors, by clicking here! |
Hal.dll is a Windows .DLL file. The acronym HAL stands for “Hardware Abstraction Layer”, and is a file the operating system uses to carry out a wide range of functions and task on the various external and internal hardware components of your system. This file is required by Windows for it to operate optimally, and it’s often the case, that the operating system will not boot up, if this file is either missing or corrupt.
Hal.dll Overview
The term hardware abstraction layer, for the vast majority of computer users, means absolutely nothing. For that reason, I’ll attempt to explain it as plainly as I can. The hal.dll is an integral aspect of the Windows boot up phase.
The hal.dll file acts as an interface between the various applications and the hardware installed inside your system. Whenever the hal.dll file is being accessed by an application, essentially, it’s acting as a proxy layer, granting indirect access to the systems hardware.
The hal.dll is very similar to an API (application programming interface). As it allows applications to operate independently on the system it’s being run on.
In the past, there was a wide assortment of hal.dll files. Each version of the file had its own function. During an OS installation process, for example, the installer would determine which hal.dll file to use, based on the hardware components within the computer. The HALs were setup like the following:
- Hal.dll – non-ACPI
- Halacpi.dll – ACPI
- Halaacpi.dll – ACPI Uniprocessor
- Halmacpi.dll – ACPI Multiprocessor
- Halapic.dll – MPS Uniprocessor
- Halmps.dll – MPS Multiprocessor
On the latest Windows operating systems, all the variations of the hal.dll file, are rolled into one file. Since, Windows current support base, is becoming more and more uniform, the Windows HAL acts, mostly as a means of distinguishing between I/O bus types and memory architectures.
Can You Remove Hal.dll?
The hardware abstraction layer file, is basically hardware management. The entire process of managing the various hardware components within your system, can be said to be a relatively complex task. This is the sole motivation behind the creation of the HAL file. As a means of hiding that complexity.
Because the hal.dll is a Windows system file, the operating system will notify you, if the file has been tampered with. The end result is a system that no longer works optimally, and in more severe cases, a system that refuses to boot altogether.
Common Hal.dll Errors
If the hal.dll file on your system is either missing or corrupt, you may receive one of the following error messages:
Cannot find hal.dll. Please re-install a copy of the above file.
Cannot find windows/system32/hal.dll
Hal.dll missing or corrupt: please re-install a copy of the above file
Additionally, when attempting to boot into your Windows, the boot process may be halted, presenting you with the following message:
Windows could not start because the following file is missing or corrupt: windows/system32/hal.dll
The exact cause of these error messages is pretty straightforward. The hal.dll file has either been removed or is corrupted. This can arise from a number of different circumstances. A system improperly shut down, can cause file corruption, for example.
Another common issue attributed to the hal.dll file, is when it starts to consume a considerable amount of CPU resources. Through Windows Task Manager, you can determine which processes and programs are running, and how much resources they are consuming. If the hal.dll file is using a sizable amount of system resources, then it’s best to assume the file has been compromised.
Hal.dll errors are also known to occur when your operating systems boot.ini file has been corrupted. In situations like this, rebuilding the boot.ini file has proven to be the most effective solution.
Hal.dll errors are typically the result of your systems inability to either access or read the hal.dll file. The file is saved in the following location:
C:\Windows\System32
Additionally, the most common culprits of this files corruption, or deletion is the following:
- The Windows registry being corrupted.
- A virus file infiltrating and corrupting integral system files.
- Data corruption, the result of a hardware fault or human error (improper shutdown).
How to Fix It
On the later versions of Windows (7/8/8.1/10) most system crashes that site the hal.dll file, tend to be false readings. This is due to the various updates and enhancements to these versions of Windows. As a result, situations where the file is impeding the operating system from booting up, are very uncommon.
In most cases, where the hal.dll is singled out, the actual culprit is in fact a hardware component or an application in its attempt to interface with the hardware abstraction layer. If you currently have a hal.dll related error on your system, then I highly recommend you attempt the many solutions outlined below.
Run a Registry Scan to Fix Hal.dll Error
Depending on the severity of the hal.dll error, you may or may not be able to access Windows. In the event that you are, the first potential cause I suggest you look at is the registry.
DLL errors happen so widely and commonly, because the operating system is constantly using these files to execute and run programs on your system.
However, in order to utilise these (DLL) files, the operating system must know where to locate them. This is where the registry comes into the equation. As a database system for sensitive hardware and software settings data. The registry keeps a record of the locations of all the files on your system. Unfortunately, it’s not uncommon for the references to these files to become corrupted. In the event that this occurs, the operating system will no longer be able to locate the affected files.
To rectify this problem, the end user must run a professional registry cleaner tool, like Advanced System Repair Pro. Such a program will scan, detect and repair any and all infractions found within the registry. It’ll also do a host of other positive things for your system. All of which you can learn about, from the link below:
CLICK HERE TO CHECK OUT ADVANCED SYSTEM REPAIR PRO
 The solution(s) below are for ADVANCED level computer users. If you are a beginner to intermediate computer user, I highly recommend you use the automated tool(s) above! The solution(s) below are for ADVANCED level computer users. If you are a beginner to intermediate computer user, I highly recommend you use the automated tool(s) above! |
Restore Hal.dll File
If the hal.dll is truly missing or corrupt, then your only viable solution is to restore/replace the file. To do that, you will need to access Command Prompt or Recovery Console (on older Windows platforms).
To access Recovery Console, simply do the following:
1. Put your Windows CD into your CD-ROM drive, and boot from the disc.
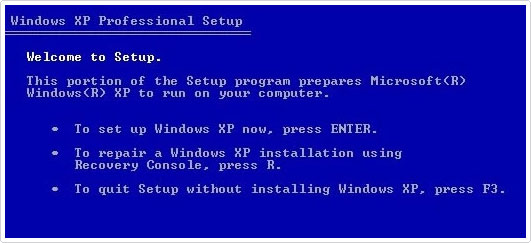
2. When Windows Setup loads up, press R.

On later versions of Windows you’ll need to create a Windows Media Installation file, before you can access Command Prompt. You can find step-by-step instructions on how to do this from my post on repairing 0xc0000225 errors.
3. Once you have successfully accessed the Recovery Console (or Command Prompt), you should then attempt to recover the file, by using the following commands (pressing Enter after each line):
CD System32
Expand d:\i386\hal.dll_
Note: Where D: is the letter of your CD-ROM drive. Additionally, if the system asks you, if you would like to overwrite the original hal.dll file, say yes. Then exist and restart your system.
If the command completes successfully, then a new copy of the file hal.dll should be on your system. However, if this fails to rectify the error. Then I suggest you attempt the solution below.
Repair the Boot.ini
If the hal.dll is in working order, then it means there must be something wrong with the boot.ini file. To repair the boot.ini file, follow the instructions below:
1. First you will need to access Recovery Console or Command Prompt. Which you can do, following the instructions on Restore Hal.dll File.
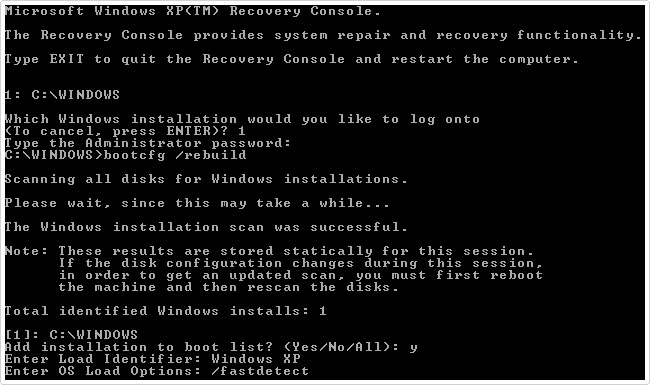
2. From Recovery Console (Command Prompt), type the following commands, pressing Enter after each line:
Attrib -h -r -s c:\boot.ini
Del c:\boot.ini
Bootcfg /rebuild
3. When prompted to Add Installation to boot list, type Y and press Enter. For the Boot identifier type your Windows version, i.e. Windows XP then press Enter. On Boot Load Options, type /fastdetect and press Enter.

4. Lastly, type the next two commands, pressing Enter after each line:
Bootrec /fixmbr
Bootrec /fixboot
Note: After trying the attrib command, you may receive a “Parameter is wrong” error message. Please ignore and continue.
Are you looking for a way to repair all the errors on your computer?

If the answer is Yes, then I highly recommend you check out Advanced System Repair Pro.
Which is the leading registry cleaner program online that is able to cure your system from a number of different ailments such as Windows Installer Errors, Runtime Errors, Malicious Software, Spyware, System Freezing, Active Malware, Blue Screen of Death Errors, Rundll Errors, Slow Erratic Computer Performance, ActiveX Errors and much more. Click here to check it out NOW!

