| Attention Before you read this post, I highly recommend you check out my resources page for access to the tools and services I use to not only maintain my system but also fix all my computer errors, by clicking here! |
File compression involves encoding data using fewer bits than the original file. There are currently two different types of compression, they are lossless and lossy. Lossless compression uses a method which entails identifying and removing redundant bits, while maintaining the full integrity of the original file. Lossy compression on the other hand reduces the size of a file by identifying data that it deems unnecessary. Although data/file compression is the more popularly known name for this method, the official name is actually source coding. In this post I hope to explain exactly how to compress files using all the various methods.
Through the use of data compression individuals can reduce the amount of resources their system uses during a Windows sessions. However, the main drawback of data compressions is that, in order for the computer to access a compressed file, it must first decompress it, a process which can be somewhat taxing on the CPU (Central Processing Unit); one example of data compressions trade-off. Another example of this trade-off would be in the area of video compression, as a computer system may require a considerably powerful graphics card to be able to decompress the data fast enough for it to be viewed at the standard 24FPS (Frames per Second). In addition, the option to completely decompress a video before you can watch it, has its own set of inconveniences, as users may be required to wait a considerable length of time, and additional storage space would also be required to store the data; this all crucial information when looking at how to compress files.
Data compression schemes are specifically designed with their own trade-offs in various areas, such as the level of compression, the amount of data distortion (which is available with the lossy compression methods), and the amount of computer resources required for compressing and decompressing the data; these are things you need to consider when learning how to compress files.
Lossless Data Compression
The lossless data compression method utilises an algorithm which enables data that is compressed (using this method) to be reconstructed or decompressed back to its original characteristics. This is one thing that sets it apart from lossy data compression, as data compressed using this method (lossy) cannot be reconstructed back to how it was originally. Lossless is a fairly popular data compression method that is used in a number of different applications, and the method you are most likely to use when first learning how to compress files. For example, it’s used in Gzip, which is a UNIX utility tool, and the popular ZIP file format. It’s also used in lossy data compression technologies, though only as a minor component of it.
This particular compression method is best suited for users who feel it’s important that the data that is compressed is the same data the user will receive once they decompress it; examples of when this method would be very useful is when compressing source code or executable programs.
There are also a number of image file formats, such as PNG, that use this compression method, while other formats, such as MNG and TIFF may use either methods (lossy or lossless). GIF is another image format that uses the lossless compression method, however GIF has a colour limitation of 256 or fewer, which means images may lose their full range of colours when converted to this image format. This is probably not the compression method you’ll use when looking at how to compress files for the first time.
Lossy Data Compression
The lossy data compression method involves the compression and decompression of data, but at the disadvantage of losing the integrity of the initial file. This compression method is used quite commonly in the form of codec’s on the internet for streaming media and also for telephony programs. Generational loss is another factor of lossy data compression formats, this is because repeatedly compressing and decompressing the same file can causes it to gradually deteriorate in quality. A far cry from what you get with the lossless method, and something you probably won’t use when adopting a compression type after learning how to compress files.
Lossy Compression Types
When it comes to lossy compression, you’ll find that there are two different basic schemes:
- Lossy Transform Codec: Samples of data are taken, and then segmented into small bits, which are then transformed into a basis space then quantized. The resulting data is then entropy coded.
- Lossy Predictive Codec: Subsequent and/or previous data that has been decoded is used for predicting the current frame of an image file or the sample of a sound file. The level of error that exists between the real data and predicted data, along with any additional data which may be required to reproduce the prediction is then quantized and coded.
It’s not uncommon for both techniques to be used at the same time. This is especially true with transform codec’s which are used for compressing error signals that the predictive process generates.
With that said when looking at how to compress files, there are a number of ways you can do it. The most common methods are outlined below.
How to Compress Files Using Windows Operating System
When it comes to using the operating systems built-in compression tools, you have two options. The first is to compress files and/or folders individually and the second option is to use Windows Disk Cleanup tool to compress redundant personal and/or system files.
For more information on how to compress files using this method, I suggest you check out my post on dealing with low disk space, as it covers these two compression methods.
Using WinZip
WinZip is currently the world’s #1 utility tool, offering the best in file compression, protection and achieving. So it’s definitely the recommended tool for those interested in wanting to know how to compress files. Anyway, to effectively utilise this program, I suggest you follow the instructions below.
1. First, visit the following website to buy and download WinZip: CLICK HERE TO CHECK OUT WINZIP
2. Once you have downloaded and installed WinZip to your computer, all you have to do is right click on any file(s) or folder(s), then select WinZip, and then click on Add to Zip file…
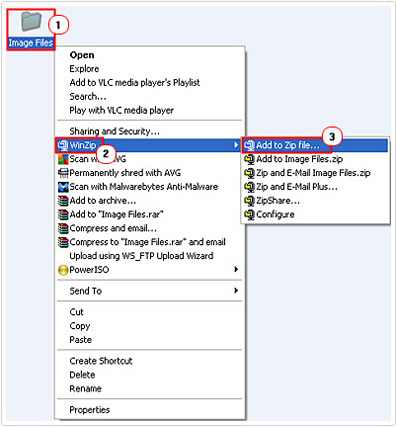
3. If you haven’t already purchased the product through the link provided above, then I highly recommend you click on Buy Now, then follow the onscreen instructions.

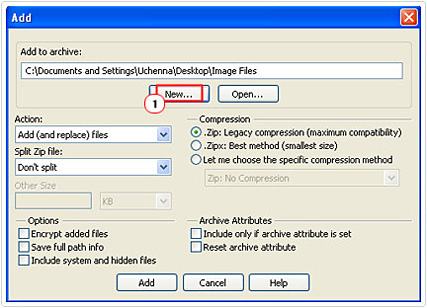
4. Following the buying process, an Add applet should load up, from here, click on New.
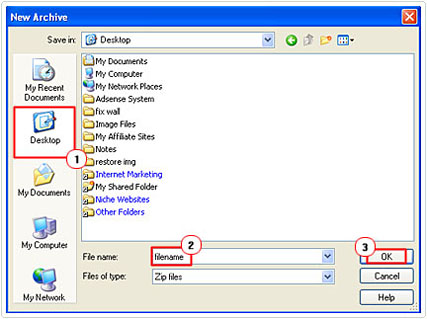
5. Then click on Desktop and give it a File name: and then click on OK.
6. This will bring you back to the Add applet, from here, select your preferred Compression method, and then click on Add.
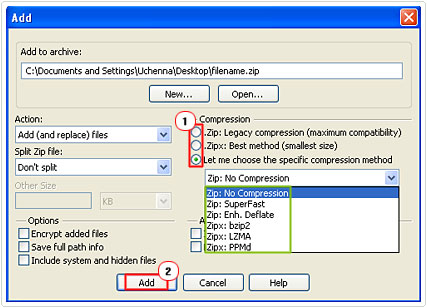
| Compression Method | Recommendation |
.Zip: Legacy compression (maximum compatibility) | This compression method uses an algorithm called deflate. Deflate is compatible with virtually all Zip file and similar utility programs. This compression method is thought to be good, ideal for most file types, and best suited for those who have intentions of sharing the created Zip file, i.e. through an email attachment. |
.Zipx: Best method (smallest size) | When you choose this method, it will enable the WinZip program to choose the best compression method for each file that you are trying to compression. It will typically choose the compression method based on its ability to preserve the most amount of space. If you intend on sharing the file created through this method, then you will have to ensure that whoever you send it to, has the latest WinZip program on their computer. |
Zip: No Compression | This option is probably only suitable when you have a number of files that are already compressed, but you would like to contain within a single Zip file. |
Zip: SuperFast | This is the deflate compression algorithm, and thus, is similar to using the Legacy compression method, with an emphasis on speed rather than compressed size. So you can expect files to compress faster, but be somewhat larger in size. |
Zip: Enh. Deflate | The enhanced deflate compression method is very similar to the original deflate method only it’s optimised to work on much larger segments of data, this results in a more improved compression rate. This method is best suited when compressing very large files, such as database and text-based files. |
Zip: bzip2 | bzip2 is a compression algorithm that is open-source, it’s optimised to compress files more effectively than the deflate algorithm, but with the trade-off of being much slower. |
Zip: LZMA | This is another open-source compression method that uses a dictionary compression scheme that is considerably larger than the deflate method. The advantage of this is that it’s capable of producing a much better compression ratio. |
Zip: PPMd | PPMd is a compression algorithm that is optimised for compressing text-based files, which it is more efficient at doing than both the bzip2 and deflate options. The only drawback is that it can be quite slow. |
Note: If you click on Let me choose the specific compression method, then this will open up additional compression options.
Using WinRAR
A easy route to learning how to compress files is WinRAR, which is a very powerful utility tool which can be used for a variety of tasks, such as backing up data, creating archives, and compressing files. To use this tool for compressing your files/folders, just follow the instructions below.
1. First, visit and download WinRAR from here: CLICK HERE TO CHECK OUT WINRAR
Note: WinRAR comes with support for both 32 bit and 64 bit operating systems.
2. Once you’ve installed the program, simply right click on a file(s)/folder(s) that you would like to compress, and then click on Add to achieve…
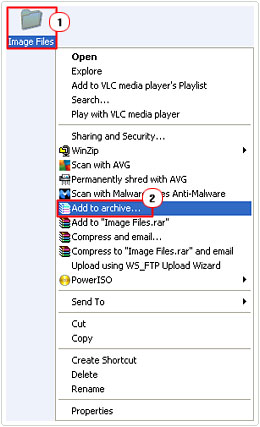
3. This will bring up the Archive name and parameters applet, simply select the appropriate Compression Method from the drop down menu, and then click on OK.
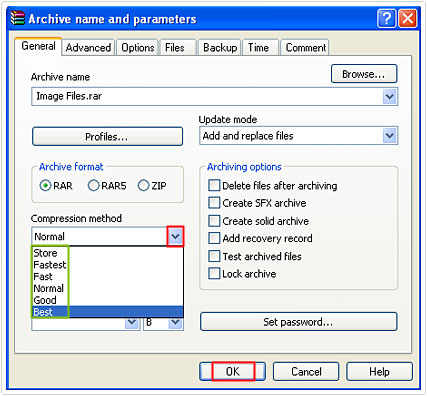
| Compression Method | Recommendation |
Store | This method amounts to putting all your files (assuming you’ve highlighted more than one file or folder) into one archive file. It won’t compress any of the files, so there’s nothing to think about in terms of loss in quality etc. |
Fastest | Like its name, it will compress your files/folders using the fastest possible compression method. It won’t compress the files by much, but it will take the least amount of time to do it. This method is only advisable when attempting to compress a significant number of files. |
Fast | This method is similar to fastest; only, it’ll use a slightly better compression method, while taking slightly more time to compress your files. |
Normal | This is the default setting; there isn’t much improvement in the level of compression over the previous two methods. But if you’re not too fussy about levels of compression, then the default setting is probably your best option. |
Good | This method, should theoretically give you a better level of compression over the normal setting, although, this depends a great deal on the type of files your trying to compress. |
Best | This is the best option, giving you the highest level of compression. Although, depending on the amount of files you’re trying to compress, you could be waiting a considerable length of time. If you’re willing to wait the extra time it takes to compress, then you should pick this setting. |
Are you looking for a way to repair all the errors on your computer?

If the answer is Yes, then I highly recommend you check out Advanced System Repair Pro.
Which is the leading registry cleaner program online that is able to cure your system from a number of different ailments such as Windows Installer Errors, Runtime Errors, Malicious Software, Spyware, System Freezing, Active Malware, Blue Screen of Death Errors, Rundll Errors, Slow Erratic Computer Performance, ActiveX Errors and much more. Click here to check it out NOW!

