| Attention Before you read this post, I highly recommend you check out my resources page for access to the tools and services I use to not only maintain my system but also fix all my computer errors, by clicking here! |
We store more and more files onto our computers as each day passes. Most of these files are only relevant for a given time period, whereas others remain valuable over a considerable length of time. For our more important files, we may want to implement measures that ensure their safety, this is when knowing how to protect files on your computer becomes handy.
The good thing is that once you know how to protect files it is a relatively simple process. By following the steps outlined below, you can ensure that all the documents you create remain within reach. The methods that you can use to protect the files on your computer are plentiful. In this tutorial I cover everything, from deploying encryption, to using file recovery software, all of which you can put to use immediately.
How to Protect Files By Being Prepared
Are you interested in removing unneeded files or possibly rearranging the positioning of all your files? Well, before you go ahead and doing anything, backing things up should be one of the first things in your mind. You may also want to examine the current file structure of your computer, that way; you will be much clearer about the assortment of files on your computer, which should go a long way in decreasing the chances of you removing an important file or document.
Modify Application Settings
Having some understanding of where the applications you use, save your data, is very important, as it’s not uncommon for all associated files of an application to be removed, during to uninstallation process of that specific application. Before you can ever hope to learn how to protect files on your computer, you must first familiarise yourself with the settings of all the applications that you use.
Note: It’s always best that you split your hard drive into at least two partitions. This way, you can separate your application data from your personal data. By default, applications tend to save personal data into your “My Documents” folder, as a safety and precautionary measure, it’s best for this data to be stored on a separate partition of your hard drive.
Password-Protect Important Files
Is your computer shared amongst several family members? Even if every user of the computer has their own personal profile, it’s still possible for each user to access files from other profiles. Thus, if your computer is shared amongst several people, than you may want to think about password-protecting your most important files. You could also opt to password-protect folders, just make sure the password you choose is memorable.
Using an Archive Tool
If you want to know how to protect files or folders with a password, then you can do so with WinRAR. The steps are as follows.
1. First, purchase and download the archive tool from here:
CLICK HERE TO CHECK OUT WINRAR
Note: Download WinRAR is available in both x86 32 bit and x64 64 bit versions, and also as a physical CD; which provides an additional level of security, in the event that your hard drive becomes corrupted.
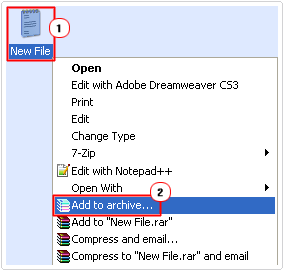
2. Once you’ve downloaded and installed this program, simply right click on the file/folder that you want to password-protect and select Add to archive…
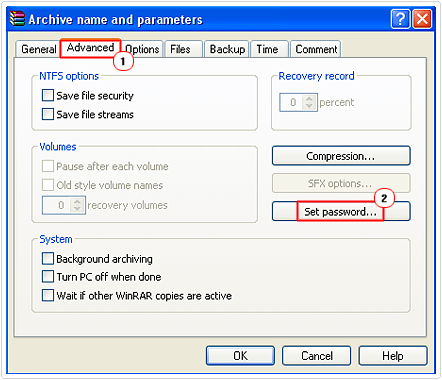
3. This will bring up an Archive name and parameters dialog box, from here click on the Advanced Tab, and then click on the Set Password button.
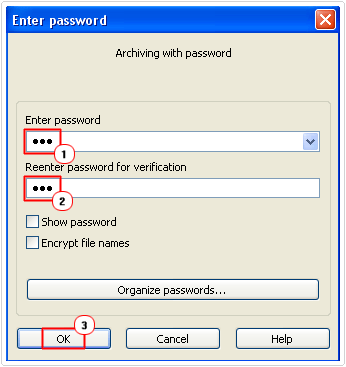
4. From the Enter Password dialog box, type in a password under the corresponding boxes, Enter password and Reenter password for verification, then click on OK.
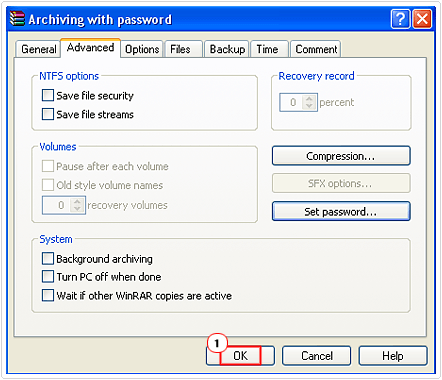
5. This will take you back to the Archive name and parameters dialog box, simply click on OK and a password-protected archive will be created with your file inside it.
Note: Make sure you delete the original file, once you’ve password-protected it within an archive.
Using Microsoft Word/Excel/Access
Microsoft Word, Excel and Access have a feature that allows you to protect your documents with a password. If you use Microsoft Office, then this may be the more convenient option for you. The step-by-step instructions below will show you how to how to protect files.
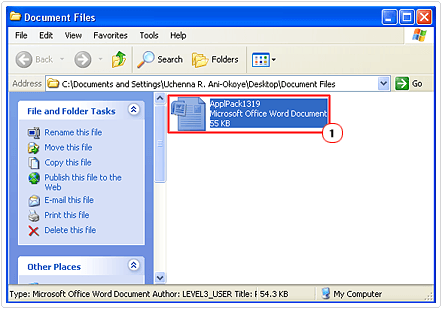
1. First, double click on the document that you want to password-protect.
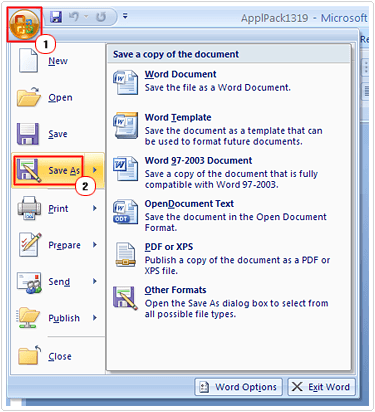
2. Once the document loads up, click on the Orb, in the top left corner, then click on Save As.
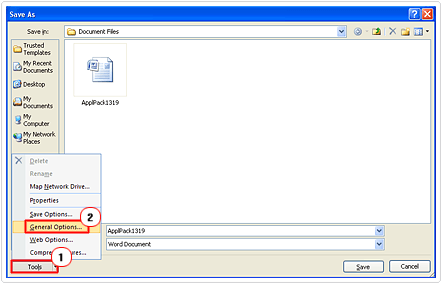
3. From the Save As dialog box, click on Tools -> General Options.
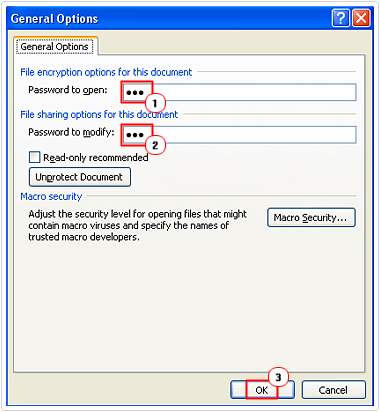
4. This will bring up a General Options dialog box, from here, type in a Password to open and a Password to modify, and then click on OK.
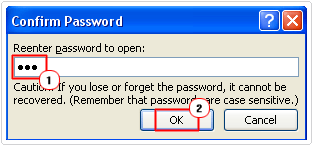
5. A Confirm Password dialog box will pop up, Reenter password to open into it and click on OK.
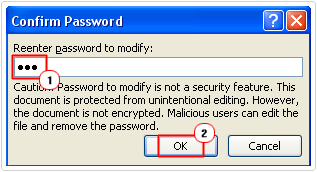
6. Another Confirm Password dialog box should pop up, Reenter password to modify into it and click on OK.
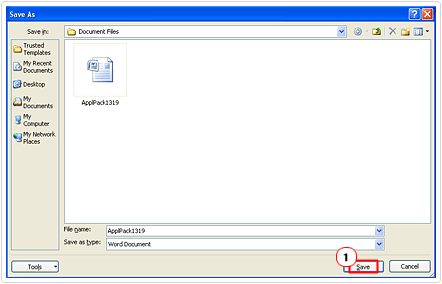
7. Once you’ve finished confirming your passwords, save the document by clicking on the Save button.
Install File Recovery Software
As a precaution, you may want to know how to protect files, so you can preserve them in the event of an accidental deletion, however, in order for you to do this; you will require file recovery software. The recovery process is fairly simple as it entails running the program immediately after accidently deleting a file. Having this nifty application on your computer can potentially save you from a great deal of stress, and is a sure-fire way of recovering any files that you didn’t explicitly intend on deleting.
There are many of these recovery programs around, but the specific application that I recommended is Stellar Photo Recovery, which is a specialised file recovery tool. To recover a file using this application, follow the instructions below.
1. First, download your copy of Stellar Photo Recovery here:
CLICK HERE TO CHECK OUT STELLAR PHOTO RECOVERY
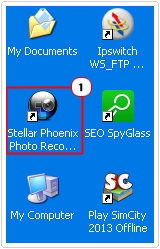
2. Once the application is installed on your computer, double click on its icon on your desktop.
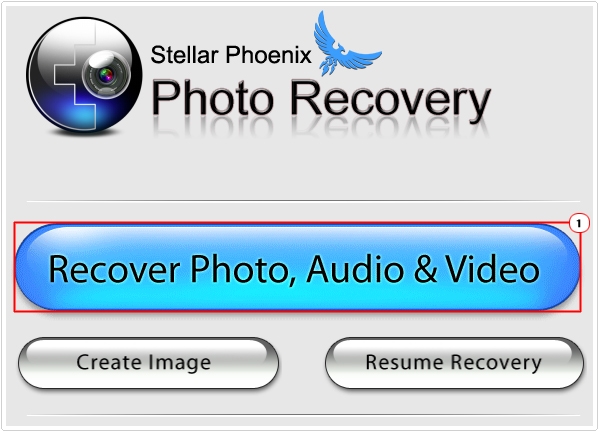
3. This will load the program up, from here, click on the Recover Photo, Audio & Video button.
4. This will take you to the Recover Photo, Audio & Video Files, from here select the Hard Drive you would like to recover files from, then click on Scan Now.
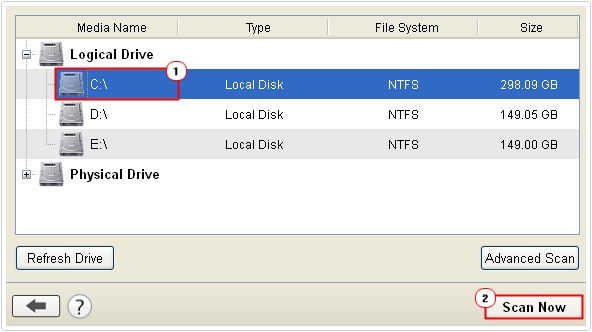
Note: The application will then proceed to run a search for all recently deleted files
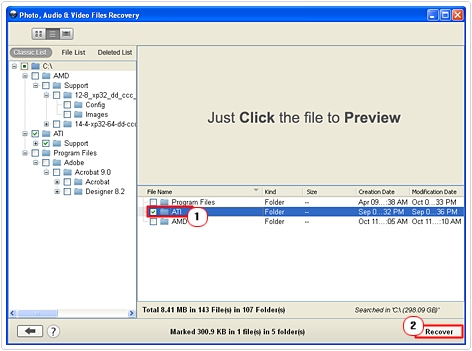
5. To recover a file, check the box next to the file(s) or folder(s) you want to recover, and then click on Recover.
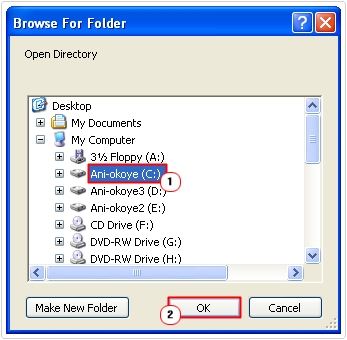
6. A Browse For Folder dialog box will pop up, select where you would like the file to be restored to, then click on OK.
Use a File Shredder to Delete Files Permanently
Have you passed your system over to another family member, such as a young niece or nephew? Are you interested in selling your hard drive? Well formatting the hard drive will not permanently remove the files that are on it. Through the use of a file recovery program, the files can very easily be recovered. If you’re able to recover accidently deleted files, then so can the next individual. Thus, it’s recommended that you use a file shredder to delete files that you do not want anyone to ever access.
Again, when it comes to file shredding, there are many applications that you can use to do this, but I recommend you use Remo File Eraser, which is a specialised data shredding application. To shred a file, simply do the following.
1. First, you will need to download the program, which you can do from here:
CLICK HERE TO CHECK OUT REMO FILE ERASER
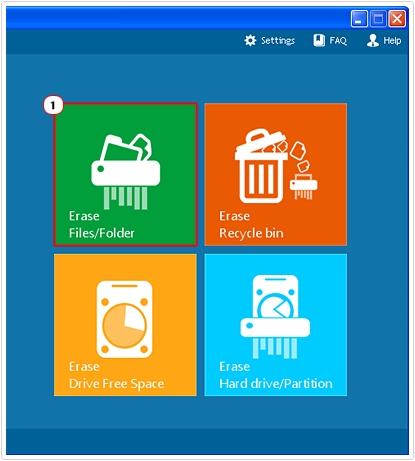
2. Once, you’ve got the application up and running, click on the Erase Files/Folder button.
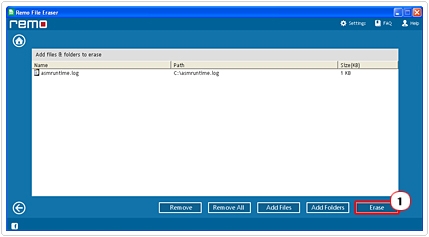
3. This will bring up Add files & folders to erase screen, to shred a file, click on the Add Files or Add Folders button, depending on what you want to delete.

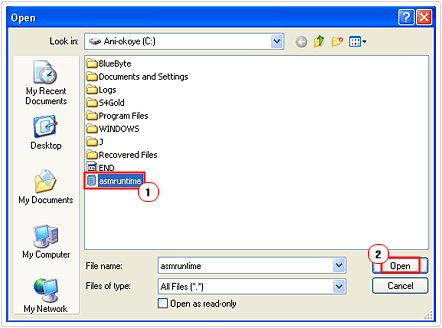
4. This will bring up an Open dialog box, simply locate a file you would like to delete, and then click on Open.
5. The file(s) or folder(s) you intend to delete will show up under Name, Path and Size(KB) on the Add files & folders to erase screen, from here, click on Erase, to remove the file from your system.
Note: The Erase button will take you to the Select wiping method screen, simply click on Proceed.
Make Regular Backups
Although it’s something that is commonly known, it’s not something that is commonly carried out. The vast majority of computer users have at least one external hard drive, which would be ideally suited for backup purposes. There are many backup options, such as various applications, online services etc, so there’s little reason why your most important files shouldn’t be backed up. For more information on this topic, I suggest you read my post on backing up your computer.
Hide Important Files
If you’re unable to install the maintenance suite that I recommended above, for whatever reason, then you may want to consider hiding important files. When it comes to learning how to protect files, you can bypass that very easily by hiding them from people simply by changing their attributes. This can be done by doing the following.
1. First, ensure you’ve logged into your computer with a user profile that has administrative rights.
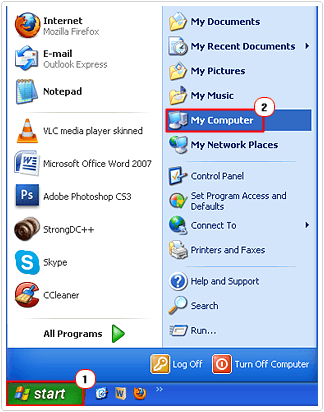
2. Then click on Start -> My Computer. [Windows Vista/7: Computer]
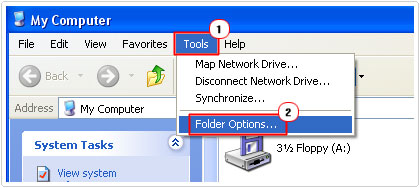
3. Once My Computer loads up, click on Tools -> Folder Options. [Windows Vista/7: Organize -> Folder and search options]
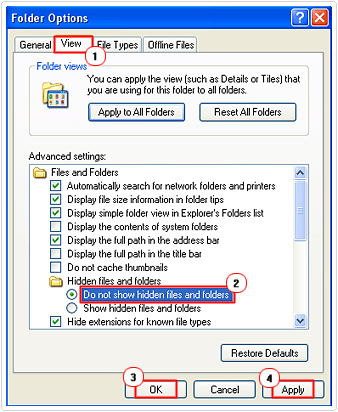
4. From the Folder Options dialog box, click on the View Tab, then click on Do not show hidden files and folders to select it, and then click on Apply and OK.
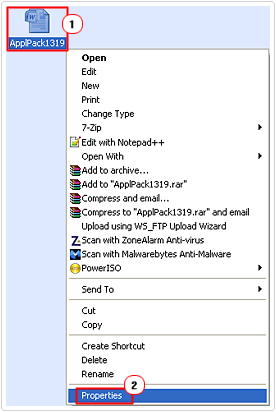
5. Once you’ve done that, simply right click on a file you would like to hide, and click on Properties.
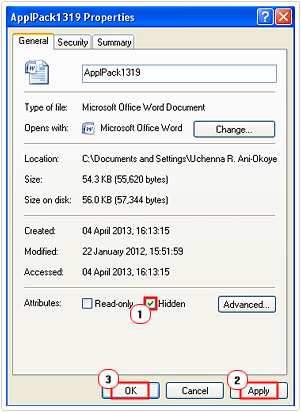
6. From the Files Properties applet check the box next to Hidden, besides Attributes, and click on OK.
Use EFS Encryption
If you would like to know how to protect files, then EFS encryption is another method that you can use to do just that, on your system. Through this method, only those that have access to your user profile will be able to open your documents, making it ideal for systems that have multiple users on it. Anyway, to encrypt a file, do the following.
1. First, ensure you’ve logged into your computer with the appropriate user profile.
2. Then right click on the file or folder you would like to encrypt and select Properties.
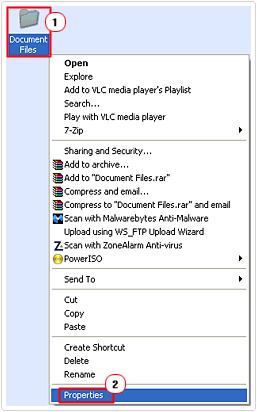
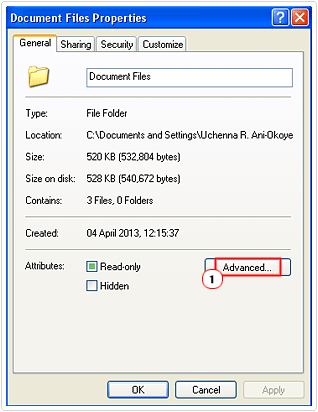
3. This will bring up the file/folder Properties applet, from here, click on the Advanced Button.
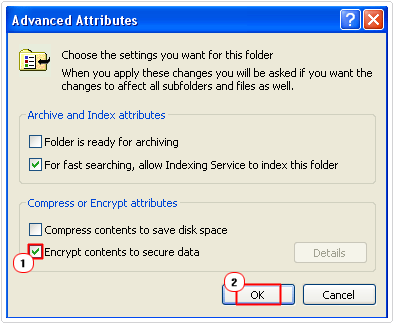
4. A small Advanced Attributes dialog box will pop up, simply click on Encrypt Contents to secure data, and then click on OK.
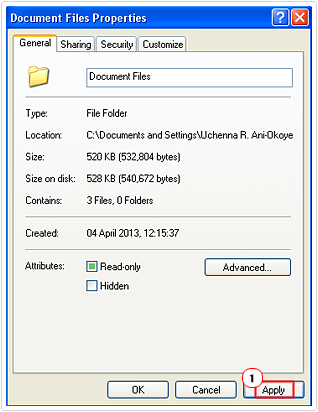
5. This will take you back to the file/folder Properties applet, click on Apply.
Note: If you selected a folder a Confirm Attribute Changes applet will show up, click on Apply changes to this folder, subfolders and files and click on OK.
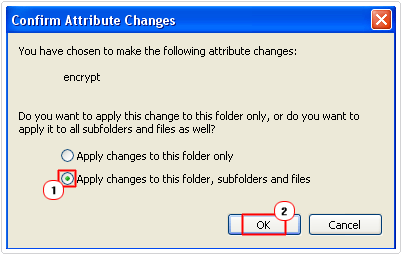
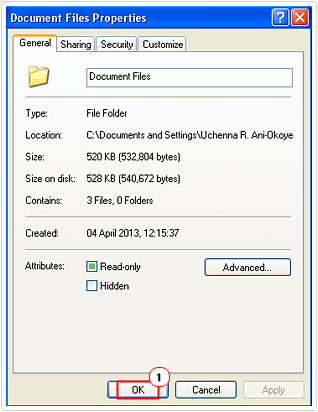
6. Lastly, click on OK to close the file/folder Properties applet.
Are you looking for a way to repair all the errors on your computer?

If the answer is Yes, then I highly recommend you check out Advanced System Repair Pro.
Which is the leading registry cleaner program online that is able to cure your system from a number of different ailments such as Windows Installer Errors, Runtime Errors, Malicious Software, Spyware, System Freezing, Active Malware, Blue Screen of Death Errors, Rundll Errors, Slow Erratic Computer Performance, ActiveX Errors and much more. Click here to check it out NOW!

