| Attention Before you read this post, I highly recommend you check out my resources page for access to the tools and services I use to not only maintain my system but also fix all my computer errors, by clicking here! |
In this tutorial I intend to inform my readers on how to remove the Google redirect virus using the same method I used. One thing you should keep in mind however is that your ability or inability to successfully eliminate this virus depends greatly on you following through with my instructions in its entirety.
The Google redirect virus is a fairly notable virus that is designed to redirect your traffic to other, usually malicious websites. There are a number of names that this virus is known by; these include the search engine redirect virus and the browser hijack virus. This virus is highly effective at finding its way onto the computers of disconcerted users, and proves quite difficult to get rid of; this is because it uses known rootkits. It’s these rootkits that alter your systems settings in such a manner that when you attempt to access your favourite search engine, such as Google, the virus actually redirects your browser to a website that mirrors the search engine. That way, when you conduct a search through this site and attempt to click on one of the search engine listings, your browser is immediately redirected to another website.
To put it simply, the websites that will show up in your search listings will be legitimate sites, but when you attempt to click on one, in order to access it, your browser will be redirected to another website. Once on this dubious website, you may be offered a downloadable application, such as a file sharing client. One of the main reasons why hackers infect people’s computers with this virus is because it provides an eventful means of driving more traffic to their websites. They see it as a way of generating a ton of free traffic, since all the search listings will typically take you through to the exact same dubious website.
This particular virus can find its way onto your computer from a number of different Medias, such as music files, video files and executables. It can also be sent to you via email or in a browser plug-in. Even the most credible websites that offer applications that are of real use to the end user are capable of distributing this virus. The virus infects the machine without providing the end user with any heads up warning; this makes it increasingly more difficult to counteract.
Signs You’ve Been Infected
Before looking at how to remove the Google redirect virus, you must first examine the many signs that your computer may exhibit if it has actually been infected with the Google redirect virus, the things to look at for are as follows:
- The homepage of your web browser has changed, prohibiting you from changing it back to the original homepage.
- When you attempt to access certain websites, you’re randomly sent to unrelated websites.
- The number of pop-ups that you encounter while surfing the internet increases, considerably.
For those of you who would like to know how to remove the Google redirect virus, continue reading for the step by step instructions that I used to successfully eliminate this irritant.
How to Remove the Google Redirect Virus – Check Network Connections
When figuring out how to remove the Google redirect virus, the first thing you’ll want to do is ensure that your internet connection is not running through an alternate DNS. To do this, simply do the following.
1. First, log into your computer with a user profile that has administrative rights.
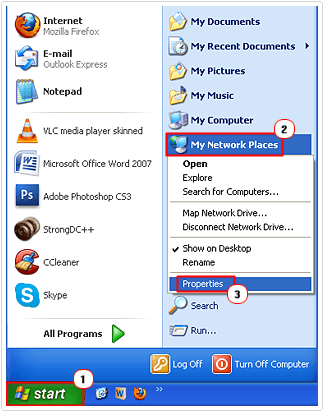
2. Then click on Start and right click on My Network Places and select Properties.
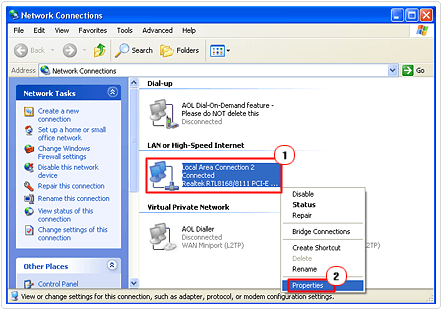
3. Once Network Connections loads up, right click on Local Area Connection and select Properties.
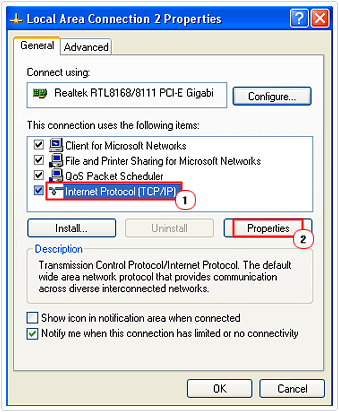
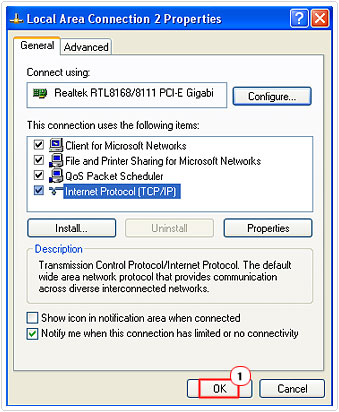
4. From the Local Area Connection Properties dialog box, click on Internet Protocol (TCP/IP), and then click on the Properties button.
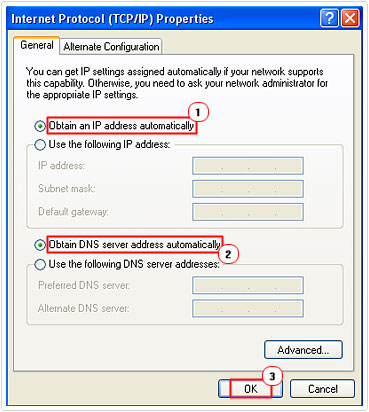
5. This will bring up the Internet Protocol (TCP/IP) Properties dialog box, from here; ensure Obtain DNS server address automatically and Obtain an IP address automatically are selected, and then click on OK.
6. This will take you back to the Local Area Connection Properties applet, from here, just click on OK, to close it.
Check Proxy Settings
The next thing you’ll want to do is check whether your connection, unbeknownst to you, is being funnelled through a proxy. To do this, simply do the following.
Internet Explorer
1. First, ensure you have administrative rights on your computer.
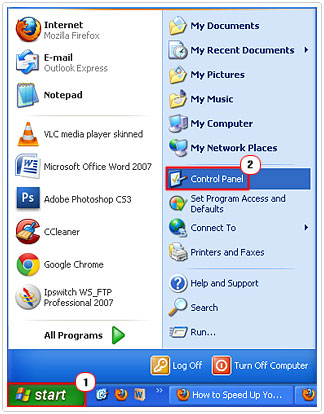
2. Then click on Start -> Control Panel.
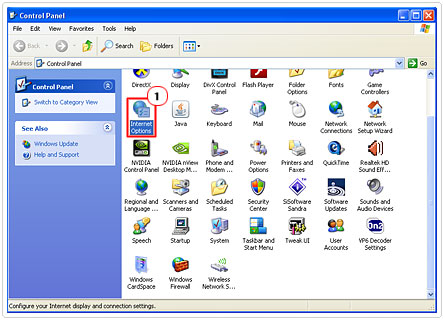
3. Once Control Panel loads up, double click on Internet Options.
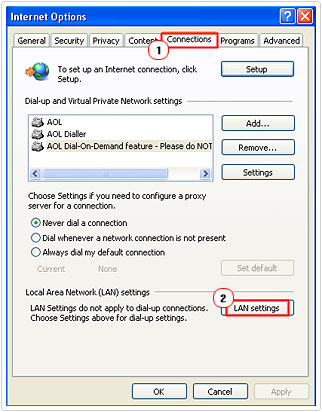
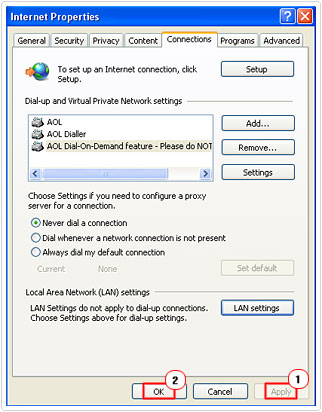
4. This will bring up an Internet Properties dialog box, from here, click on the Connections Tab, and then click on LAN Settings.
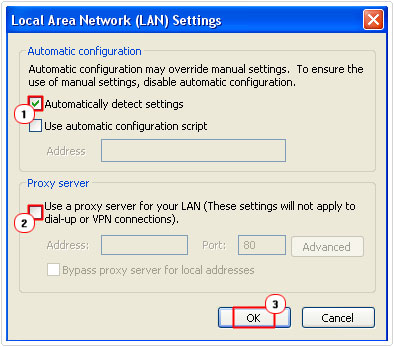
5. A Local Area Network (LAN) Settings applet will pop up, from here, ensure that the box next to Automatically detect settings is checked. Then make sure the box next to Use a proxy server for LAN (these settings will not apply to dial-up or VPN connections) is unchecked, and then click on OK.
6. Lastly click on Apply, then OK, from the Internet Properties applet.
Firefox
1. Load up your browser window by clicking on your desktop Firefox Icon.

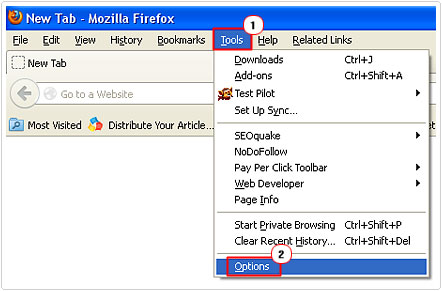
2. Then click on Tools -> Options.
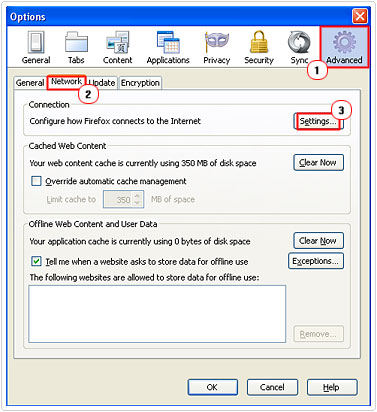
3. From the Options dialog box, click on the Advanced Tab, and then click on the Network Tab. This will bring up the Network settings, from here, click on the Settings button besides Configure how Firefox connects to the internet.
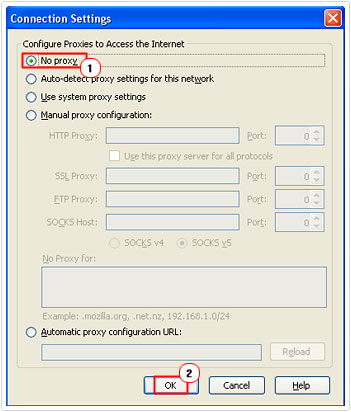
4. On the Connection Settings dialog box, make sure No proxy is selected, and then click on OK.
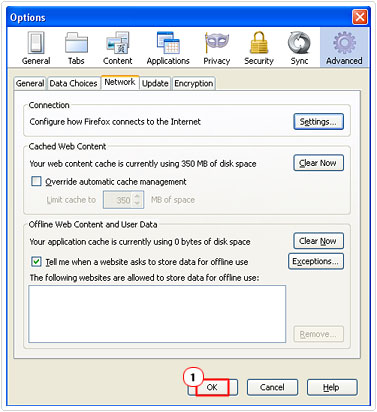
5. This will take you back to the Options applet; simply click on OK to confirm the last changes.
Restore Your Internet Settings
Once you’ve verified that your connection isn’t being relayed off a proxy server, you may want to consider resetting all your internet options, that way, all your settings, including your homepage will be set to default. To do this, do the following.
Note: This step is purely optional and thus, and when looking at how to remove the Google redirect virus, should only be implemented if the virus has altered a significant amount of your browser settings.
Internet Explorer
1. First, follow steps 1 – 4 from “Check Proxy Settings”
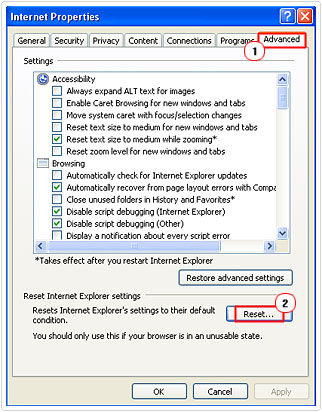
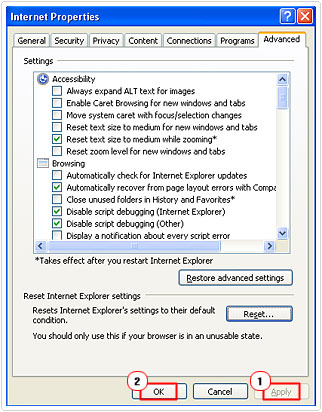
2. From the Internet Properties dialog box, click on the Advanced Tab, and then click on the Reset button.
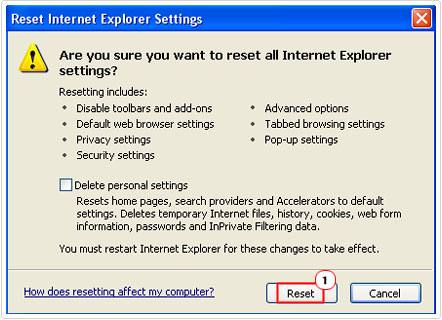
3. A Reset Internet Explorer Settings dialog box will pop up, from here, click on Reset.
4. This will take you back to the Internet Properties applet, click on Apply and OK, to confirm the changes.
Firefox
1. Click on your desktop Firefox Icon to load up your browser window.

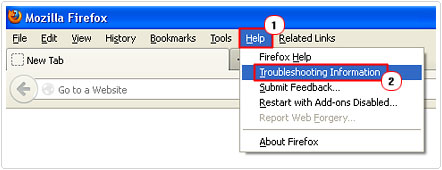
2. Then click on Help -> Troubleshooting Information.
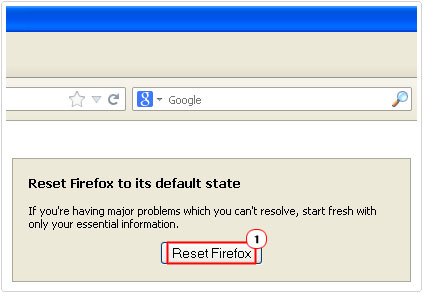
3. From the Troubleshooting Information page, click on the Reset Firefox button.
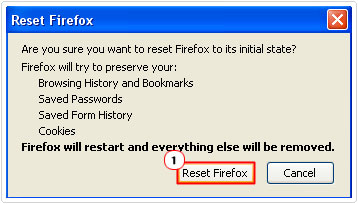
4. Lastly click on the Reset Firefox button on the confirmation dialog box.
Check Your HOSTS File
The next thing you’ll want to do is ensure that your HOSTS file hasn’t been altered. When I initially learnt how to remove the Google redirect virus, this was one step I was keen on not forgetting, anyway you can do it by doing the following.
1. First, make sure you have administrative rights.
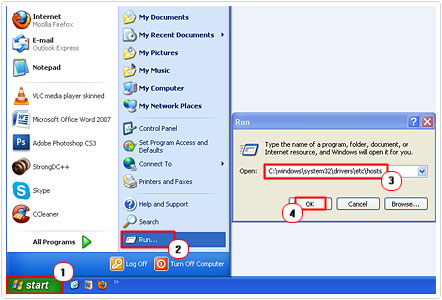
2. Then click on Start -> Run [Windows Vista/7: Press  + R], and type C:\windows\system32\drivers\etc\hosts and click on OK.
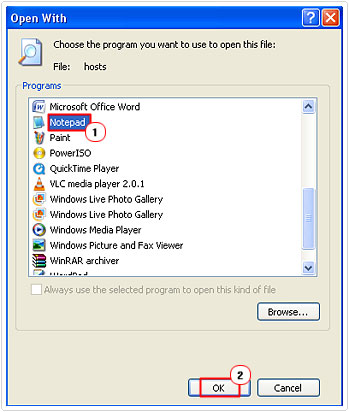
3. An Open With dialog box should pop up, from here, find and select Notepad from the drop down menu, then click on OK.
4. This will bring up your HOSTS file. From here you’ll want to ensure that the contents of this file resemble my example below:
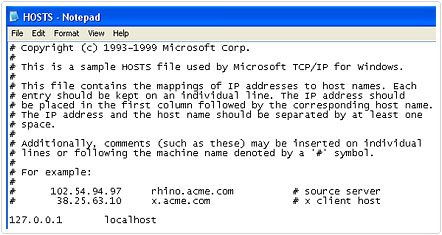
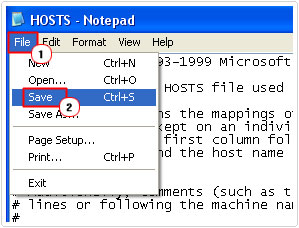
If you find any additional entries, delete them, then click on File -> Save.
Use SpyHunter
Once you’ve completed the initial steps on how to remove the Google redirect virus, the next thing you’ll need to do is download SpyHunter. SpyHunter is a malware remover tool that is capable of locating and neutralising any instances of the Google redirect virus on your computer. To run this application, simply download and install it from here:
CLICK HERE TO CHECK OUT SPYHUNTER
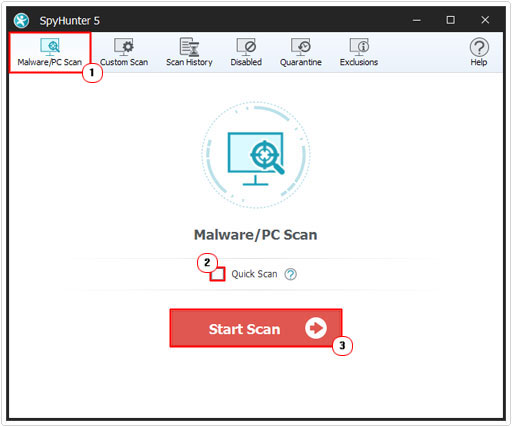
Operating the application is pretty self explanatory, it should perform the scan automatically, but in the event that it doesn’t, simply click on Malware/PC Scan, then un-tick the box next to Quick Scan, then click on Start Scan.
Use TDSSKiller
After you have performed a quick scan of SpyHunter, you will need to download a tool called TDSSKiller and run it on your computer. This is the last part of the process on how to remove the Google redirect virus, and one you should definitely not miss. This particular tool is developed by KasperSky Labs and is designed for fishing out malicious drivers and hidden rootkits on your computer, it’s these drivers and rootkits that power the Google redirect virus. You can download this application from here: http://support.kaspersky.com/
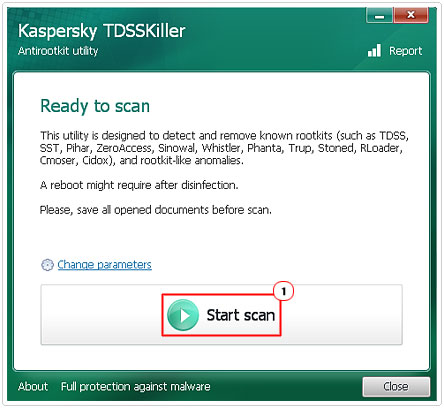
The use of this program is also self explanatory, simply download the TDSSKiller.exe file to a folder, and then double click on it to execute. Once the program is running, click on Start scan and it will scan your system for any instances of the virus and remove it.
Are you looking for a way to repair all the errors on your computer?

If the answer is Yes, then I highly recommend you check out Advanced System Repair Pro.
Which is the leading registry cleaner program online that is able to cure your system from a number of different ailments such as Windows Installer Errors, Runtime Errors, Malicious Software, Spyware, System Freezing, Active Malware, Blue Screen of Death Errors, Rundll Errors, Slow Erratic Computer Performance, ActiveX Errors and much more. Click here to check it out NOW!

