| Attention Before you read this post, I highly recommend you check out my resources page for access to the tools and services I use to not only maintain my system but also fix all my computer errors, by clicking here! |
In this tutorial, I will discuss system file checker, what it is, how to use it, how to run SFC Scannow and how to open SFC logs.
Sfc.exe or System File Checker is a utility tool that comes as part of Microsoft Windows operating systems. It’s located in the C:\Windows\System32 folder and is designed to restore corrupted system files.
To begin with, let me discuss the significant of how to run SFC scannow, and how it can help your computer.
While, for most users, the data on their solid state drive or hard drive is in the form of documents, music, movies and game files, there are those integral files that form your operating system. These files are crucial to the smooth functionality of Windows and so, if they were to get corrupted, it can have significant ramifications for your computer.
Fortunately, when you run system file checker, it can restore these damaged files.
This tool was originally introduced with Windows 2000, and has come as standard with every other Windows release since then.
System File Checker
In Windows Vista/7/8/8.1/10, the system file checker tool and Windows Resource Protection component work in tandem; designed to protect important system files, as well as certain folders and registry keys. If any of these protected files are modified in anyway, such change is detected by this component (when run) and is immediately restored using a cached copy, located somewhere in the Windows folder.
So if during the course of your systems life cycle, your system is hacked or tweaked without your explicit permission, resulting in your operating system not running as well as it used to, or not at all, you can simply run this tool, preferably before running System Restore, to fix it.
Requirements for SFC Scannow
In order to run this tool, you will first, need administrative access to your system. If your system is shared, and wasn’t set up by yourself, then it’s fair to assume that you do not have administrative access to it.
To use this tool, you are going to need someone that has administrative privileges to the system, so seek help, if need be. SFC Scannow can be opened in a number of different ways, for this post though, I will be outlining the most efficient and most effective way of doing it. Instructions will be easy to follow, so there is no need to worry.
What Does SFC Scannow Do?
Basically, when you run this command, it will scan several integral operating system files and repair them where applicable. However, if you’re on an older version of Windows (2000/XP), then you will need your original installation disc to complete the process, as it will replace the damaged, corrupted or missing file(s) with the file(s) on disc.
If you have a Windows theme, for example, that made changes to integral OS files when installed, then this tool will restore those files to their original state, which in turn could revert your theme back to its original state, so that’s something to be cognizant of.
How to Run SFC Scannow (SFC.exe)
1. First, you’ll need to boot into your computer with administrative privileges (as I already discussed).
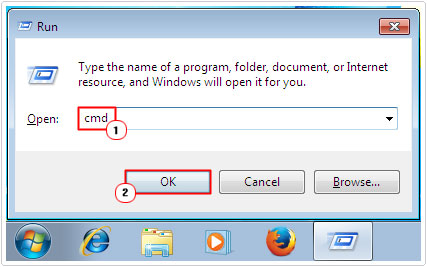
2. Once Windows logs in, press  + R, type cmd then press Ctrl + Shift + Enter to open Command Prompt as Administrator.

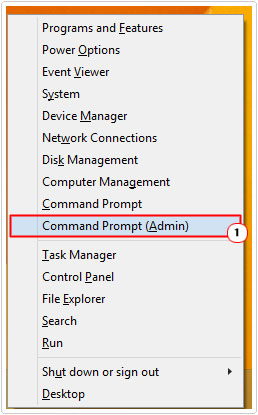
Note: Alternatively, if you’re on Windows 8 or 10, you can right click on the Windows Icon and select Command Prompt (Admin).

3. When Command Prompt loads up, type the following command DISM.exe /Online /Cleanup-image /Restorehealth and press Enter.

Note: You should only run this command if you’re on Windows 8/8.1/10, otherwise, you should skip this step.
Note: When you run the DISM command, it will use Windows Update to provide the files that it needs to repair any corruption that it finds.
4. When Command Prompt loads type SFC /Scannow and press Enter.

Note: System file checker will now scan all the protected files on your system and replace where applicable using a cached copy, which is typically located in the following folder:
%WinDir%\System32\dllcache
%WinDir% refers to the Windows operating system folder, which is by default C:\Windows, but can change at the discretion of whoever installed Windows.
Note: As a very important of the process on how to run SFC scannow now, it’s crucial that you do not close Command Prompt until the verification process is complete. After it’s finished, you will be presented with the scan results.
You should receive one of the following messages:
- Windows Resource Protection did not find any integrity violations.
This means there are no corrupted or missing system files in your computer. - Windows Resource Protection could not perform the requested operation.
In order to resolve this issue, you will need to run System File Checker in Safe Mode, and ensure that both the PendingDeletes and PendingRenames folders are present in the %WinDir%\WinSxS\Temp location. If not, you should create them. - Windows Resource Protection found corrupt files and successfully repaired them. Details are included in the CBS.log %WinDir%\Logs\CBS\CBS.log.
This means the scan was completed and repaired your system successfully, and you can find a detailed report in the CBS.log file. The section on viewing SFC processes, outlines how to open and view this report. - Windows Resource Protection found corrupt files but was unable to fix some of them. Details included in the CBS.log %WinDir%\Logs\CBS\CBS.log.
If you receive this results message, it means you will need to repair the corrupted files yourself. However, in order to do that, you will need to open the CBS.log file, to find out which file(s) need to be replaced. Again, the section on accessing SFC processes, will tell you how.
How to View SFC Processes
If you’ve successfully followed the steps on how to run SFC scannow, and would now like to view the CBS.log file, to do that, you will need to copy its contents to a text file, using the Findstr command, and then open that text file, to view its contents. In order to do that, simply follow the instructions below:
1. First, open Command Prompt as an administrator, using the instructions above.
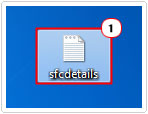
2. From Command Prompt, type findstr /c:”[SR]” %windir%\Logs\CBS\CBS.log >”%userprofile%\Desktop\sfcdetails.txt” and press Enter.

Note: This command will copy the contents of CBS.log to Sfcdetails.txt on your Desktop. Inside this file, you will find information on every time SFC was run, including the files that were not repaired. You will need to verify the date and time, in order to determine which files you need to repair.
3. Double click on Sfcdetails.txt (on your Desktop).

Windows Resource Protection could not perform the requested Service or Start the repair Service
If you have followed all the steps on how to run SFC scannow, but are still unable to it, instead receiving the “Windows Resource Protection could not perform…” error, then you should first, verify that the Windows Module Installer service has not been disabled.
For step-by-step instructions on how to correct the Windows Installer component, check out my post on fixing Installer errors.
Are you looking for a way to repair all the errors on your computer?

If the answer is Yes, then I highly recommend you check out Advanced System Repair Pro.
Which is the leading registry cleaner program online that is able to cure your system from a number of different ailments such as Windows Installer Errors, Runtime Errors, Malicious Software, Spyware, System Freezing, Active Malware, Blue Screen of Death Errors, Rundll Errors, Slow Erratic Computer Performance, ActiveX Errors and much more. Click here to check it out NOW!


Well done, used your info and cleared up the non-stop error checking on my ssd. Thanks
I really appreciate this post. I’ve been looking all over for this! Thank goodness I found it. You have made my day! Thx again