| Attention Before you read this post, I highly recommend you check out my resources page for access to the tools and services I use to not only maintain my system but also fix all my computer errors, by clicking here! |
Did you know that, when you erase files through the Recycle Bin, that it hasn’t really been deleted, that it’s possible for these files to be retrieved? It’s for this very reason knowing how to wipe your hard drive is so important.
Not being familiar with how to wipe your hard drive, shouldn’t deter you from being aware of how the process works. Computer security is ever more important for both individuals and business users, nowadays. That is way; an integral aspect of organisations today involves wiping deleted space several times a day to ensure that the files can never be retrieved again.
The reason behind such security measures is definitely justifiable, especially when you consider the fact that data can be retrieved from a hard drive, even after it has been formatted.
If you want to ensure that the important data on your computer is no longer accessible after you delete it through the Recycle Bin, you will need to know how to wipe your hard drive using a hard disk analysis tool.
Tackling the Risks
For security purposes, you’ll want to wipe all free and slack space on your hard drive.
- When it comes to wiping all the free space on your hard drive, if it’s a drive with a relatively large storage capacity, then a single pass of random data should sufficiently clear the drive.
- For best practice purposes, you should consider wiping the free space on your hard drive on a regular basis. On a sizable hard drive, after running a full free space wipe on the drive, it should be completely cleared, that means, if you had file recovery software and attempted to use it to retrieve a recently deleted file, after the drive had been wiped, it’d scanned the open space in your drive, and report back with nothing.
- However, the drawback of wiping your hard drives is that, when this feature is performed on relatively small drives, it may still be possible for pockets of partial data to be recovered from the drive; though the bulk of the free space should be clear.
- Another drawback of wiping the free space from your hard drive is that it can take a considerable length of time to perform, which is why you may want to consider shredding files, instead of deleting them through your recycle bin.
Why Wipe Your Hard Drive?
Having your identity stolen is a real threat. Especially if you’ve recently sold your computer or had it stolen as someone could very easily recover your personal data from it. This is why it’s very important that you treat your computer like you’d treat your file cabinet, by shredding information you no longer need. However, with all of that said, your real threat is most likely to come through the internet, as the result of hacking.
If you delete something, it makes sense that you’ll want it deleted, permanently, as it makes very little sense for someone to throw something in a bin, only to later take it out. In most cases, when you delete a file, its tagged, and then overwritten by new data, despite that, it’s still possible for the data to be recovered, even if it’s only a partial recovery. There are a lot of disk tools out there that come with erasing features, such as Ccleaner and all-in-one maintenance suites like Auslogics BoostSpeed. When it comes to the various methods that you can use when trying to work out how to wipe your hard drive, these tools make it considerably easier for you to do that.
Before Wiping Your Hard Drive
Once you’ve learnt how to wipe your hard drive and in turn, carried out this process, the possibility of recovering any data from it is virtually impossible for larger hard drives, and generally unlikely with smaller hard drives. Despite that, it’s also important that you don’t destroy any files that you need. With that said, go through my checklist to ensure that the process of wiping your hard drive is a fruitful:
- Consider backing up any important data on your hard drive; this is especially important if you intend on wiping the entire hard drive, so that you can sell it.
- Make sure you have the drivers of all the components on your computer on CD.
- Make sure you have a hard copy of all the passwords and serial numbers for your applications.
How to Wipe Your Hard Drive Using Auslogics BoostSpeed
There are a variety of options that you can explore when trying to work out how to wipe your hard drive, but the easiest way of doing it is through the use of a third party application like Auslogics BoostSpeed’s Disk Wiper. Its interface is very sleek, making it easy for beginners to get to grips with. To use it to wipe your drives free space, simply do the following.
Auslogics Disk Wiper
1. First, download and install Auslogics BoostSpeed, from here:
CLICK HERE TO CHECK OUT AUSLOGICS BOOSTSPEED
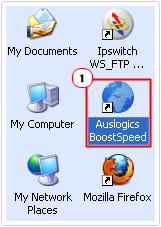
2. Once you’ve installed Auslogics BoostSpeed, double click on its desktop icon to run it.
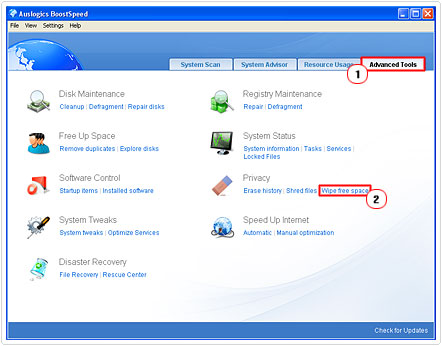
3. Once Auslogics BoostSpeed loads up, click on the Advanced Tab, and then click on Wipe free space, under Privacy.
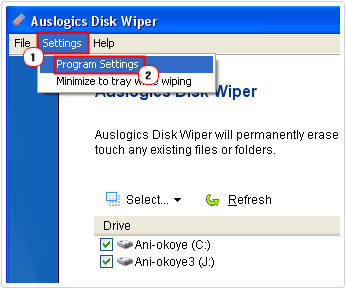
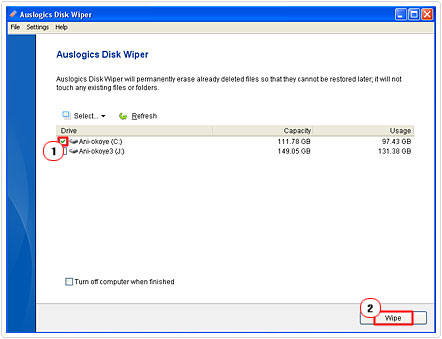
4. This will bring up Auslogics Disk Wiper, from here, click on Settings -> Program Settings.
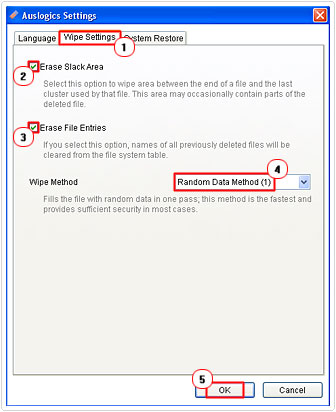
5. A dialog box called Auslogics Settings should appear, click on the Wipe Settings Tab, and ensure that the boxes next to Erase Slack Area and Erase File Entries are checked, for the Wipe Method set it to Random Data Method (1) if you have a large hard drive. If you have small hard drive, generally something less than 100 Gigabytes, then set it to US DoD 5220-22M (3) and click on OK.
6. Lastly, check the boxes next to the hard drives that you would like to wipe, and then click on the Wipe button.
Auslogics Disk Cleaner
Auslogics Disk Cleaner is another useful tool, when looking at how to wipe your hard drive, as it can remove junk files, while wiping the data that it’s removing. Because wiping your hard drive takes a considerable length of time, a viable workaround would be to wipe any data that you remove from the drive. This way, you’ll never have to endure running a full free space wipe. Anyway, to use this tool, simply do the following.
1. First, follow steps 1 – 2 of “Using Auslogics Disk Wiper”.
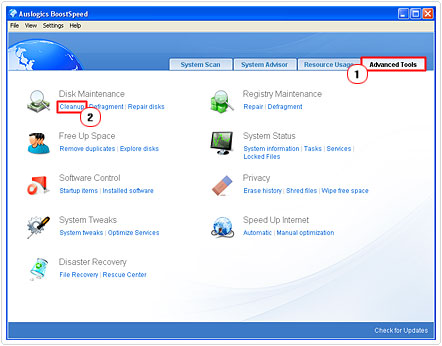
2. Once Auslogics BoostSpeed is up and running, click on the Advanced Tab, then click on Cleanup, under Disk Maintenance.
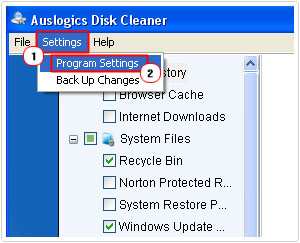
3. This will bring up Auslogics Disk Cleaner, from here, click on Settings -> Program Settings.
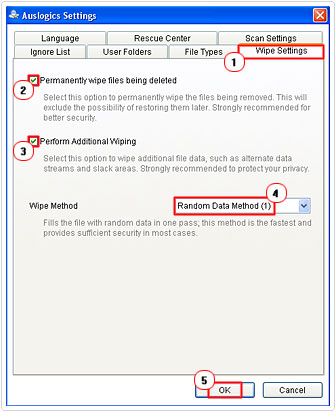
4. An Auslogics Setting dialog box will pop up, from here, click on the Wipe Settings Tab, and then check the box next to permanently wipe files being deleted and Perform Additional Wiping. Then choose the Wipe Method, based on your hard drive (as was written above), then click on OK.
5. Lastly, check the box next to Wipe files being removed, method: then click on Scan Now.
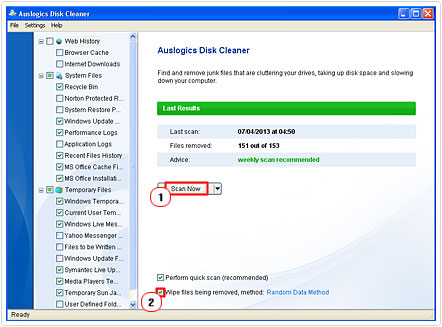
Note: It’s best to leave the predefined settings on the left column, only check/uncheck an option, if you know exactly what you’re doing.
Using Ccleaner
When thinking of how to wipe your hard drive, Ccleaner comes to mind, as a very useful disk maintenance tool that is able to remove junk and clutter from your hard drive. Although not as powerful as Auslogics BoostSpeed, it does come with a feature that enables you to wipe an entire drive, removing all data in the process. However, this method is only practical under circumstances that entail you either selling your computer or selling your hard drive. Anyway, in order to carry out this function, simply do the following.
1. First, download and install Ccleaner, from here:
CLICK HERE TO CHECK OUT CCLEANER
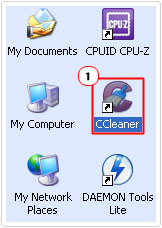
2. Once the program is installed on your computer, double click on its desktop icon to run it.
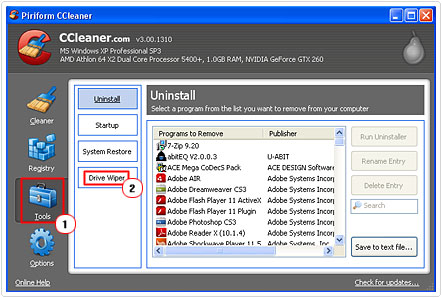
3. This will bring up the Piriform Ccleaner tool, from here, click on the Tools button, then Drive Wiper.
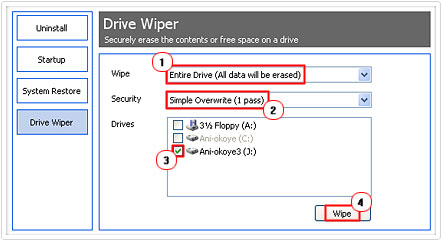
4. This should give you access to Drive Wiper, from here, besides Wipe, select Entire Drive (All data will be erased) from the drop down menu. Besides Security select Simple Overwrite (1 pass), if you have a large (over 100 gig) hard drive, if you have a smaller (less than 100 gig) hard drive select DOD 5220.22-M (3 passes). Besides Drives, check the box next to the drive(s) you would like to wipe, and then click on the Wipe button.
Note: Ccleaner is also capable of carrying out other wiping functions; however, because of the efficiency and effectiveness of Auslogics BoostSpeed, I highly recommend you use that tool for such purposes.
Are you looking for a way to repair all the errors on your computer?

If the answer is Yes, then I highly recommend you check out Advanced System Repair Pro.
Which is the leading registry cleaner program online that is able to cure your system from a number of different ailments such as Windows Installer Errors, Runtime Errors, Malicious Software, Spyware, System Freezing, Active Malware, Blue Screen of Death Errors, Rundll Errors, Slow Erratic Computer Performance, ActiveX Errors and much more. Click here to check it out NOW!


Great article. Thanks for the tips. Do these two programs offer accurate recording after wiping the hard drive? I also have used a program called WipeDrive. It also wipes hard drives but offers accurate recording of each wipe. It’s been great for reselling computers I’ve had before.
Yes, they are both excellent products.
is running multiple drive-wipes a day dangerous to the health of the hard drive?
Not exactly, but your biggest concern would be time, since it takes a considerable length of time to complete one 1 pass.