| Attention Before you read this post, I highly recommend you check out my resources page for access to the tools and services I use to not only maintain my system but also fix all my computer errors, by clicking here! |
If you’re reading this post, then the first thing you’d like to know is exactly what jusched.exe is. Whether or not it’s a dangerous file or whether it should be running on your computer. Well, I intend to answer all of these questions for you, I’ll also explain to you, exactly how to disable this service, replacing it with a more efficient alternative, the Windows Scheduler, which will help your computer conserve a noticeable amount of system resources.
This article is just one of an ongoing series that I have, talking about, and explaining the various processes found in Windows Task Manager. I’ve also written about Distnoted.exe, Dlg.exe, Alg.exe, Unsecapp.exe, Mobsync.exe, and Mcshield.exe, so be sure to check them out, if you aren’t already familiar with them.
What Is Jusched.exe?
Well, the good news is that it isn’t a virus, well, in most cases, anyway. This process is basically the Java Update Scheduler, a process that runs continuously on your computer, using up system resources, while only checking for Java updates once per month.
The main issue with this process is that it’s always running on your computer (if you have Java installed on it), and while it is running, it will use system resources, which can be an issue, depending on the specifications of your computer.
Fortunately, there is an alternative to using this tool, which is the Windows Scheduler, this feature is built into Windows and is designed for tasks such as this. The very nature of jusched.exe, checking for updates just once per month, means its task is noncritical.
While it is very intelligent on your part to ensure all your programs, especially ones as important as Java are kept up to do, to prevent issues such as malicious attacks, programs like Java are updated only a couple of times per year and thus, can be scheduled in a way that is more efficient for your computer, especially if you don’t have a particularly fast computer.
The Java Scheduler can be configured to look for new updates every day, week or month. By default it’s configured on a per month basis, which is why it makes very little sense to have it slowing down your system, wasting resources when it’s not doing anything.
That said you should be able to see this process running in Windows Task Manager, by right clicking on the Taskbar and selecting Start Task Manager. On the Processes Tab, you will be able to find the process and references to the Java Application in the description:
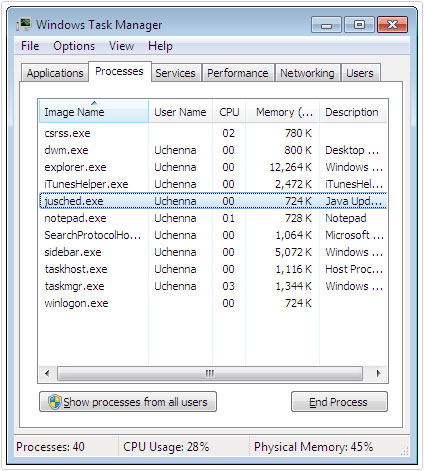
The amount of memory that it uses, tends to be quite small, on average, although there are those circumstances when users report the process using in excess of 4MB, which is quite significant for a process that just sits there and does nothing.
Dangers of Jusched.exe
Given the reality of using our computer systems, it’s not uncommon for computer hackers to create malicious files and give them the file name of legitimate processes on your computer. I’ve written quite extensively on this in the past, on posts such as Quickset.exe.
There is an IRC backdoor Trojan which is known to use the file name jusched.exe to trick the end user into thinking it’s a legitimate process running on their system. So what can you do to determine whether or not the jusched.exe process is a virus?
The first thing you will need to do is determine whether or not the jusched.exe file on your computer is digitally signed and verified by Sun Microsystems, Inc. Using Windows Task Manager, as I’ve already explained above, you should be able to determine this. If the publisher is said to be unknown, that is a strong indication that the file on your computer may be a virus.
The second thing you’ll want to do is verify the location of the file. The software updater for Java can typically be found in the following location:
C:\Program Files\Java\jre1.6.0_01\bin\jucheck.exe
Note: The \jre1.6.0_01\ part will vary depending on the version of Java you have currently installed on your computer.
The malicious equivalent of this file will usually be found in the Windows temp folder (%Temp%) or the Windows system folder (%Windir%). Locations such as the following are strong indications of a malicious file:
C:\Windows\Temp\Jucheck.exe
C:\Windows\Jucheck.exe
C:\Users\AppData\Local\Temp\jucheck.exe
How to Fix It
Well, unless the jusched.exe file on your computer is a malicious file, there really isn’t anything to fix, only something to optimise; your computer.
To follow are a set of instructions that you can use to better optimise your computer for Java updates and also what to do, in the event that you discover your system has been infected.
Run a Malware Scan
If after verifying the file, you find that it is illegitimate, then the next course of action you should take is to run a full antimalware scan of your computer. In order to do this, I recommend you use SpyHunter, and that’s because it is currently the best antimalware tool available, capable of detecting and removing a plethora of malicious files, while optimising system performance and repairing previously damaged Windows components in the process.
You can download this powerful took from the following link:
CLICK HERE TO CHECK OUT SPYHUNTER
 The solution(s) below are for ADVANCED level computer users. If you are a beginner to intermediate computer user, I highly recommend you use the automated tool(s) above! The solution(s) below are for ADVANCED level computer users. If you are a beginner to intermediate computer user, I highly recommend you use the automated tool(s) above! |
How to Remove Jusched.exe
If you have jusched.exe running on your computer, then removing it or rather, disabling it should be your first course of action. To do that, you need only do the following:
1. First, you will need to boot into your computer with full administrative rights.
2. Then press  + R, type Control Panel and click on OK. [Windows XP: Press
  + R, type C:\Program Files\Java\jre6\bin and click on OK].
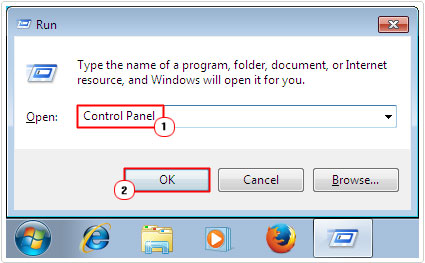
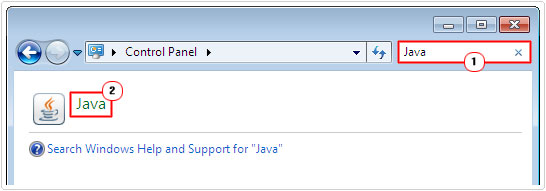
3. Once Control Panel loads up, type Java into the Search Control Panel box and click on Java. [Windows XP: Double click on Javacpl.exe]
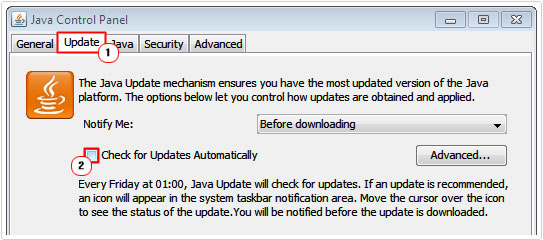
4. When Java Control Panel loads up, click on the Update Tab, then un-tick the box next to Check for Updates Automatically.
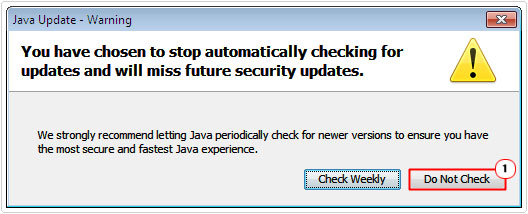
5. A Java Update Warning notification will pop up; simply click on Do Not Check, to bypass it.
6. Then close Java Control Panel and the jusched.exe process should immediately disappear from the Processes Tab in Windows Task Manager.
Using Windows Task Scheduler
Again, routinely checking for Java updates is very important, but it’s a process that should be done more efficiently. This is where Windows Task Scheduler comes into play. This built-in Windows tool will close the Java Update Scheduler process whenever it is not in use, freeing up much needed system resources.
Anyway, in order to schedule the task with this tool, simply do the following:
1. Make sure you have booted into your computer with a user profile that has administrative rights.
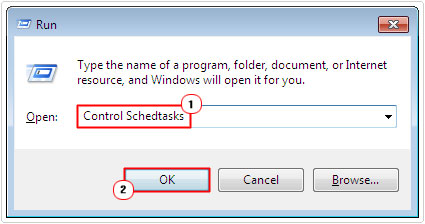
2. Then press  + R, type Control Schedtasks and click on OK.
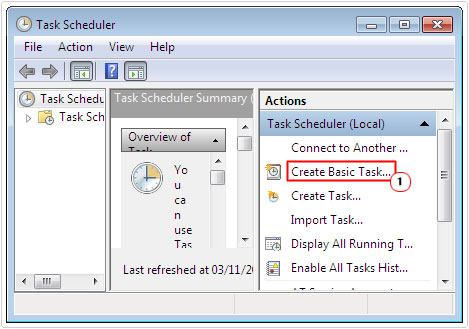
3. Once Task Scheduler loads up, click on Create Basic Task.
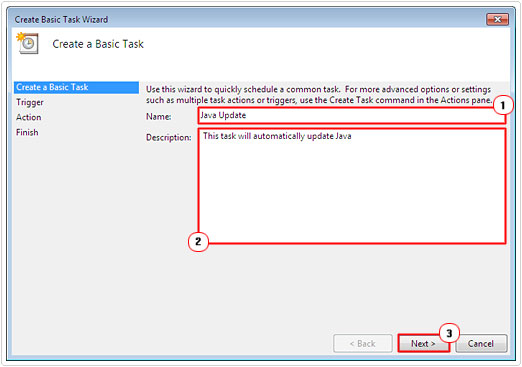
4. This will load up the Create Basic Task Wizard, on the first screen; give the task a Name and Description then click on Next.
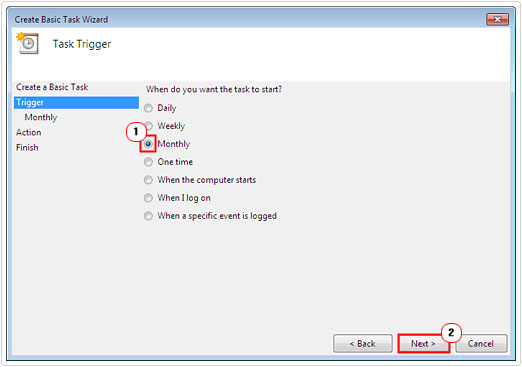
5. The next screen is the Task Trigger, here you should configure the task to run Monthly, and then click on Next.
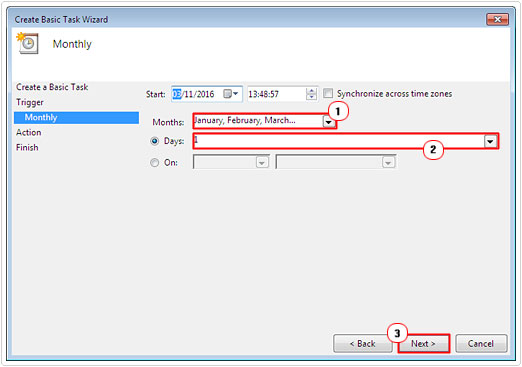
6. You can now specify the Months and Days you would like it to check for Java Updates, once done, click on Next.
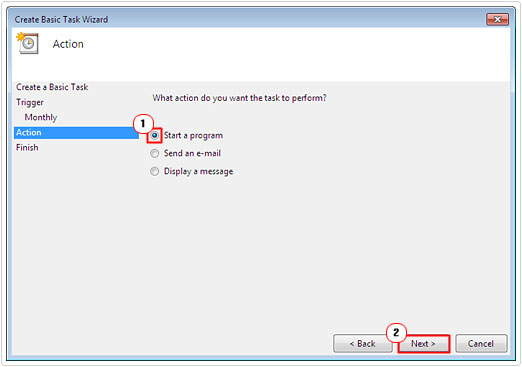
7. The next screen is the Action option; select Start a program and click on Next.
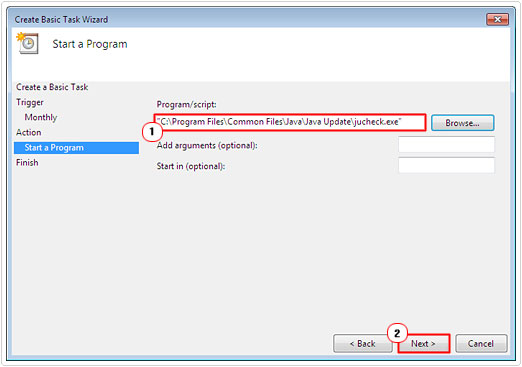
8. The following screen should ask you to specify a location for the Program/script, simply type in or navigate to the following path and click on Next.
C:\Program Files\Common Files\Java\Java Update\jucheck.exe
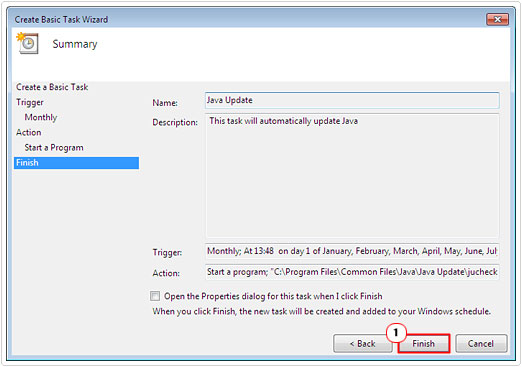
9. This will take you to the finish screen, where you can verify the task you’ve just create. Once you’ve done that, click on Finish.
Are you looking for a way to repair all the errors on your computer?

If the answer is Yes, then I highly recommend you check out Advanced System Repair Pro.
Which is the leading registry cleaner program online that is able to cure your system from a number of different ailments such as Windows Installer Errors, Runtime Errors, Malicious Software, Spyware, System Freezing, Active Malware, Blue Screen of Death Errors, Rundll Errors, Slow Erratic Computer Performance, ActiveX Errors and much more. Click here to check it out NOW!

