| Attention Before you read this post, I highly recommend you check out my resources page for access to the tools and services I use to not only maintain my system but also fix all my computer errors, by clicking here! |
LockApp.exe is an integral Windows component that carry’s the responsibility of overlaying the GUI (Graphical User Interface) during a locked screen, which typically occurs when your system has been idle for a specified length of time. This overlay screen is also visible during the initial log in process.
Whenever you boot up your computer, the Windows operating system will load up a number of tools and services, many of which remain hidden. The various processes determine a number of things on your system, such as, how your Windows session will appear, how your system connects to other devices, the method in which your device connects to your local network, your sign in process, and much more. All of which are integral to the smooth operation of your computer.
Taking a glimpse into the various Windows processes, you’ll find LockApp.exe, which is amongst some of the more unusual of its kind. LockApp.exe is essential for your operating system and usually can be found running in the background of your system (via Task Manager). LockApp.exe main duty is to showcase a background image (usually accompanied with a date and time) when your screen has been locked.
This tutorial forms part of a much larger series delving into the various processes found running on your system, such as dwm.exe, Runtime Broker, rundll32.exe, ctfmon.exe and much more.
LockApp.exe Overview
As previously explained, the LockApp.exe process provides the background image that you see when your system is in a locked state. However, in addition to the background image, there are also several other features that this process provides.
These are the following:
- Date and time (as previously mentioned)
- Notifications
- Network status
- Ability to restart or shutdown Windows
Whenever you boot up your Windows 10 (or 11) system, the first thing you’ll see is a background image, along with the current date and time, as well as any other relevant data, such as your current network status and battery level (if you’re on a laptop). This initial screen (which occurs prior to the sign-in prompt) is the locked screen. Which in hindsight can be likened to a splash screen at best.
The locked screen is only accessible when your system has been left idle for a specified length of time (you can set how long). Alternatively, you can press  + L to lock the screen yourself.
Another thing to note is that the LockApp.exe remains inactive (or suspended) while your system is in an active state.
LockApp.exe File Information
The lockapp.exe can typically be found in the following location (on Windows 10 systems):
C:\Windows\SystemApps\Microsoft.LockApp_cw5n1h2txyewy
The LockApp.exe file can be further examined by right-clicking on it and selecting Properties. File size various, but is usually around the 3 – 4MB range, which makes it relatively small in size.
Is LockApp.exe Safe?
The LockApp.exe files main responsibility is to generate and control your locked screen state. Outside of that, it has no other responsibility. There have been the occasional report of LockApp.exe using an excessive amount of RAM and CPU resources, however, this is uncommon and highly irregular. LockApp.exe is not a resource hungry process.
LockApp.exe will usually lie dormant, once you’ve successfully logged into your system. That aside, LockApp.exe is a genuine system process, and is thus, safe. However, there are instances when malicious files masquerade as this process (by using the same file name). In situations like this, a virus scan should be in order.
Is LockApp.exe Resource Hungry?
LockApp.exe as a system process using minimal amount of resources. If you receive reports of this file running for any real length of time, that is an indication that your system has been in a locked state for some time. The LockApp.exe file will usually suspend itself, once you’ve logged back into your computer.
During a locked screen state, research indicates that the LockApp.exe file typically uses anywhere from 10 – 15MB of memory. CPU usage is also very low, as the system is already in a semi-sleep state. After the end user resumes their Windows session, the lockapp.exe file suspends itself, at which point it uses, virtually no system memory, you can find this information, under the Details Tab in Task Manager.
LockApp.exe is a very efficient yet streamlined Windows process. Thus, if it does appear to be using an excessive amount of system resources, this is oftentimes an indication of one of two things, a virus or a bug.
How to Determine the Legitimacy of LockApp.exe
You’re operating system has many processes running in the background during a single Windows session, and any one of them could be a virus. Many cybercriminals like to disguise their viruses by using the names of legitimate Windows processes. It’s for this reason why you may need to confirm the legitimacy of any one process on your computer.
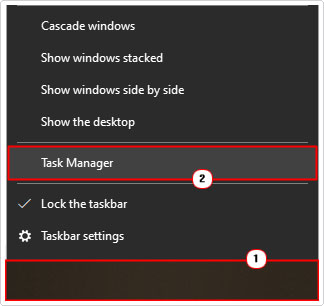
Anyway, the first way you can go about confirming the legitimacy of this file is by opening Task Manager. Simply right-click on the Taskbar and select Task manager.
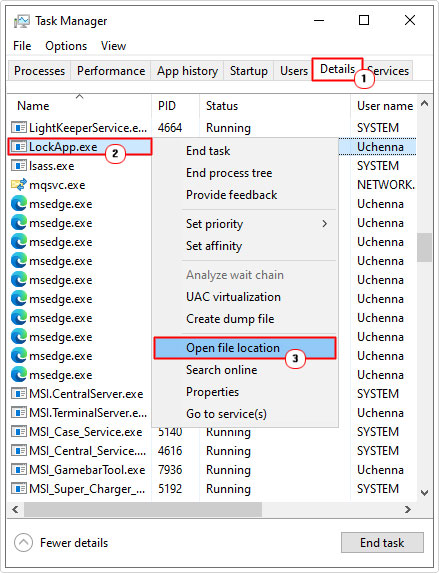
Once Task Manager loads up, click on the Details, then right-click on LockApp.exe and select Open file location.
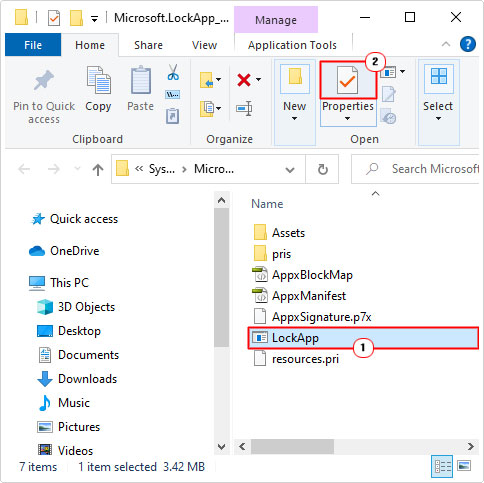
This will load up the Microsoft.LockApp_cw5n1h2txyewy folder, from here, click on LockApp.exe, then select Properties.
On the LockApp.exe Properties applet, click on the Digital Signatures Tab. Now check that the Name of Signer has Microsoft Windows written under it.
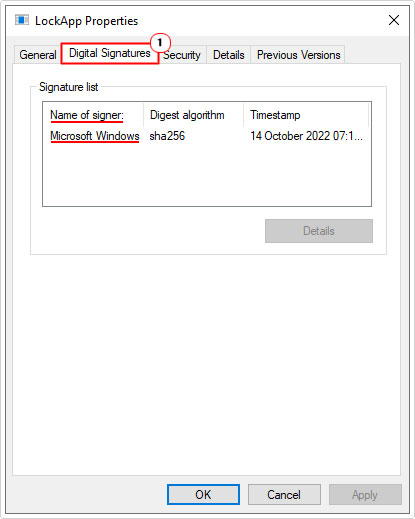
Note: If there’s nothing written under it or if there’s a name other than Microsoft written there, than it’s likely a malicious file.
How to Fix It
LockApp.exe originally is a legitimate Windows process that should be on your computer. However, there are a number of circumstances that surround it. For one, there’s the possibility of it being a virus and in other instances, it has been known to consume an excessive amount of system resources.
In either case, you’d want a viable solution to fix it.
Below you’ll find those solutions.
Run Windows Repair Tool to Fix LockApp.exe Viruses
Continuing on, from the legitimacy check. If it is found that the LockApp.exe file on your system is illegitimate, then you should run a full scan of your system. Using whatever internet security solution you have.
Alternatively, you can try the Windows repair and optimisation suite Advanced System Repair Pro. This tool comes with a wide range of features. Capable of optimising your system as well as identifying and eliminating known virus threats.
You can learn more about this tool from the link below:
CLICK HERE TO CHECK OUT ADVANCED SYSTEM REPAIR PRO
 The solution(s) below are for ADVANCED level computer users. If you are a beginner to intermediate computer user, I highly recommend you use the automated tool(s) above! The solution(s) below are for ADVANCED level computer users. If you are a beginner to intermediate computer user, I highly recommend you use the automated tool(s) above! |
Disable LockApp.exe Using Registry Editor
It’s possible for you to disable the LockApp.exe feature, in the event that you’re having performance issues attributable to it. However, disabling this process will disable the lock screen feature. This means, whenever you boot into your system, it will bypass the usual lock screen, defaulting you to the sign-in prompt.
LockApp.exe is a system process, however, it is not integral to the smooth functionality of your system, and therefore can be disabled without issue.
To disable this feature you will need to access the Windows Registry:
WARNING: The Windows Registry is a sensitive area of your operating system. Thus, the wrong removal or modification of file(s) within this area can result in an inoperable operating system.
1. First, boot into your computer as a full administrator.
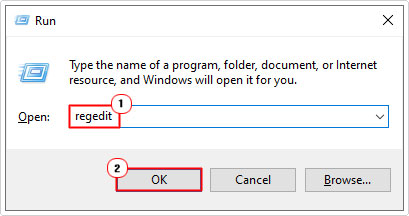
2. Press  + R, type regedit and click on OK.
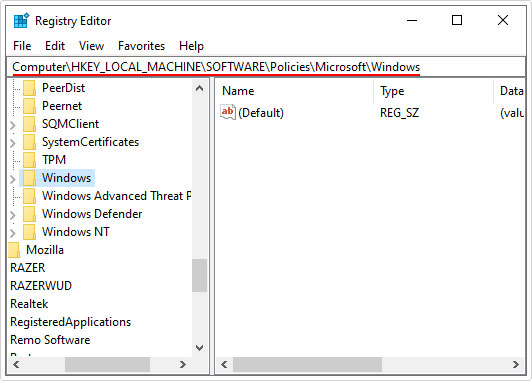
3. When Registry Editor loads up, go to the following path:
HKEY_LOCAL_MACHINE\SOFTWARE\Policies\Microsoft\Windows\Personalization
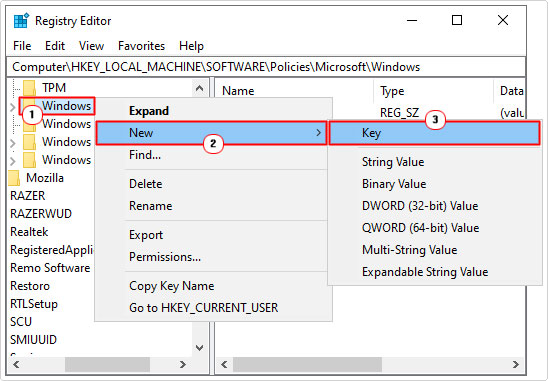
Note: If the Personalization key is not there, you will need to create it. By clicking on Edit -> New -> Key then Rename the New Key #1 to Personalization.
4. Once inside this key, right-click on the right-pane then select New -> DWORD (32-bit) Value.
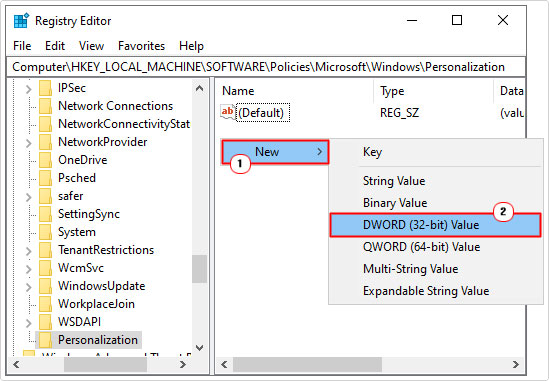
5. Now name it NoLockScreen, then double-click on it.
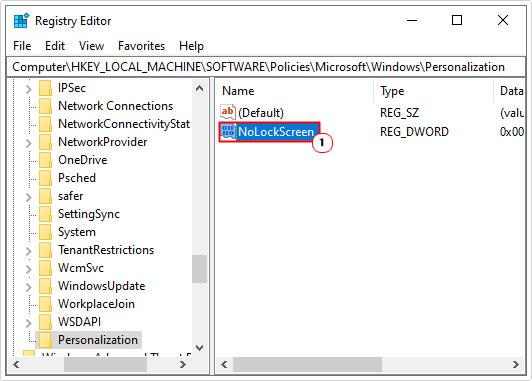
6. This will bring up the Edit DWORD (32-bit) Value, now type 1 into the Value data box, then click on OK.
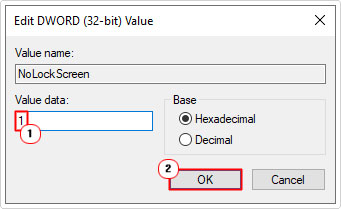
7. Now close the Registry Editor and restart your computer.
Once complete, this will disable the LockApp.exe feature. Removing the lock screen during Windows boot up (as previously explained).
Disable LockApp.exe Using File Explorer
It’s possible to disable the LockApp.exe feature using File Explorer; if that’s your preferred choice.
Anyway, to utilise this method, simply follow the instructions below:
1. First, boot into your system as a full administrator.
2. Then press  + R, type C:\Windows\SystemApps\ and click on OK.
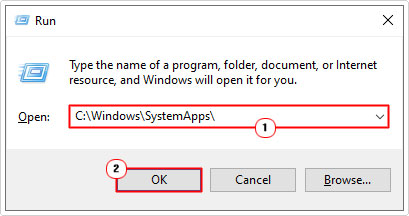
3. This will bring up the SystemsApps folder, now locate the Microsoft.LockApp_cw5n1h2txyewy folder, and then Rename it to Microsoft.LockApp_cw5n1h2txyewy.backup.
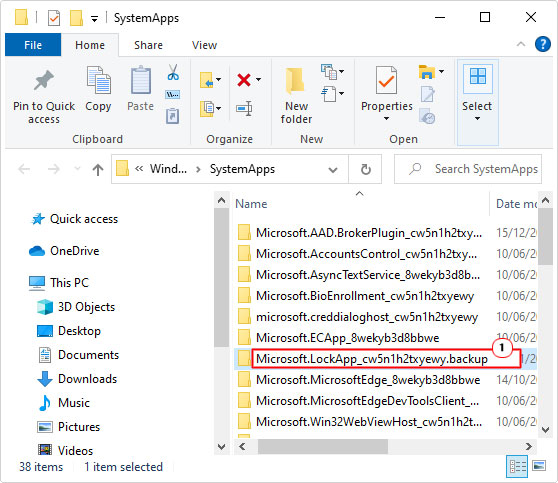
4. Close File Explorer and you’re finished.
Now restart your computer, and the LockApp.exe feature should no longer appear during the initial boot phase.
Are you looking for a way to repair all the errors on your computer?

If the answer is Yes, then I highly recommend you check out Advanced System Repair Pro.
Which is the leading registry cleaner program online that is able to cure your system from a number of different ailments such as Windows Installer Errors, Runtime Errors, Malicious Software, Spyware, System Freezing, Active Malware, Blue Screen of Death Errors, Rundll Errors, Slow Erratic Computer Performance, ActiveX Errors and much more. Click here to check it out NOW!

