| Attention Before you read this post, I highly recommend you check out my resources page for access to the tools and services I use to not only maintain my system but also fix all my computer errors, by clicking here! |
Write Protection is a feature found on external storage devices (such as USB sticks, portable hard drives, etc.) that exists as an additional security measure. Ultimately, its objective is to prevent the user from accidently erasing or altering the data on disk. The media is write protected (ERROR_WRITE_PROTECT) – is an error notification that appears when a user attempts to copy, erase or edit the contents of a feature locked device, such as this.
The error will halt (prevent, block) the user from making any “unauthorised” changes to the device data – in theory.
However, there are instances, when this error will appear, when the feature has not been enabled or doesn’t even exist on the device in question. In situations like that, what do you do? In this tutorial, we’ll dive deeper into this issue, examining its many causes, along with verifiable methods you can use, to fix it.
Error Overview
The “media is write protected” or “ERROR_WRITE_PROTECT” is an error notification that appears when users attempt to edit, copy or write to an external storage drive. Although, 99% of the time, the problematic device will be external, there have been recorded instances of this error occurring on internal hard drives. So, what exactly does this error mean?
As I briefly touched on, Media Write Protection is a feature that you will find on a wide assortment of external storage devices (SD, USB, etc.). Its purpose is to prevent the user from accidently editing or erasing the contents of a disk. In most of these devices, the media write protection feature exists in the form of a switch, which the user can toggle on or off.
When the write protection feature has been enabled, it is then, impossible for the user to make alterations to that disk. However, it is still possible to copy (from) and read the data from the disk in question.
What Causes Media Is Write Protected Errors?
In the vast majority of cases, users will encounter the “media is write protected” error notification when the write protection feature has been enabled on the device.
However, there are instances when the write protection error can appear, as a result of the following potential causes:
- The user attempts to overwrite a file set to read-only.
- The external storage device is physically damaged or corrupted.
- The File system has been corrupted.
- Write protection has been enabled – via the registry.
- A virus has infiltrated and corrupted the data on the external device.
To follow, we will be outlining a number of solutions that you can use, right now, to rid yourself of the “media is write protected” error message. So, continue reading, for those much desired solutions.
How to Fix It
As previously noted, in the majority of cases, the “media is write protected” is an error notification. That will appear when it has been physically enabled on the external device. Thus, as a first possible solution, you may want to ensure it has not been enabled, accidently.
First, you will need to verify that the device actually has the feature. If so, then make sure the switch position is set to off. Oftentimes that’s in the down position.
Once you have switched the feature off, you can now try writing to the disk. However, if that fails to fix the problem or if write protection is not a feature available on the device. Then I suggest you attempt the many sophisticated solutions below:
Use Windows Repair Tool to Fix Media Is Write Protected Error
It’s definitely a common occurrence, for users to encounter issues and errors on their Windows based systems. These problems can range from sluggish system performance is random system crashing (or, write protection errors, in the case of this tutorial). In situations like this, it’s recommended that you give a Windows repair tool a try.
The tool I have in mind is called Advanced System Repair Pro, and it is a multifaceted tool, capable of fixing a wide range of issues, such as malware (and virus) infections, Windows data corruption, and more.
It’s also equally adept at making your system run faster. So if you’re system has started to act-up, performing way below the speeds it once did (at purchase). Then you need to have your system, scanned and fixed by this tool.
Anyway, if any of this interest you, then visit the link below:
CLICK HERE TO CHECK OUT ADVANCED SYSTEM REPAIR PRO
Run a Malware Scan
It’s possible a malicious file infiltrated the storage device, and set the device to write protected, to prevent its deletion. In situations like this, a simple virus scan should be able to track down and quarantine the problematic file(s).
For this reason, I recommend that you run a full scan of your system, using whatever internet security solution you have.
Alternatively, if you do not have a virus scanner, or you’re disillusioned by its effectiveness. Then I suggest you give SpyHunter a try. You can learn more about it, from the link below:
CLICK HERE TO CHECK OUT SPYHUNTER
 The solution(s) below are for ADVANCED level computer users. If you are a beginner to intermediate computer user, I highly recommend you use the automated tool(s) above! The solution(s) below are for ADVANCED level computer users. If you are a beginner to intermediate computer user, I highly recommend you use the automated tool(s) above! |
Remove Read-Only Attribute
The “media is write protected” error oftentimes will occur if the attributes of all (or some) of the files on the external drive have been set to read-only.
Fortunately, it is possible to remove the read-only attribute from the disk. To do that, simply follow the steps below:
1. First, boot into your system as a full administrator.
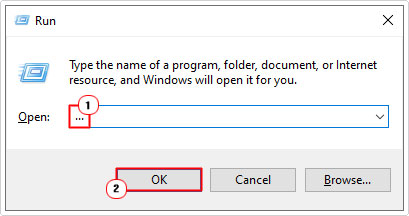
2. Then press  + R, type … and click on OK.

3. When File Explorer loads up, access the External Device, by clicking on it, on the left pane.

4. You should now have access to the External Device, now, click on the problematic file (or folder) and select Properties.

5. This will bring up the File Properties applet, from here (on the General Tab), un-tick the box next to Read-only and click on OK.

Once that has completed, you can try copying, editing or erasing the file(s) in question, to determine whether or not the error has been fixed.
Check Disk for Errors
Another method you can use to potentially fix the “media is write protected” error, is to run a full error scan of your drive. This is a fairly simple process, just do the following:
1. First, ensure you’ve booted into your system as a full admin.
2. Then, in the left pane, click on the External Device and select Properties.

3. This will bring up the Device Properties applet, from here, click on the Tools Tab, then click on Check.

4. An Error Checking applet box will appear. Click on Scan and repair drive, to carry out the scan.

Registry Hack
Sometimes the “media is write protected” error message will appear because the registry value for the external device is incorrect; thus, enabling write protection when it should be off.
As a workaround, you can make alterations to the registry to, possibly fix this issue. To do that, follow the steps below:
WARNING: The Windows registry is a very sensitive area of the operating system. Thus, any wrong modification can render your OS inoperable.
1. First, boot into your system as a full administrator.
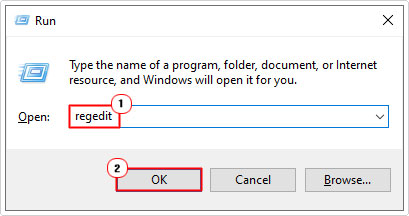
2. Now, Press  + R, type regedit and click on OK.

3. When Registry Editor loads up, navigate to the following location:
HKEY_LOCAL_MACHINE\SYSTEM\CurrentControlSet\Control\StorageDevicePolicies

4. Now, double-click on the WriteProtect DWORD.

5. This will bring up the Edit DWORD (32-bit) Value applet, set the Value data to 0 and click on OK.

6. Now, close Registry Editor and restart your system.
Note: If the StorageDevicePolicies Registry Key does not exist, then you must create it, to do that, follow the steps below:
Create StorageDevicePolicies
For those of you, who do not have the StorageDevicePolicies registry key, don’t fret, you can simply make it yourself. To do that, follow the steps below:
1. First, follow steps 1 – 3 of Registry Hack, but instead, navigate to the following path:
HKEY_LOCAL_MACHINE\SYSTEM\CurrentControlSet\Control\

2. From here, click on Edit -> New -> Key.

3. Name this new Key StorageDevicePolicies.

4. Now, click on it, to access it, and in the right pane, right-click and select New -> DWORD (32-bit) Value.

5. Name the new DWORD WriteProtect.

6. Lastly, follow steps 4 – 6 of Registry Hack.
Use DiskPart to Fix Media Is Write Protected Error
DiskPart is a built-in Windows command line tool that can be used to edit the attributes of a partition or disk.
To use this tool, first ensure the external device is plugged into your USB port, then do the following:
1. Ensure you’ve booted into your system as an admin.
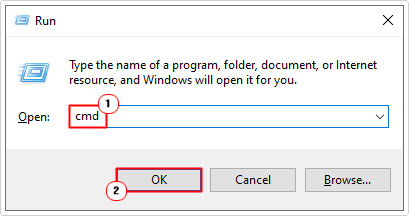
2. Then press  + R, type cmd and press CTRL + Shift + Enter.

3. When Command Prompt loads up, type DiskPart and press Enter.

4. When DiskPart loads up, type list disk and press Enter.

Note: This will give you a list of the available drives connected to your system, along with their drive number.
5. Now, type select disk # and press Enter.

Note: Where # is the number of your listed external device.
6. From your External Disk Drive, type attributes disk clear readonly and press Enter.

Note: DiskPart will confirm the successful removal of the read-only attribute from all files and folders in the drive.

7. Now, close DiskPart and verify whether or not it has fixed the “media is write protected” error.
Are you looking for a way to repair all the errors on your computer?

If the answer is Yes, then I highly recommend you check out Advanced System Repair Pro.
Which is the leading registry cleaner program online that is able to cure your system from a number of different ailments such as Windows Installer Errors, Runtime Errors, Malicious Software, Spyware, System Freezing, Active Malware, Blue Screen of Death Errors, Rundll Errors, Slow Erratic Computer Performance, ActiveX Errors and much more. Click here to check it out NOW!

