| Attention Before you read this post, I highly recommend you check out my resources page for access to the tools and services I use to not only maintain my system but also fix all my computer errors, by clicking here! |
Have you had to contend with your CPU being at 100% utilisation for extended periods of time? It’s not an uncommon scenario for the msmpeng.exe process to unexpectedly consume large portions of available CPU resources.
So what exactly is the msmpeng.exe process and what measures are available to you, to rectify the various associated issues. Well, there are several things that you can do, all of which I intend to discuss in this article.
What Is Msmpeng.exe?
Msmpeng.exe is an integral component of the Windows Defender and Microsoft Security Essentials applications. The purpose of this process is to provide real-time scanning, scanning files as and when they are copied to your computer and notifying the user when it detects a suspicious file. This process is also designed to detect and remove spyware, adware, worms and Trojan horse viruses.
To summary things, the msmpeng.exe process is what provides the Windows Defender and Microsoft Security Essentials applications with all its scanning capabilities, making it not only integral to the application itself, but also to your computer.
The msmpeng.exe file is typically found in the following directory:
C:\Program Files\
This process is usually around 14,100 bytes in size, occupying a minimal amount of your hard drive space. Msmpeng.exe is also a digitally signed file, which means it has been verified and tested to work correctly in Microsoft Windows. The associated programs to this file can typically be found in Add or Remove Programs.
Why Is Msmpeng.exe Consuming All My CPU Resources?
If you’re reading this article, then it’s fair to assume that the msmpeng.exe process on your computer is consuming a considerable amount of your CPU resources. So, why exactly is it doing that? Well there are a number of scenarios that are known to cause this particular issue. The most common of which are as follows:
- The Windows Security Essentials or Windows Defender application is conflicting with Windows Live Essentials.
- Your hard disc drive has developed bad sectors.
- The associated Microsoft security tool(s) are conflicting with a third-party internet security suite.
- Windows Security Essentials or Windows Defender is constantly attempting to scan its own installation files, resulting in high CPU utilisation.
- The msmpeng.exe file has been damaged or corrupted by another application.
As is the case with most third-party applications, it is possible for you to take the more drastic step of removing the application altogether. Whether or not you choose this option, depends greatly on how important the application is to your system.
How to Fix It
My personal belief is that Microsoft Security Essentials and Windows Defenders are fairly competent internet security outfits. However, as is the case with many applications, issues can and do arise.
Many users have encountered this very same problem in the past, utilising various methods to rectify this issue. Fortunately, this means there are many different solutions that you can choose to tackle this CPU usage issue. For example, some users have found that the cause of the error on their system was due to a virus infection, whereas others found the problem to be caused by a software conflict.
That said, if you’re faced with high CPU usage issues, then I highly recommend you attempt the following methods below:
Use an Alternative Scanner
Fixing errors associated with this tool can be difficult and thus, you may be forced to disable it, in the event that you are the only viable alternative would be to install a new antimalware tool on your computer. Again, if you would like your computer to be protected from malware threats, and Trojan horses, then I would recommend you used SpyHunter, but there are several solutions that you can try. For more information on SpyHunter I recommend you visit the following link:
CLICK HERE TO CHECK OUT SPYHUNTER
 The solution(s) below are for ADVANCED level computer users. If you are a beginner to intermediate computer user, I highly recommend you use the automated tool(s) above! The solution(s) below are for ADVANCED level computer users. If you are a beginner to intermediate computer user, I highly recommend you use the automated tool(s) above! |
Check Your Antivirus Program
Although Microsoft recommends you have more than one antivirus program running on your computer at all times, it’s not uncommon for such programs to conflict with one another. In this particular situation it’s quite common for Windows Defender to conflict with third-party internet security suites; this is why Windows Defender is usually disabled whenever such programs are installed.
As a result, it’s recommended that you considering uninstalling your third-party scanner as a viable solution to this high CPU usage issue.
Exclude Directory from Scanning
Another common reason why this high CPU usage issue occurs is because of the Windows Defender tool attempting to scan its own installation files. A fairly unusual, but quite common occurrence that can be solved by doing the following:
1. First, boot into your system with a user profile that has administrative rights.
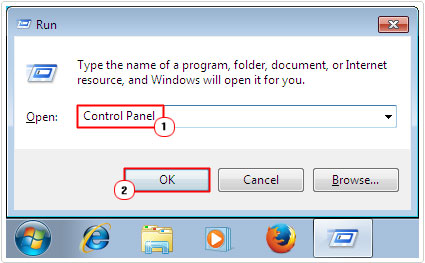
2. Then press  + R, type Control Panel and click on OK.
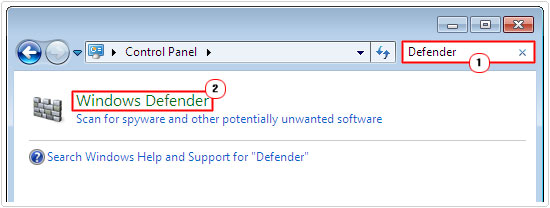
3. Once Control Panel loads up, type Defender into the Search Control Panel box, then click on Windows Defender.
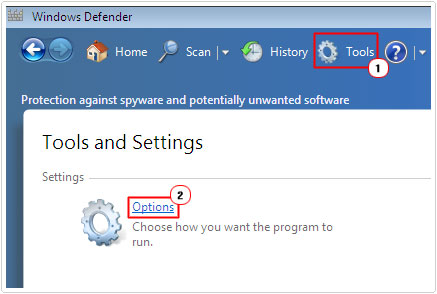
4. Once Windows Defender loads up, click on Tools then Options.
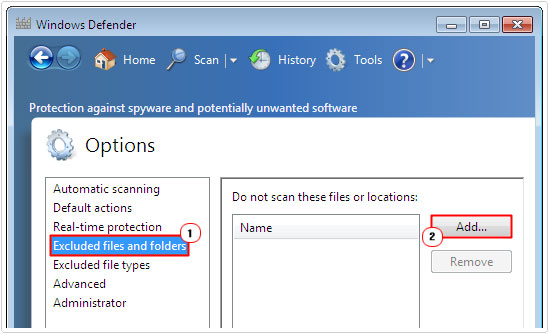
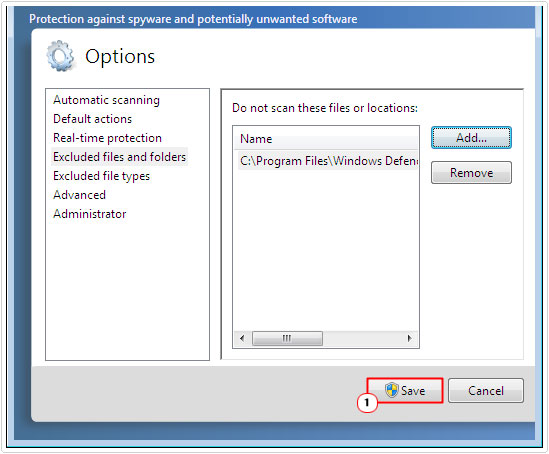
5. This will take you to the Options menu, from here, click on Excluded files and folders, then click on Add.
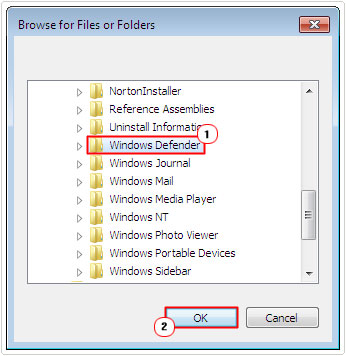
6. A Browse for Files and Folders applet will pop up, simply navigate to the following path C:\Program Files\Windows Defender and click on OK.
7. Lastly, click on Save.
Turn Off Windows Defender
If you’re still having problems with the msmpeng.exe process, you may want to consider switching off Windows Defender. Although it’s a good internet security program there are many other internet security programs out there that are significantly better.
SpyHunter is one alternative that I’ve already recommend, as it’s also capable of removing viruses, worms, Trojan horses, adware and spyware, and also has the capabilities of repairing damaged Windows components. Anyway, if you haven’t already, I recommend you download it from the following link:
CLICK HERE TO CHECK OUT SPYHUNTER
That said you can turn off Windows Defender by doing the following:
1. First, load up Windows Defender following steps 1 – 2 of Exclude Directory from Scanning.
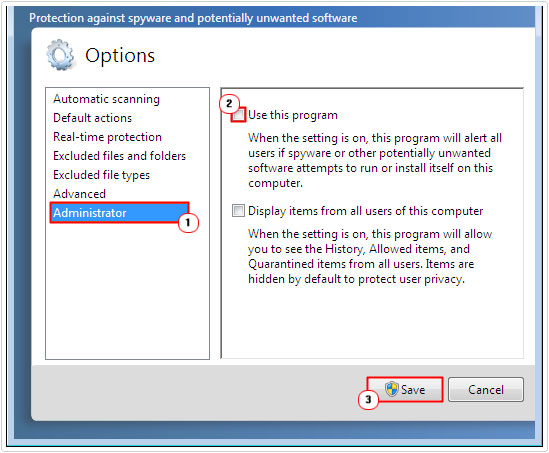
2. On the Options menu click on Administrator, then un-tick the box next to Use this Program and click on Save.
Alternatively you could disable Windows Defender by doing the following:
1. First, boot into your computer with full administrative rights.
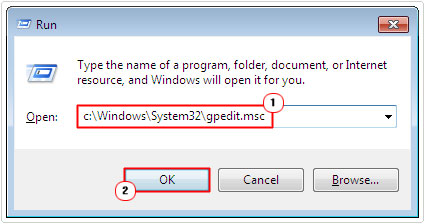
2. Then press  + R, type C:\Windows\System32\gpedit.msc and click on OK.
3. Once the Local Group Policy Editor loads up, navigate to the following path:
Computer Configuration/Administrative Templates/Windows Components/
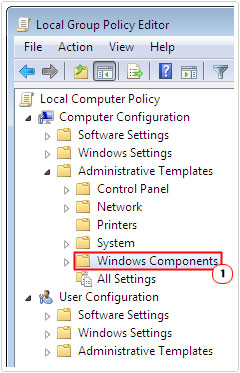
4. Then double click on Windows Defender in the right pane.
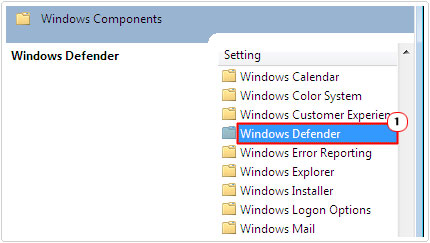
5. Then double click on Turn off Windows Defender.
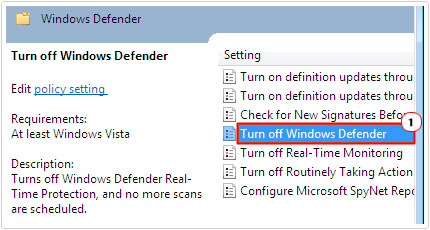
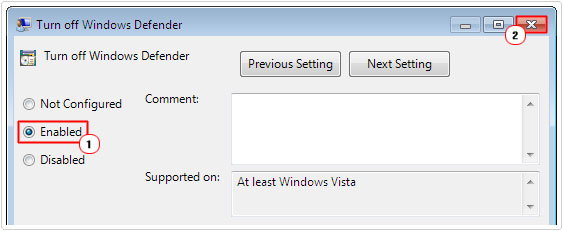
6. On the following Turn off Windows Defender applet, click on Enable, then close the applet.
Are you looking for a way to repair all the errors on your computer?

If the answer is Yes, then I highly recommend you check out Advanced System Repair Pro.
Which is the leading registry cleaner program online that is able to cure your system from a number of different ailments such as Windows Installer Errors, Runtime Errors, Malicious Software, Spyware, System Freezing, Active Malware, Blue Screen of Death Errors, Rundll Errors, Slow Erratic Computer Performance, ActiveX Errors and much more. Click here to check it out NOW!

