| Attention Before you read this post, I highly recommend you check out my resources page for access to the tools and services I use to not only maintain my system but also fix all my computer errors, by clicking here! |
Is it fair for me to assume you’ve recently encountered an nvlddmkm.sys failed error on your Windows 10/11 system? This can and does occur for a multitude of reasons. Maybe your NVIDIA drivers are corrupt. In which case, a reinstallation may be in order. Either way, whatever the cause, I’m sure to cover it in this tutorial.
The nvlddmkm.sys file belongs to the NVIDIA driver set. Its primary function or responsibility is to manage communication between the graphics card and your Windows operating system. It is therefore, an essential component of your graphics card device. Symptoms associated with nvlddmkm.sys failed errors, include, random crashing and general system instability.
An nvlddmkm.sys failed error is a BSOD or Blue Screen of Death error. And as a BSOD error, it can occur at any time, usually during the most unexpected instances – such as, when playing a game or using an app that’s GPU intensive. In other situations it may occur while shutting down or booting up your system.
Either way, the situation is the same – a system crash, followed by the typically BSOD screen referencing the nvlddmkm.sys file along with a stop code such as: VIDEO_TDR_FAILURE.
VIDEO_TDR_FAILURE Overview
The TDR in VIDEO_TDR_FAILURE stands for Timeout, Detection and Recovery. Essentially, it resets your GPU after it has become unresponsive for an extended period of time. However, if these instances occur too frequently, then it will result in the BSOD error screen.
What Causes Nvlddmkm.sys Failed Errors?
Nvlddmkm.sys errors refer to issues with your graphics card (specifically NVIDIA cards). This could be a driver issue or a physical fault with the component itself.
Nvlddmkm.sys is a fairly common issue that occurs on a great many systems, for so many different reasons. Below you will find a rundown of the most common reasons why you may be experiencing this problem:
- Graphics card drivers are incompatible, corrupt or outdated: If you haven’t updated your drivers in a considerable length of time, it can lead to errors such as this.
- Faulty (RAM) Memory Modules: It’s possible you installed your memory modules incorrectly, or they could be damaged. A RAM test will determine whether or not that is the case.
- Graphics card is overheating: Your graphics card runs at exceedingly high temperatures. Thus, if it isn’t being adequately cooled, at all times, it can overheat. Alternatively, the overheating could be due to an unstable overclock.
- Hardware problem: It’s possible a culprit hardware component is faulty or damaged – such as your power supply unit (PSU), graphics card or motherboard.
Of all the possible causes, those outlined above are the most likely reason(s) you’re experiencing issues with the nvlddmkm.sys file.
Now, with that out of the way, let’s take a look at possible solutions.
How to Fix It
Now we have a firm understanding of the types of things that can cause an nvlddmkm.sys failed error, this should put us in a better position when attempting to fix it.
So, the first thing you’ll want to do is restart your computer. If the nvlddmkm.sys error notification occurs during a random system boot up, your first solution should be to restart the computer. It’s possible, the cause was only minor in nature.
Just hold down the power button on your system for several seconds, until the system powers down completely. Then switch it back on.
However, if the circumstances in which you’ve encountered this error are more, severe, then I suggest you attempt the many solutions listed below.
Update Graphics Card Drivers
If you haven’t updated your graphics card drivers for a considerable length of time, then it can lead to a multitude of problems (nvlddmkm.sys errors being just one of them).
Ransom crashing and general instability are just some of the many symptoms you can and may experience.
Fortunately you can overcome this problem. Simply by updating your drivers. To do that visit the NVIDIA website and download the drivers off there.
Alternatively, you can use a driver automation tool like DriverFinder, which will do all the heavy lifting for you.
For more information on this tool, please visit the link below:
CLICK HERE TO CHECK OUT DRIVERFINDER
Run Windows Repair Tool to Fix nvlddmkm.sys Failed Error
Another recommend solution to the nvlddmkm.sys failed error is the use of a PC repair and maintenance tool like Advanced System Repair Pro.
This tool when run, will scan, detect and fix a number of issues that could be adversely affecting your drivers – essentially, culprits for the nvlddmkm.sys error.
It will also optimise your system performance, remove malicious files as well as a whole host of other things.
If that’s something that peaks your interest, then visit the link below:
CLICK HERE TO CHECK OUT ADVANCED SYSTEM REPAIR PRO
 The solution(s) below are for ADVANCED level computer users. If you are a beginner to intermediate computer user, I highly recommend you use the automated tool(s) above! The solution(s) below are for ADVANCED level computer users. If you are a beginner to intermediate computer user, I highly recommend you use the automated tool(s) above! |
Run RAM Test
One possible cause of the nvlddmkm.sys failed error are faulty RAM modules. Thus, to determine whether or not your memory modules are at fault, you will need to run the Memory Diagnostic Tool.
A built-in Windows tool, which you can access by doing the following:
1. Ensure you’ve booted into your system with full administrative rights.
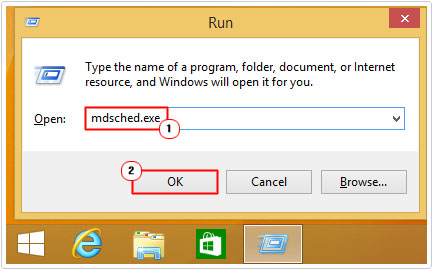
2. Now, press  + R, type mdsched.exe and click on OK.

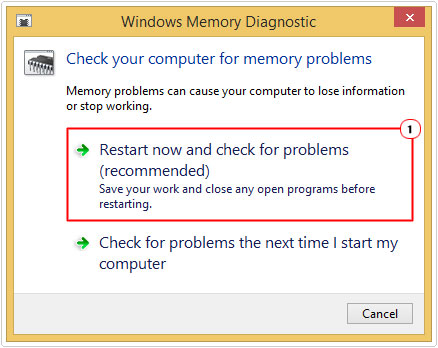
3. This will bring up the Windows Memory Diagnostic applet, from here, click on Restart now and check for problems.

Your system will reboot and run the test. If it determines that your memory modules are faulty, then you will need to purchase new ones.
Consult your motherboard manual for compatible RAM modules.
Uninstall Conflicting App
If you installed one of those graphics tweaking tools right before you started experiencing nvlddmkm.sys failed errors, it’s possible that, that’s the culprit.
As a solution, consider removing it, using its InstallShield. For instructions on how to do that, check out my post on fixing Windows Update Error 0x80d02002.
Remove GPU Overclock
All the various components that make up your system come with their own Thermal Design Power (TDP), power consumption rating. Thus, when you overclock a component in your system, no matter what it is, you need to ensure you have sufficient PSU power to compensate.
If your PSU falls short of the overall power demands, brought about by your overclock, then it can result in a failure to boot up or system instability.
Additionally, you also want to consider cooling. Adding more power than recommended to a component, will result in that component emitting more heat than its standard cooling system can manage. So you may need to consider additional cooling for that device.
Either way, it’s possible the nvlddmkm.sys failed error is the result of an unstable overclock. In which case, you will need to remove the overclock to verify.
Of course, this solution is only applicable to those that have actually overclocked their systems. But the process of removing an overclock is determined by how the overclock was established in the first place. Whether through the BIOS or Software.
Update Windows
Sometimes, a severally outdated Windows system can trigger BSOD errors (like nvlddmkm.sys), if you haven’t updated your system in a really long while, then it is possible its grown incompatible with the app you’re attempting to run or with the graphics card drivers you recently installed (possibly).
Either way, you can update your system by doing the following:
1. Boot into your system with full administrative privileges.
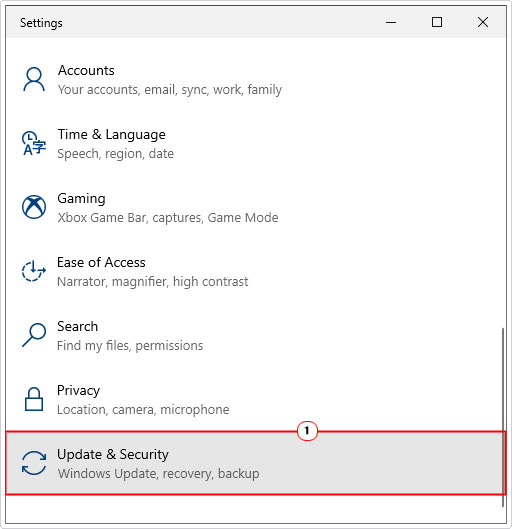
2. Next, press  + I, then click on Update & Security.

3. When Update & Security loads up, click on Windows Update.

4. This will bring up the Windows Update page, from here, click on Check for updates.

Fix Corrupted System Files
If the nvlddmkm.sys failed error continues to persist, even after attempting all the solutions above, it’s possible the root cause is OS corruption.
It is possible one or more integral system files was corrupted by an abrupt shutdown, power surge or malicious (virus) file.
Either way, you can restore the integrity of your operating system by running two relatively effective tools. They are System File Checker and DISM.
For step-by-step instructions on how to run these tools, check out my post on fixing AMDRSServ.exe system errors.
Are you looking for a way to repair all the errors on your computer?

If the answer is Yes, then I highly recommend you check out Advanced System Repair Pro.
Which is the leading registry cleaner program online that is able to cure your system from a number of different ailments such as Windows Installer Errors, Runtime Errors, Malicious Software, Spyware, System Freezing, Active Malware, Blue Screen of Death Errors, Rundll Errors, Slow Erratic Computer Performance, ActiveX Errors and much more. Click here to check it out NOW!

