| Attention Before you read this post, I highly recommend you check out my resources page for access to the tools and services I use to not only maintain my system but also fix all my computer errors, by clicking here! |
If you’re like most people, you probably install your printer(s) on your computer whenever you need to print something. However, the downside to this is that, over time you end up having many different printer installs on your computer, many of which are redundant, as you have no use for them. This is when knowing how to properly remove a printer driver comes most in handy, as the process isn’t as simple as you think.
It’s not uncommon for computer users to encounter problems, when attempting to remove all the various printer drivers they have on their computers. If you’re someone that puts off removing old drivers from your computer, after you are done with them, then you’ve come to the right place. In the case of the printer, problems, such as, the inability to print, may and does often times occur. The result of having multiple conflicting print spoolers on the same system. So there is an active downside to this situation.
In this tutorial, I will show you how to remove a printer driver the proper way, utilising all the various methods available to you. It’s not necessary that you attempt them, all, but if you want to be thorough, then it’s probably your best option.
Remove a Printer Driver by Uninstalling Old Software
When you want to remove a printer driver, the very first thing that you must do, is remove all the associated software that comes with it. To do that, simply follow the instructions below:
1. First, boot into your computer with your administrative user account.
2. Then press  + R, type Appwiz.cpl and click on OK.
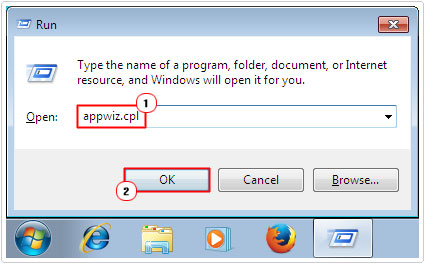
3. When Uninstall a program loads up, click on the Printer Software, then click on the Uninstall button.
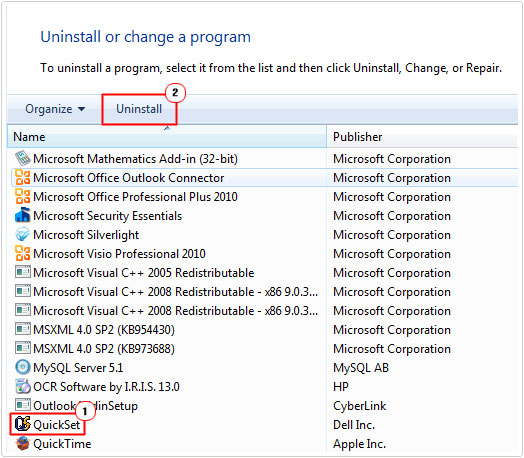
4. Once it has finished removing the software from your computer, you will be requested to restart the system, please do that.
Remove Unused Printer
Once you have removed the printer software from your computer, the next step is for you to remove the printer from your Devices and Printers section of the operating system.
Simply follow the instructions below:
1. Boot back into your computer with your administrative account.
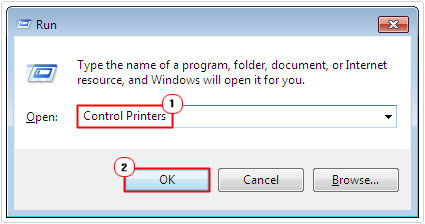
2. Then press  + R, type Control Printers and click on OK.
3. Once Devices and Printers loads up, right click on the Printer and select Remove Device.
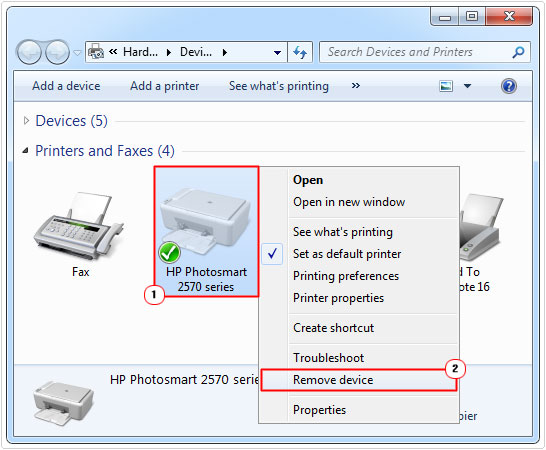
4. Once you have removed the Printer, you’ll want to click on Microsoft XPS Document Writer and then click on the Print Server Properties button.
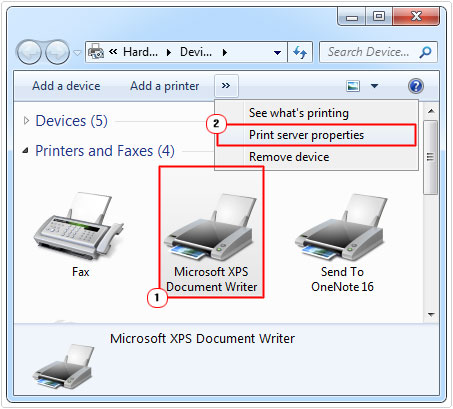
Note: You can access the Print Server Properties by clicking on ANY available Print device.
5. Once the Print Server Properties applet loads up, click on the Drivers Tab, then click on your Printer Driver, and click on Remove.
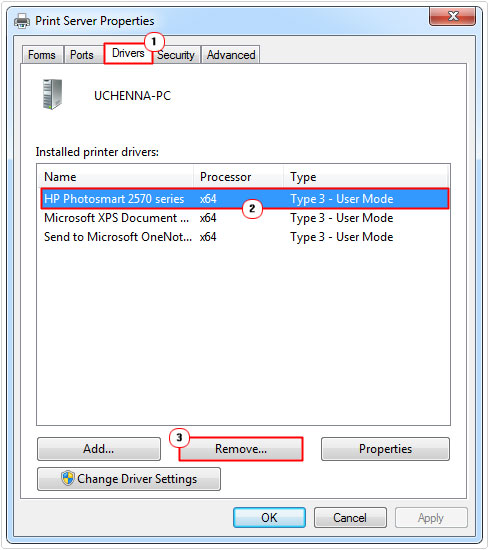
6. Once it finishes removing your printer drivers, restart your computer.
Note: If you encounter any print spooler errors, I recommend you check out my post, on how to rectify it.
Print Management
As someone who likes to ensure my computer is always in tip-top condition, I like to regularly clean out the junk, in my computer. So, for the next process on how to remove a printer driver, involves using the Print Management tool, which is designed to do just that.
The process is relatively simple, just follow the instructions below:
1. First, make sure you’re booted into your computer, with administrative rights.
2. Then press  + R, type Printmanagement.msc and click on OK.
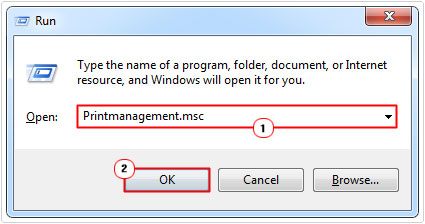
3. This will bring up Print Management, what you’ll want to do, is click on Print Servers, then your Computer name, then Drivers.
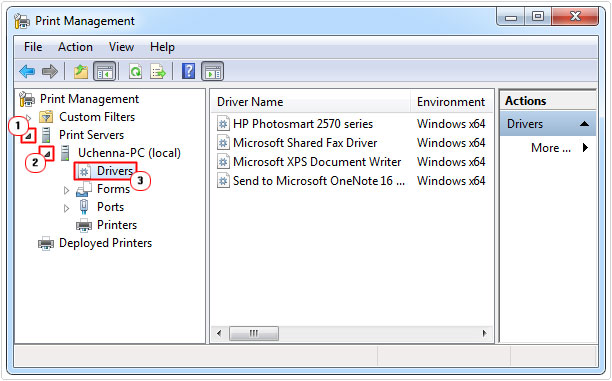
4. This will take you to a list of all the Printer Drivers installed on your computer. Simply, click on your Printer, then click on Delete.
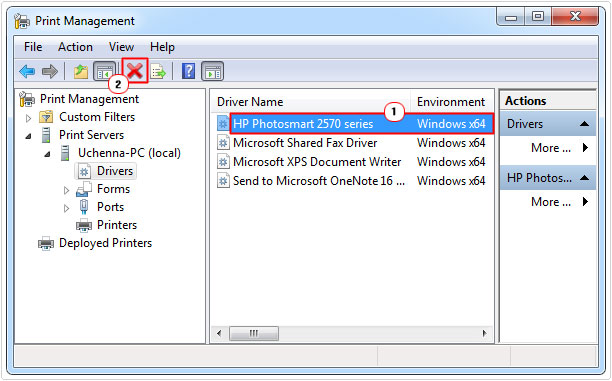
Because this is a tutorial about how to remove a printer driver, it is possible for you to keep the printer while simply removing the driver(s). To do that, just do the following:
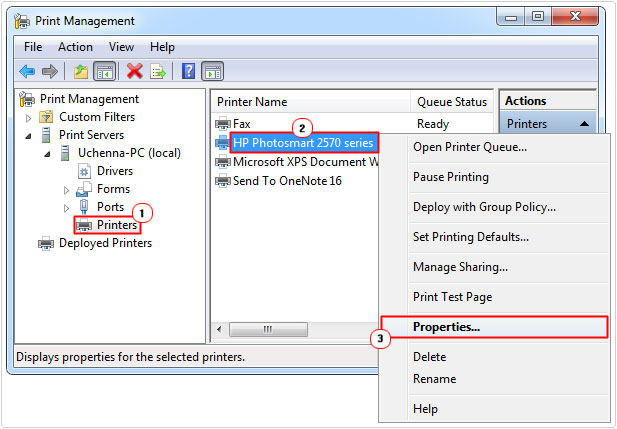
5. To just remove the Drivers, simply click on Printers, in the Left Window Pane, then right click on your Printer and select Properties.
6. When the Printer Properties applet appears, click Advanced, then under Driver, select a different driver and click on OK.
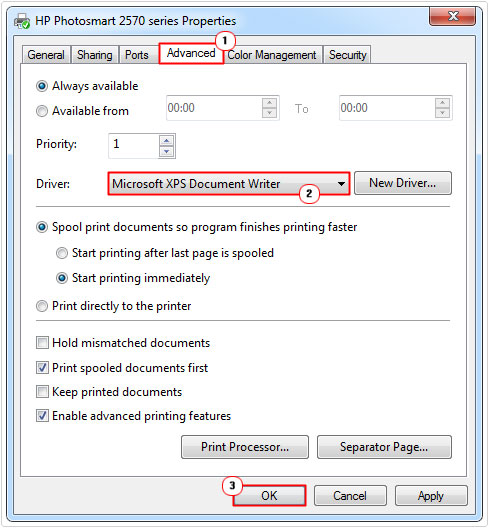
Note: It doesn’t matter what driver you set, just as long as it isn’t the printer’s drivers.
7. Now go back to Drivers, on the Left Window Pane, and right click on your Printer Drivers and select Delete.
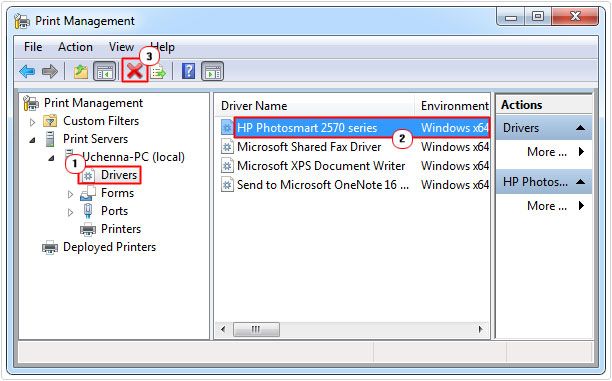
Note: If done correctly, it should delete without problem, otherwise an error message may appear, stating that the drivers are in use. To rectify this problem, just ensure that you’re NOT using the printer drivers on the printer that you would like to use – as previously mentioned.
Remove Drivers from Registry
The registry is an integral component of the operating system, as it contains information that is used to determine how everything, like connected devices and applications, should be configured.
When looking at how to remove a printer driver, the registry is one area that cannot be overlooked. The registry houses information that describes the location of the printer drivers, its date, version, manufacturer and other crucial information. In most cases, you would not be required to directly remove the drivers from the registry, and in the event that you were, you’d likely be instructed to use a professional registry cleaner tool like Advanced System Repair Pro, as it would alleviate all the confusion and potential risk.
I’m going to put it out there, as a recommended alternative:
CLICK HERE TO CHECK OUT ADVANCED SYSTEM REPAIR PRO
However, for this tutorial, I’m also going to show you how to do it manually. How to enter the registry and remove a printer driver.
WARNING: This is very dangerous, as deleting the wrong entry within the registry can render your system inoperable.
1. First, boot into your computer with administrative rights.
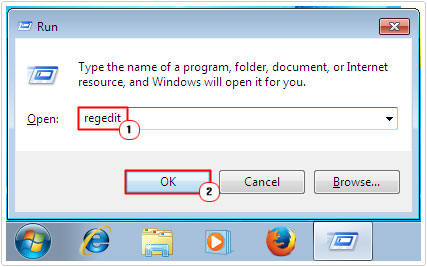
2. Then press  + R, type regedit and click OK.
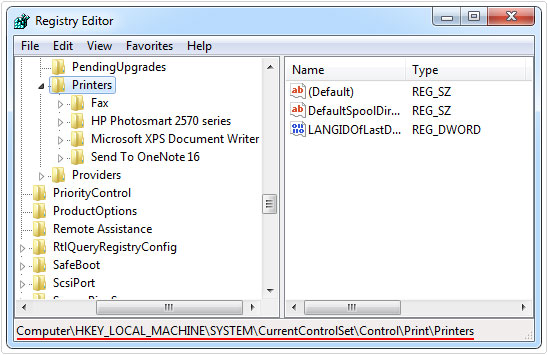
3. When Registry Editor loads up, navigate to the following path:
HKEY_LOCAL_MACHINE\SYSTEM\CurrentControlSet\Control\Print\Printers\
4. On the Left-Pane, right click on your Printer, then select Delete.
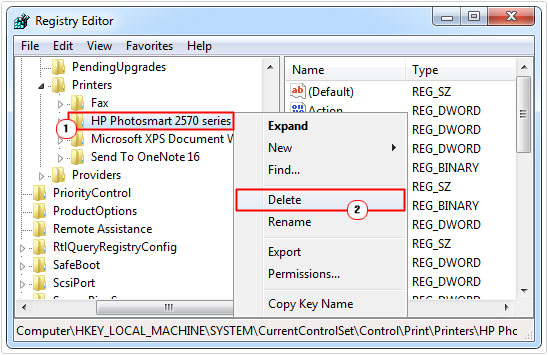
5. Once it has been removed, simply restart your computer, and you’re done.
Are you looking for a way to repair all the errors on your computer?

If the answer is Yes, then I highly recommend you check out Advanced System Repair Pro.
Which is the leading registry cleaner program online that is able to cure your system from a number of different ailments such as Windows Installer Errors, Runtime Errors, Malicious Software, Spyware, System Freezing, Active Malware, Blue Screen of Death Errors, Rundll Errors, Slow Erratic Computer Performance, ActiveX Errors and much more. Click here to check it out NOW!

