| Attention Before you read this post, I highly recommend you check out my resources page for access to the tools and services I use to not only maintain my system but also fix all my computer errors, by clicking here! |
Bad sectors are basically data clusters on the platter of your hard drive that cannot be read or written to. There are a variety of reasons why this may occur, but from the perspective of your operating system, the only thing it acknowledges is its inability to read or write data to that segment of the disk. The most alarming thing about bad sectors is that they have the ability to cause your hard drive to fail if little is done to stifle them. Bad sectors occur through normal computer use and so they are fairly common, however, there are a number of things that you can do to either prevent, flag or repair bad sectors.
Despite the negatives attributed to bad sectors, if you have a hard drive that hasn’t been used yet, or has been reformatted, then bad sectors shouldn’t be an issue for you. This is because operating systems during formatting create a map of all the sectors on a hard drive, and then flag the ones that come back bad, this way, data is never written to those sectors on the disk and you’ll never find yourself in a situation when you have to repair bad sectors.
Another thing that you may be unaware of is that all modern hard drives come with additional sectors, which may be used as a replacement for space lost due to bad sectors. This enables a drive to automatically compensate for any manufacture-related defects which would typically occur the moment you installed the drive in your computer. Continue reading for additional information on what a sector is, and what you can do to protect your system.
What Is A Sector?
A sector can be summed up as a unit of data that is stored on your hard drive. Data is stored onto your hard drive in small sectors of 512 bytes in a sequential fashion; this makes it easier for the data to be accessed.
You may need to repair bad sectors for a variety of reasons, with the most common being the following:
- System wasn’t shutdown properly.
- Computer has contracted a virus/malware.
- The hard drive has become defective, due to overheating, general wear and tear, or the build of dust particles within the system case.
- Other aging hardware on your computer has become defective, adversely affecting your hard drive.
Soft and Hard Bad Sectors
All bad sectors are not created equally, as there are two different types that your hard drive could/may inherent, these are hard and soft bad sectors.
Hard Bad Sectors are the result of physical damage to the platter of the hard drive which could be the result of a head crash. If, while your computer is accessing data from the hard drive, it’s bumped, or if it develops a mechanical fault (possibly due to overheating), then this may result in a hard bad sector. Once you’re hard drive has contracted a hard bad sector, it cannot be repaired, however, it can be flagged, so that data is no longer written to that segment of the drive.
Soft Bad Sectors are the result of a mismatch between the data reported to be in a sector and the actual data within the sector. Soft bad sectors occur as the formatting of your hard drive begins to wear out, these errors are logical in nature, which means they are not the result of physical degradation to the device. The good thing is that these types of bad sectors are easily repaired.
Methods to Repair Bad Sectors
When it comes to methods available to repair bad sectors on your hard drive, you have three options that you can choose from. They are as follows.
Error Checking is a process that entails scanning all the files and folders on your drive for inconsistencies and corruption. This may include files that have long been erased from the hard drive, but references to them still exist within the file system. Error checking is capable of clearing up most basic data issues, which might be a catalyst for bad sectors on your drive. If while performing error checking you experiences an excessive amount of errors on your drive, then that is a sign that the device is on its last legs, a result of all the bad sectors festering within the drive. Error checking should take you no more than 5 minutes to perform and can be carried using the Windows inbuilt tool.
A Surface Scan examines each individual sector on your hard drive in order to determine its health; all sectors deemed bad are flagged. This way, defective areas of the disk become off-limits to the file system, with the hard drives spare sectors coming into play, as a suitable replacement. A surface scan will take a considerable length of time to perform, but it’s one of the least intrusive and complicated ways for a general map of all the sectors on your hard drive to be created. Surface scans can also be carried out through Windows inbuilt tool.
A SMART Diagnostic Test accesses the internal SMART (Self-Monitoring, Analysis and Reporting Technology) data of the drive, in order to determine its health status. From this status, you can determine whether or not your drive is about to fail. For more information on running this particular kind of test, I suggest you check out my post on hard drive failure.
Run Surface Scan/Error Checking
All Windows based systems come with a hard disk tool called Chkdsk. It’s in your best interest to ensure that you run this tool on a regular basis. It’s capable of running surface scans and error checking, detecting and flagging, before it will repair bad sectors on your drive. Regularly running this tool will ensure that your system remains progressively stable.
The only drawback from using this tool is that surface scans in particular can take a considerable length of time to perform. The amount of time that it may take you to complete will of course depend on your systems specifications, such as RAM, hard drive size and number of files and folders on the disk. So it’s best that you put aside some time, maybe a couple of hours to run it.
Another thing to note is that this tool will require exclusive access to repair bad sectors on your system. This means, you will be required to reboot your system, and the tool will initiate and run immediately after the boot up phase.
To run Chkdsk, simply do the following:
1. First, log into your computer with a user profile that has administrative rights.
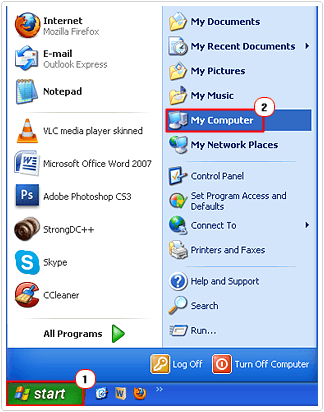
2. Then click on Start -> My Computer. [Windows Vista/7: Computer]

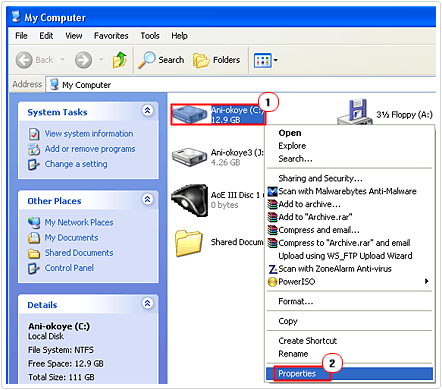
3. Once My Computer loads up, right click on your Hard Drive and select Properties.

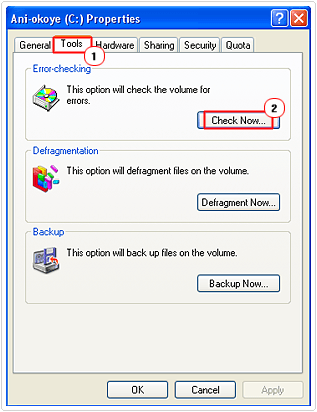
4. From the Hard Drive Properties dialog box, click on the Tools Tab, and then click on Check Now, under Error-checking.

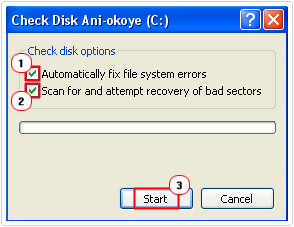
5. A small Check Disk dialog box will pop up, from here, check both boxes next to Automatically fix file system errors and Scan for and attempt recovery of bad sectors, then click on Start.

6. An additional dialog box will pop up asking you whether you would like to schedule this disk check for the next time you restart your computer, click on Yes. Then restart your system.

Note
By checking the boxes next to both Check disk options, your computer will run a surface scan and error checking.
Preventing Bad Sectors
There are a number of things that you can do to prevent, as opposed to repair bad sectors, from ever manifesting themselves on your hard drive, all that is required is your attention to both the software and hardware of your computer.
Preventing Hardware Related Bad Sectors
- Make sure you keep your computer case free of dust particles.
- Ensure that your system is sufficiently cooled.
- Never move/touch your computer while it’s on.
- Ensure that all your hardware cables are tidily tucked away.
- Use surge protection to protect your system from improper shutdowns.
Preventing Software Related Bad Sectors
- Make sure you have sufficient virus protection on your computer, and regularly check for viruses/malware.
- Use a disk defragmenter tool, preferably a professional one, so that you can set it to automatically run at least once per month. A disk defragmenter will ensure that the data on your hard drive is sequentially arranged for faster access, which will effectively prolong the life of the disk by minimising instances of soft bad sectors, eliminating the need to repair bad sectors in the future. There are a number of such tools available for end users, but I personally recommend Advanced System Repair Pro, which you can download here: CLICK HERE TO CHECK OUT ADVANCED SYSTEM REPAIR PRO
Are you looking for a way to repair all the errors on your computer?

If the answer is Yes, then I highly recommend you check out Advanced System Repair Pro.
Which is the leading registry cleaner program online that is able to cure your system from a number of different ailments such as Windows Installer Errors, Runtime Errors, Malicious Software, Spyware, System Freezing, Active Malware, Blue Screen of Death Errors, Rundll Errors, Slow Erratic Computer Performance, ActiveX Errors and much more. Click here to check it out NOW!


Great post. I was checking constantly this blog and I’m impressed!
Extremely helpful information particularly the last part
🙂 I care for such information much. I was looking for this particular
info for a long time. Thank you and best of luck.
Superb, what a weblog it is! This weblog gives valuable information to us, keep it up.
It’s difficult to find well-informed people for this topic,
however, you sound like you know what you’re talking about!
Thanks