| Attention Before you read this post, I highly recommend you check out my resources page for access to the tools and services I use to not only maintain my system but also fix all my computer errors, by clicking here! |
This post discusses the ins and outs of not just how to repair Windows Installer, but what it is, how it works and why it’s so important for your system.
What is Windows Installer?
The purpose of the Windows Installer Service is to facilitate the installation, uninstallation, maintenance and repair of software applications on your system. Before new software can be installed onto your system, it must first abide by a number of rules which will ensure that it functions without error while on the computer. The Windows Installer Service is there to ensure that these rules are enforced, therefore prohibiting any resulting data corruptions or faults as a result of the introduction of new software.
The Windows Installer is very much helpful in that it guides the user through a process which would otherwise require a great deal of time and effort to execute. Without this particular service during the installation phase, users would be forced to unpack the files of an application, including creating the folders and directories that these files are to be copied to, then create the necessary entries within the systems registry.
Windows Installer Errors
“The Windows Installer Service could not be accessed.”
“Windows Installer Service could not be started.”
“Could not start the Windows Installer service on Local Computer. Error 5: Access is denied.”
These error messages above are the most commonly encounter, and are as a result of the Windows Installer being disabled, corrupt or installed incorrectly. The objective of this service as stated above is to manage the installation framework of the operating system, as well as the removal of software components, rollbacks for failure recovery, versioning and file resiliency.
Some of the common causes of these errors are:
* The media used in an attempt to install a new application is scratched, dirty or otherwise unreadable to the DVD/CD Rom drive.
* An application(s) currently running on your computer at the time of installation may be interfering with the process.
* The process that the installation framework must traverse through during the installation phase did not complete successfully.
These Windows Installer errors are accompanied by error codes which range from 1000 to 1999. Though these codes do not encompass every error situation, if the computer is unable to determine the true cause of the error, the operating system will compensate by providing you with a closely related code. The manual that you should have received with your operating system should provide you with further details on how to repair Windows Installer errors given the specific error code(s).
Before attempting to manually repair Windows Installer errors, the first thing you should consider doing is uninstalling and installing the program you’re having issues with. With that said, I have covered a range of methods that you should consider, if and when you find yourself in this particular situation.
The Automated Approach to Repair Windows Installer Errors
In most cases, the Windows Installer errors that you will encounter will not be directly related to the Windows Installer Service itself. Rather it may be the result of some kind of data corruption or configuration within your system. Thus, choosing to manually repair the program with the onus placed squarely on the Windows Installer may not always bear fruit. Fortunately, there are a number of automated tools designed and developed for this particular task.
The tool that I recommend to get the job done is Advanced System Repair Pro; developed by a highly reputable company, it is a very efficient program, that can repair Windows Installer errors, in addition to various other symptoms, such as intermittent performance and system errors.
You can find out more about this product here:
CLICK HERE TO CHECK OUT ADVANCED SYSTEM REPAIR PRO
 The solution(s) below are for ADVANCED level computer users. If you are a beginner to intermediate computer user, I highly recommend you use the automated tool(s) above! The solution(s) below are for ADVANCED level computer users. If you are a beginner to intermediate computer user, I highly recommend you use the automated tool(s) above! |
Check Whether Windows Installer Service Is Enabled
1. To carry out this task, you must first log into your computer with a user profile that has administrative rights.
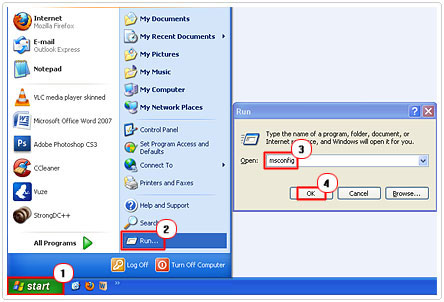
2. Then click on Start -> Run [Windows Vista/7: Press  + R], and type in msconfig and click on OK.
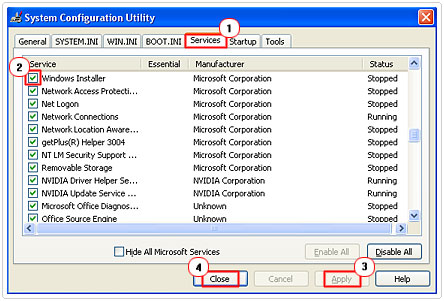
3. Once System Configuration Utility loads up, click on the Services Tab and scroll down to Windows Installer and ensure the check box next to it is ticked. Then click on Apply and Close and restart your computer.
You’ll also need to ensure that Windows Installer is working correctly. To do this, do the following.
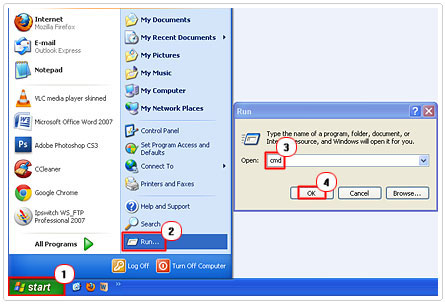
1. Click on Start -> Run, and type cmd and click on OK. [Windows Vista/7: Start -> Type cmd (into the Search programs and files box) and Press CTRL + Shift + Enter, then click on Continue]
2. Once Command Prompt loads up, type in “msiexec” and press Enter.
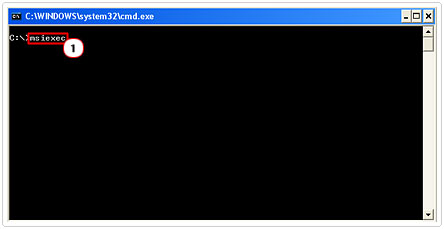
If the MSI engine is working as it should, then a dialog box should load up, with no error messages, displaying your current Windows Installer version.
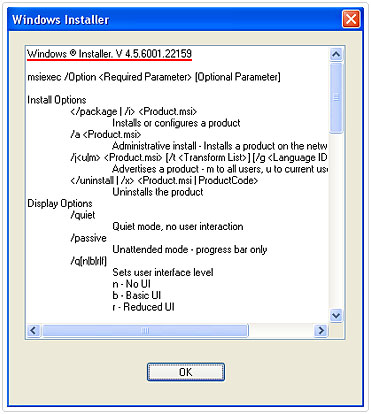
If you do receive an error messages, then you should consider the immediate reinstallation of Windows Installer, by following the instructions provided here.
Reregister the Windows Installer Engine
To carry out this process, you will have to boot into safe mode and reregister the Msiexec.exe file. You can do this by following the steps below.
1. First, click on Start -> Turn off Computer.
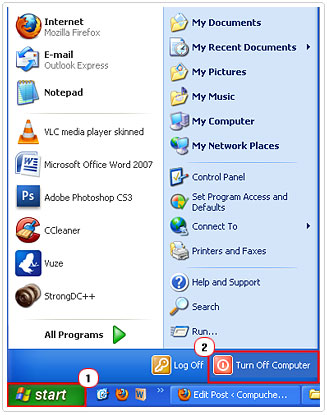
2. Then select Restart.
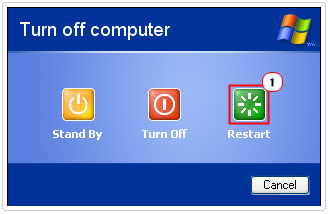
3. Once the POST (Power on Self Test) has finished, click on the F8 Key.
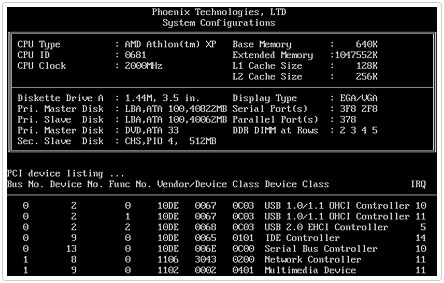
4. This will load up the Advanced Boot Option Menu, from there select Safe Mode and click on Enter.
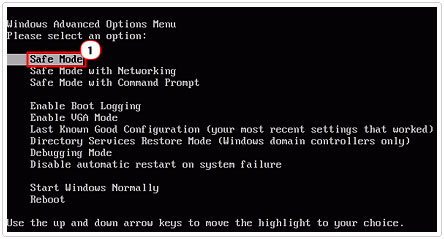
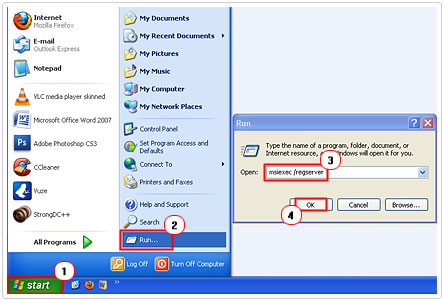
5. Once the computer has finished booting up, click on Start -> Run [Windows Vista/7: Start -> Type cmd (into the Search programs and files box) and Press CTRL + Shift + Enter, then click on Continue], and type msiexec /regserver and click on OK.
6. From there, shut down and restart your computer.
Reinstall the Windows Installer Service
In order for you to successfully repair Windows Installer issues, you must first begin by renaming all corrupt/damaged Windows Installer files, before reinstalling the service. To do this, follow the instructions below.
1. First, ensure you’ve logged into your computer with administrative rights.
2. Then click on Start -> Run, and type cmd and click on OK. [Windows Vista/7: Start -> Type cmd (into the Search programs and files box) and Press CTRL + Shift + Enter, then click on Continue]

3. Once Command Prompt loads up, begin by typing “cd %windir%\system32”, then pressing Enter.

4. Then type “attrib -r -s -h dllcache”, and press Enter.

5. Then type “ren msi.dll msi.old”, and press Enter.

6. Then type “ren msiexec.exe msiexec.old”, and press Enter.

7. Then type “ren msihnd.dll msihnd.old“, and press Enter.

8. Once you’ve completed all those commands, type Exit and press Enter.

From here, you must restart your computer and log back into it with the appropriate administrative rights.
Your last step to repair Windows Installer is to administer a fresh installation. For additional information on which version of Windows Installer you should download, and exactly how to install it, visit the following web page: http://support.microsoft.com/kb/893803
Clean the Applications CD/DVD
If the application is being installed from a CD/DVD, then you should consider cleaning it using a disc cleaning kit.
The method that I like to use to clean my CD/DVD(s) is to place some washing up agent around the surface of the disc. Then use warm water to gently wash the agent off the disc. Then, using a soft cotton cloth, I wipe the surface of the disc dry adopting a center outward motion.
Whichever method you choose to adopt, it’s very important that the disc is wiped dry prior to inserting it back into your computer to repair Windows Installer associated problems.
Copy the Installation Files To Your Computer
If your using any sort of external media, such as a CD/DVD, memory stick or floppy disk to install the program, you can repair Windows Installer issue, or at least, bypass it by copying all of the installation files to your system first. From there, you can start the installation process by clicking on the Setup.exe file.
Close Programs Running In the Background
1. Begin by logging into your computer with administrative rights.
2. Then click on Start -> Run [Windows Vista/7: Press  + R], and type msconfig and click on OK.

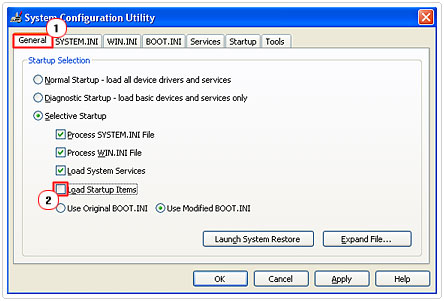
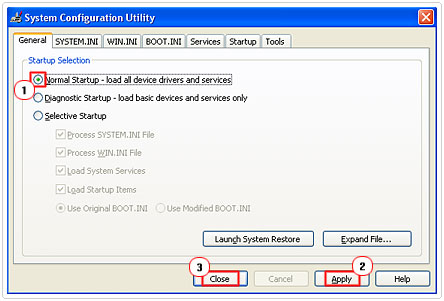
3. Once System Configuration Utility loads up, on the General Tab, click on Selective Startup, then uncheck the box next to Load Startup Items.
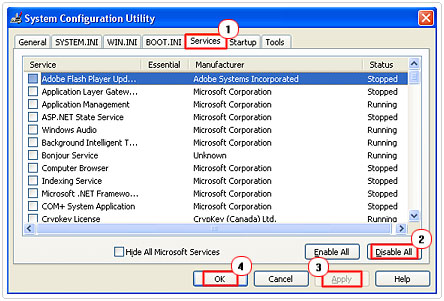
4. From there, click on the Service Tab and click on Disable All, then click on Apply and OK, and restart your computer.
5. After the computer finishes rebooting, install the program/application in question.
6. Once the installation is finished, click on Start -> Run [Windows Vista/7: Press  + R], and type msconfig.

7. On the General Tab, click on Normal Startup, then Apply and Close, and restart your system.
Are you looking for a way to repair all the errors on your computer?

If the answer is Yes, then I highly recommend you check out Advanced System Repair Pro.
Which is the leading registry cleaner program online that is able to cure your system from a number of different ailments such as Windows Installer Errors, Runtime Errors, Malicious Software, Spyware, System Freezing, Active Malware, Blue Screen of Death Errors, Rundll Errors, Slow Erratic Computer Performance, ActiveX Errors and much more. Click here to check it out NOW!

