| Attention Before you read this post, I highly recommend you check out my resources page for access to the tools and services I use to not only maintain my system but also fix all my computer errors, by clicking here! |
A restore point is essentially a collection of files stored by the System Restore component of Windows. These “points” can be created at any given time or day.
System Restore is the Windows feature that allows you to utilise these restore points. If there are none currently saved on your system, then System Restore will have no “points” of which, to revert your system back to. The end user will have no other choice but to attempt another solution; in the event that they were attempting to troubleshoot an issue.
The amount of hard drive space allocated to a restore point is limited, so there’s only so many restore points that will be saved at any point or time. After which, the operating system will start to erase earlier restore points to make way for newer ones.
Another thing to note is that, the allotted space for restore points can shrink, as the overall space on your hard drive shrinks. So, things that you save and install on your system can, and oftentimes does have an indirect effect on your restore points.
What Does System Restore Do?
System Restore works by essentially creating a snapshot of your operating system, which you can use to revert your system back to, in the event of a system mishap. These “snapshots” or restore points come most in handy, when a recently installed application, i.e. computer game or utility tool is causing the system to crash frequently or run slower than usual. A restore point is capable of removing any drivers or applications that were installed prior to the creation of the “point” itself.
Having several restore points saved on your system, can act as a sort of insurance, in the event that you encounter something unexpected. You’ll want to allocate anywhere from 2-5% of hard disk space to your restore points. This way, you can ensure you’ll have an adequate amount, before the system starts to delete them to make way for newer ones.
How Does System Restore Affect Your Programs?
As I’ve already touched on. When an end user utilises a restore point, any program that was installed prior to its creation will be uninstalled. Programs that were installed when the restore point was created will still remain on the system. Any programs that you uninstalled after the restore point was created will be restored, but at a cost. Because System Restore only restores certain files, any program that is restored would ultimately be missing files. This means the program will likely not work, and would thus, require a reinstallation before proper operation.
Windows will usually let you know the affect the restore point will have on specific programs on your system, prior to going through with the process. For this reason, its best practice to use the most recently created “point”, in order to minimise issue with programs.
You may also want to create manual restore points, right before making a significant settings change or installing a program, so that you can revert the system back, in the event that the change breaks the system.
How Does System Restore Affect Personal Files?
System Restore is very different from your standard backup. In that it specifically targets Windows system files, rather than all the data contained on your hard drive. For this reason, System Restore will not make copies of any of your personal files, when creating a restore point. It also won’t replace or delete any of your personal data, during a restoration. So you shouldn’t look at System Restore as a backup tool. As that’s not its intended function. When it comes to your personal files, you should have your own backup process in place.
Restore Point Creation Is Automated
A restore point is created automatically under several circumstances. These may include the following:
- A driver being updated.
- The operating system being updated by Windows Update.
- The end user installing an application that is compliant with System Restore.
- Running a restoration also results in the creation of itself – so that the restore can be undone.
A restore point may also be created automatically, after a certain amount of time has lapsed. This tends to differ based on the version of Windows you’re using.
- Windows 7/8/10: A new restore point is created every 7 days, if no other “point” is created within that time frame.
- Windows Vista: New restore points are created daily. Providing no other restore point is created.
- Windows XP: Restore points are created every 24 hours, regardless of whether restore points were manually created within the same timeframe.
Restore Point Storage
A restore point is limited in the amount of space it can occupy on your hard drive. These details however, vary, depending on the version of Windows you’re using:
- Windows 8/10: The amount of hard disk space a restore point can consume can be as high as 100 percent and as low as 1 percent.
- Windows 7: On hard drives with a storage capacity of 64 GB or less, a restore point can take up no more than 3 percent of its space. However, on larger drives (64 GB and higher), they can consume up to 5 percent of the drive or 10 GB of space, depending on which is less.
- Windows Vista: A restore point can take up as much as 30% of free hard drive space or 15 percent of the hard drives total space.
- Windows XP: On hard drives of 4 GB or less, no more than 400 MB of space can be used for restore points. On larger drives (4 GB and up), 12 percent of hard drive space can be used.
Note: It is possible for you to change these default storage limits for your restore points.
Creating a Restore Point in Windows
System Restore presents the option to create your own restore points, from the moment you open up the program. Allowing you to create one or more restore points, on a consistent basis.
Using the Configure feature, it’s possible for you to schedule as many restore points as needed. Its best practice to give your restore points a descriptive name, for quick recollection.
For example, if you installed a new program or carried out a major update, you could name the restore point after it, so that you can easily remember.
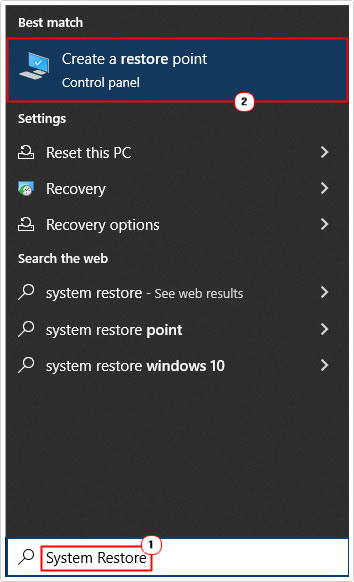
1. To open up System Restore, simply type System Restore into the Type here to search box, in Windows 10, then click on Create a restore point.
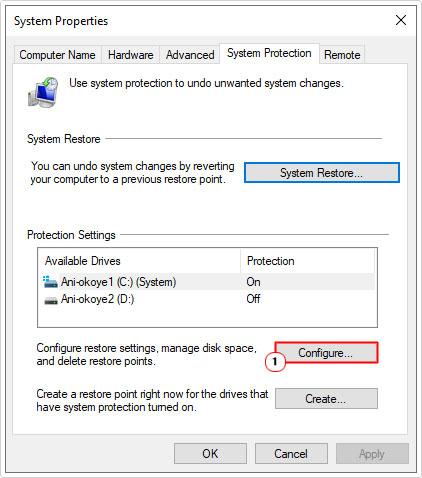
2. This will bring up System Properties, defaulting you to the System Protection Tab, from here, click on Configure.
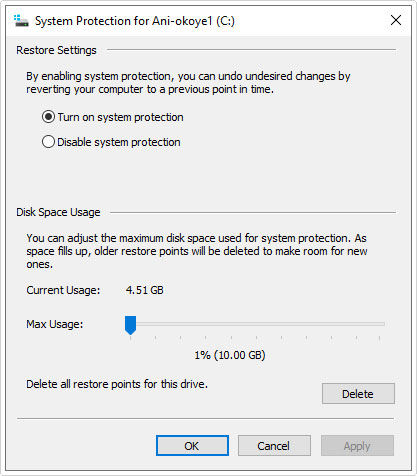
3. From here you can Enable, Delete and Allocate Space for your Restore Points.
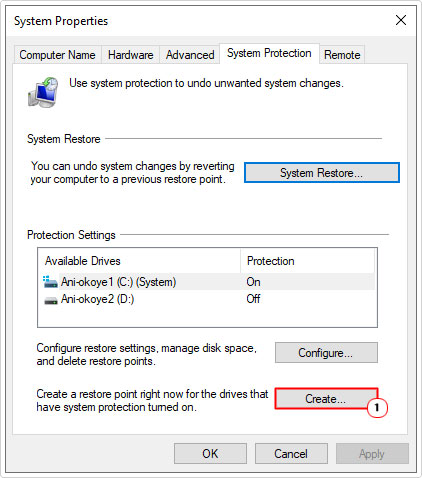
4. To create a restore point, simply click on the Create button.
5. As previously discussed, give the restore point a meaningful name, then click on Create.
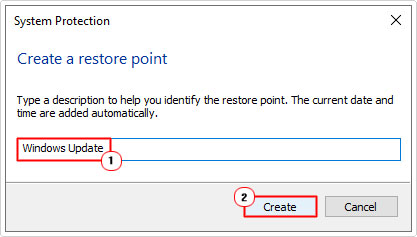
6. Once the restore point has been created, you should receive a successful creation dialog box.
Note: For step-by-step instructions on how to do this on older iterations of Windows, check out my post on how to use Windows System Restore.
How to Restore Your Files Using System Restore
Assuming your system has restore points, you can begin the restoration process, simply by clicking on System Restore:
1. Following step 1 of creating a Restore Point in Windows.
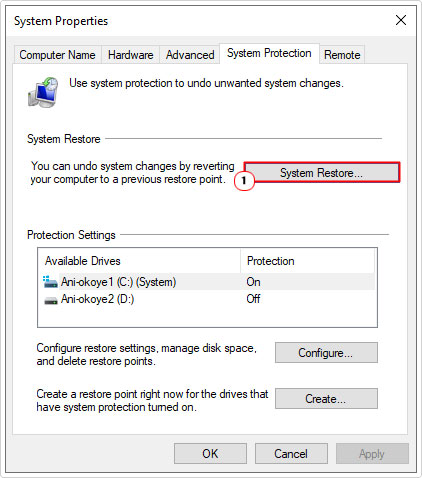
2. This will bring up the System Properties dialog box, defaulting you to the System Protection Tab, from here, click on System Restore.
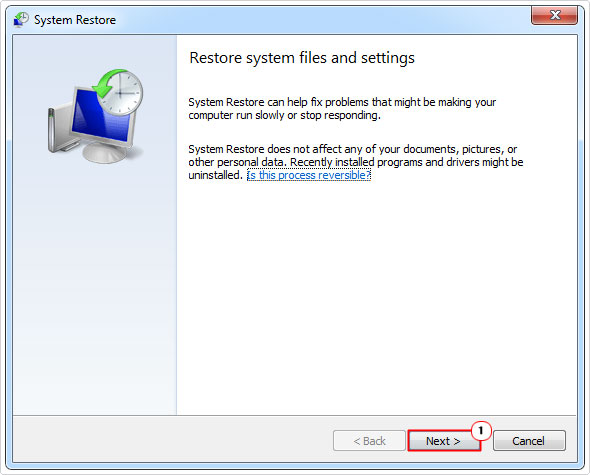
3. When System Restore loads up, click on Next.
4. On the next Window, you should be given a list of Restore Points on your system. With a full list of Restore Points on your system, click on the most appropriate one, then click on Next.
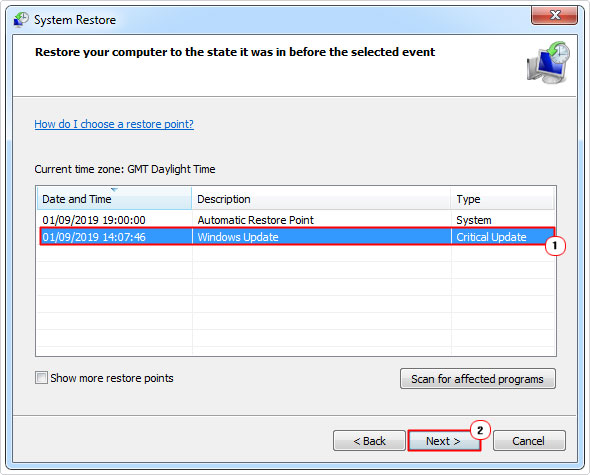
Note: You can click on the checkbox next to Show more restore points, to see all the restore points on your system.
5. This will take you to the final screen, Confirm your restore point. From here, simply click on Finish to start the process.
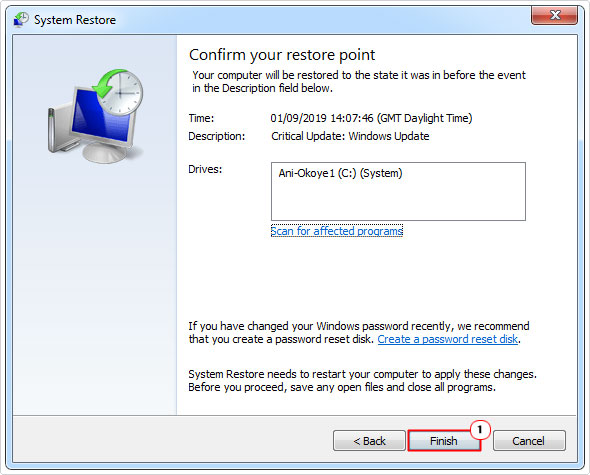
Note: You should receive a warning before the process begins. Click yes, to bypass it.
Are you looking for a way to repair all the errors on your computer?

If the answer is Yes, then I highly recommend you check out Advanced System Repair Pro.
Which is the leading registry cleaner program online that is able to cure your system from a number of different ailments such as Windows Installer Errors, Runtime Errors, Malicious Software, Spyware, System Freezing, Active Malware, Blue Screen of Death Errors, Rundll Errors, Slow Erratic Computer Performance, ActiveX Errors and much more. Click here to check it out NOW!

