| Attention Before you read this post, I highly recommend you check out my resources page for access to the tools and services I use to not only maintain my system but also fix all my computer errors, by clicking here! |
SearchUI.exe suspended and other related issues, are usually the result of software conflicts, between the operating system and a third-party tool, like your antivirus scanner. SearchUI or Search User Interface is an integral component of the Microsoft Search Assistant, which is also known as Cortana. If the SearchUI.exe component has been suspended, then it means the Cortana feature will not work. Microsoft’s Search Assistant is a very innovative and dynamic feature, allowing end users to make commands via voice. However, it’s not completely widespread, as some programs, either lack support or block the feature, right out.
What sets this issue a part from your typical error, is that end users are typically not notified when the SearchUI.exe file has been suspended. Rather, the user has to open up Windows Task manager to find out. Windows will run, optimally, and without issue, even when this component has been suspended, so there’s no immediate danger to your system. That said, if you do use this feature, it can be a major inconvenience for you.
Symptoms of SearchUI.exe Suspended
As previously explained, the failure of SearchUI.exe to load, is exclusively a Windows 10 issue that is related to Cortana, the search feature. Any problems with this file, means, an inability to use Windows Search.
That said, end users that have encountered problems with SearchUI.exe, have reported the following symptoms:
- SearchUI.exe does not respond or performs intermittently.
- The search component (Cortana) crashes, during normal Windows uses.
What Causes SearchUI.exe Suspended?
There are a number of factors that are known to contribute to this issue. The most common, are the following:
- Third-party internet security tool: If you have a third-party security tool, installed and running on your system. It’s likely that the tool has stopped the SearchUI.exe file from running, causing Windows to suspend the feature.
- Outdated Windows: If your operating system hasn’t been updated for a considerable length of time. It’s possible that it could be a contributing factor, in the suspension of SearchUI. Microsoft are constantly releasing updates, for known bugs, errors and issues, so it’s important to always be up-to-date.
- Windows corruption: It’s not uncommon for a Windows component to fail, due to file corruption. In this case, the location where Cortana is contained, may be have been corrupted.
With that said, before proceeding with any of the issues outlined below, the first thing you’ll want to do, is restart your system. In many cases, it’s the simple solutions that tend to be the most effective.
How to Fix It
According to reports from many end users, your antivirus scanner, is capable of conflicting with the SearchUI.exe component. This issue is known to occur, most commonly on Avast Antivirus, but is not exclusive to it. Removing the program, was reported to fix the issue, but in reality, only creates new problems.
Of course, removing your antivirus scanner is not a real solution, so I’d recommend reinstalling it, then altering its settings. Most antivirus scanners, have an exception or exclusion list. Just put the SearchUI.exe component into that list, and the virus scanner will ignore it.
However, if that fails, then you can disable your antivirus scanner, temporarily, every time you want to use Cortana. Or you can opt for something more drastic, and acquire a new antivirus solution.
The vast majority of antivirus scanners are 100% compatible with Windows 10 and SearchUI.exe. If a new antivirus scanner is the only viable option on the cards, then I personally recommend you consider SpyHunter.
SpyHunter is one of the most efficient, and comprehensive anti-malware tools in the marketplace today. For more information on its many benefits, visit the link below:
CLICK HERE TO CHECK OUT SPYHUNTER
Use Windows Repair Tool
If you’re antivirus scanner isn’t to blame for the SearchUI.exe suspended issue on your operating system. Then there are a number of more complicated solutions that you can adopt.
However, before looking into any of them, I’d personally recommend that you considered using Advanced System Repair Pro.
Advanced System Repair Pro is a Windows repair tool, with access to millions of Windows files, from its repository, which it can use to replace missing or corrupted files on your system. Inaccessible Windows components, are almost always due to Windows corruption, making Advanced System Repair Pro the perfect tool and perfect solution to this problem.
In addition to fixing your system, Advanced System Repair Pro is also capable of maximising your system performance.
With that said, you can learn more about this tool, from the following link:
CLICK HERE TO CHECK OUT ADVANCED SYSTEM REPAIR PRO
 The solution(s) below are for ADVANCED level computer users. If you are a beginner to intermediate computer user, I highly recommend you use the automated tool(s) above! The solution(s) below are for ADVANCED level computer users. If you are a beginner to intermediate computer user, I highly recommend you use the automated tool(s) above! |
Fix Cortana Package Folder
Many end users have found that the corruption of SearchUI.exe can be traced to the following location:
C:\Users\AppData\Local\Packages\Microsoft.Windows.Cortana_cw5n1h2txyewy\RoamingState
As a solution, deleting the folder has proven effective at fixing Cortana.
That said, to successfully remove this folder, you must complete the following steps:
1. The first thing you’ll need to do, is boot into your system via Safe Mode. If you don’t know how to do that, check out my post on fixing error 0x800700b7.
2. From here, press  + R, type cmd and press CTRL + Shift + Enter.
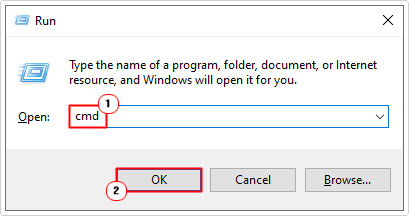
3. When Command Prompt loads up, type the following command and press Enter.
RD /S /Q C:\Users\AppData\Local\Packages\Microsoft.Windows.Cortana_cw5n1h2txyewy\RoamingState
4. Close Command Prompt when completed, then open PowerShell, by pressing  + X, and clicking on Windows PowerShell (Admin).
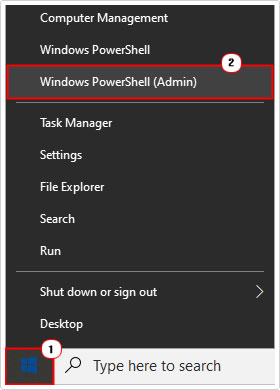
5. When PowerShell loads up, type the following command and press Enter.
Get-AppXPackage -AllUsers |Where-Object {$_.InstallLocation -like “*SystemApps*”} | Foreach {Add-AppxPackage -DisableDevelopmentMode -Register “$($_.InstallLocation)\AppXManifest.xml”}Rename UsrClass.dat File
If the solutions above, have failed to fix the SearchUI.exe component. Then you may want to consider creating a new administrator account, as a workaround.
Essentially, you create a new administrator account, then you use it to rename the affected Cortana files and folders. This way, when you log back into your original account, the files are reinitialised.
To do that, simply do the following:
1. First, ensure you’ve booted into Windows as an administrator.
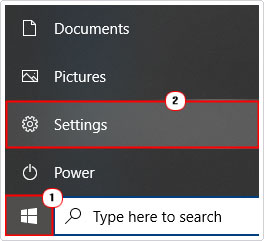
2. Then right-click on the Start button and select Settings.
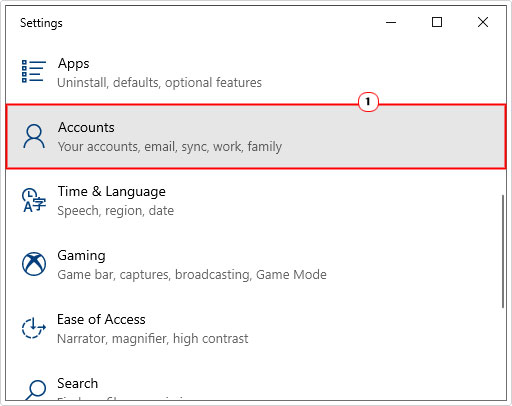
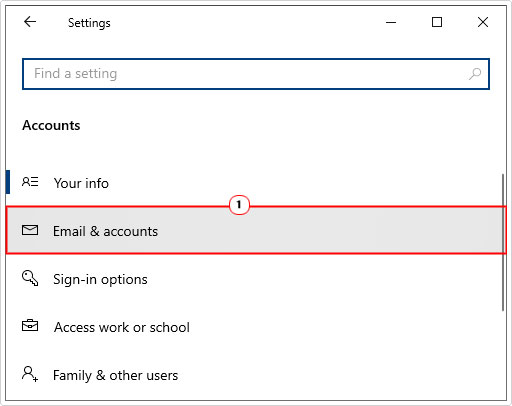
3. From the Windows Settings screen, click on Accounts.
4. Then click on Email & Accounts.
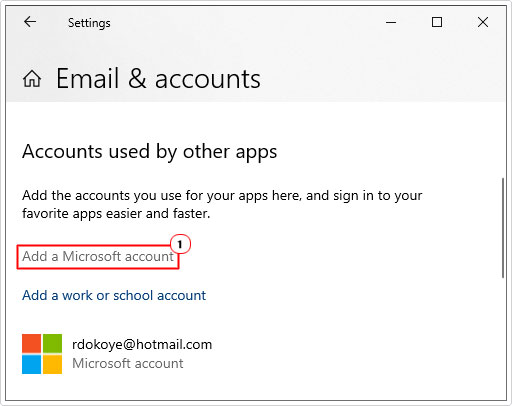
5. Lastly, click on Add a Microsoft Account.
6. Once you’ve created your new account, log into Windows with it.
7. Then navigate to the following location:
C:\Users\%user%\AppData\Local\Microsoft\Windows
Note: Where %user% is the name of your default user account.
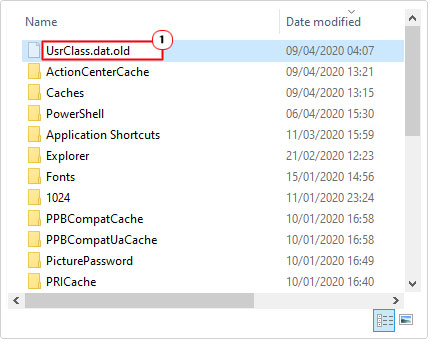
8. Then right-click on UsrClass.dat and select Rename, and change it to UsrClass.dat.old.
Delete Roaming User Profile to Fix SearchUI.exe Suspended
Roaming user profiles are known to cause problems with the SearchUI.exe file. So if you fit into this category, then you may want to consider removing the profile altogether.
Note: Roaming user profiles are networked profiles, which means, the profile will also have to be removed from the network, by a domain administrator, to completely remove all traces of it.
Anyway, to delete the profile locally, just do the following:
1. First, boot into your computer as an administrator.
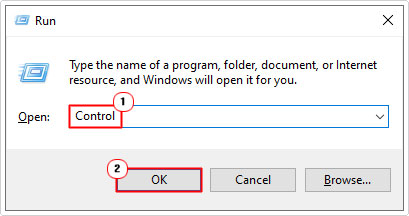
2. Then press  + R, type Control and click on OK.
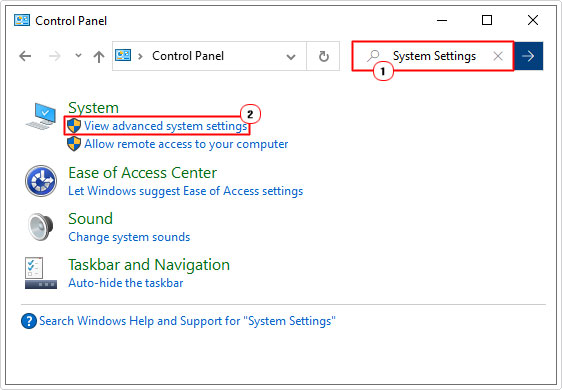
3. When Control Panel loads up, type System Settings into the Search Control Panel box, to search on it. Then click on View advanced system settings.
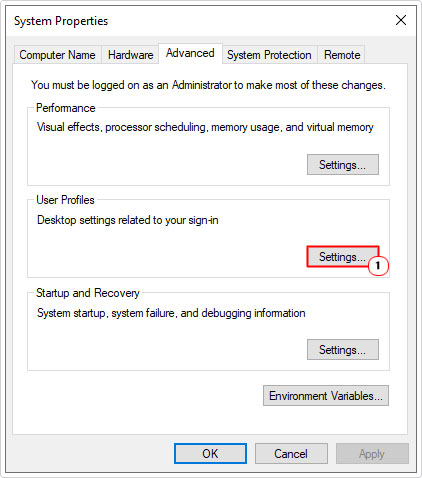
4. This will bring up a Systems Properties applet, from here, click on the Settings button, under User Profiles.
5. From the User Profiles applet, select your Domain Profile, then click on Delete.
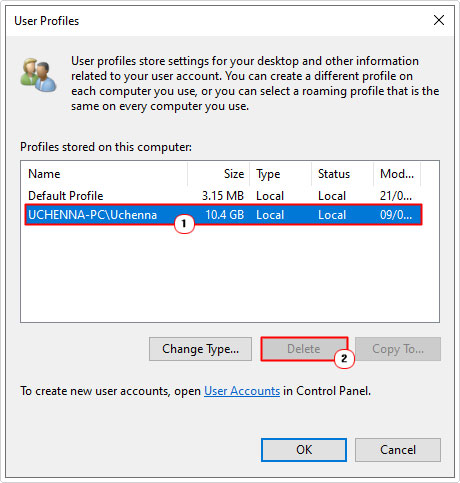
Once you have removed the profile locally, you can then remove it from the network. If you have control over the network, you can do it yourself, otherwise, you’ll need to consult your domain administrator.
Are you looking for a way to repair all the errors on your computer?

If the answer is Yes, then I highly recommend you check out Advanced System Repair Pro.
Which is the leading registry cleaner program online that is able to cure your system from a number of different ailments such as Windows Installer Errors, Runtime Errors, Malicious Software, Spyware, System Freezing, Active Malware, Blue Screen of Death Errors, Rundll Errors, Slow Erratic Computer Performance, ActiveX Errors and much more. Click here to check it out NOW!

