| Attention Before you read this post, I highly recommend you check out my resources page for access to the tools and services I use to not only maintain my system but also fix all my computer errors, by clicking here! |
There are a number of factors that can adversely affect the speed in which your computer shuts down. It can be anything from a hardware conflict, incompatible driver, corruption of data, to a poorly configured operating system. On the flip side, it could be a combination of all of these factors. However, in this tutorial, I intend to show you a number of tips that you can use to dramatically shutdown Windows Faster. Tips that the vast majority of computer users should have little difficulty implementing.
During the shutdown phase of your computer, there are a number of registry values that determine how long the system will wait before it attempts to close open programs and/or services. However, by properly tweaking your registry, it is possible for you to decrease the amount of time your system waits before it initiates this process, which in turn will make your computer shutdown Windows faster.
Note: If you make the wrong alterations to your operating systems registry, it could render your system inoperable. Thus, it’s very important that you follow the steps that I’ve outlined, exactly as they are written. Before you make any changes, you may also want to consider backing up your registry and/or creating a restore point, this way, if anything were to go wrong, you could very quickly restore your system back to its original working state.
Edit WaitToKillAppTimeout to Shutdown Windows Faster
WaitToKillAppTimeout is a registry entry that determines how long the computer will wait for user process to close during the shutdown phase. Once the specified time has lapsed, an End Task dialog box will appear, stating that the process in question will not respond. However, if you set the registry entry AutoEndTasks to 1, then it will immediately close the process instead of showing the End Task dialog box, but that’s something I’ll get into later.
For now, you’ll want to shutdown Windows faster; this can be done by doing the following:
WARNING: Editing or deleting any registry entry other than the ones specified in this tutorial, can render your operating system inoperable.
1. First, ensure you’ve logged into your computer with a user profile that has administrative rights.
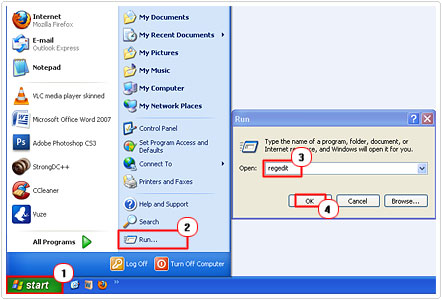
2. Then click on Start -> Run [Windows Vista/7: Press  + R], and type regedit and click on OK.
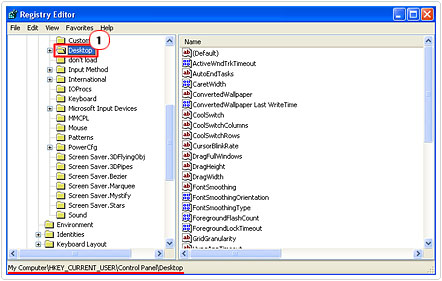
3. Once the Registry Editor loads up, navigate to the following path:
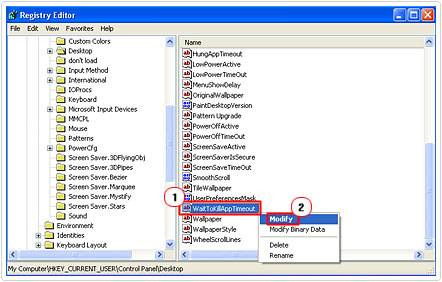
4. Then find the entry WaitToKillAppTimeout, and right click on it and Select Modify.
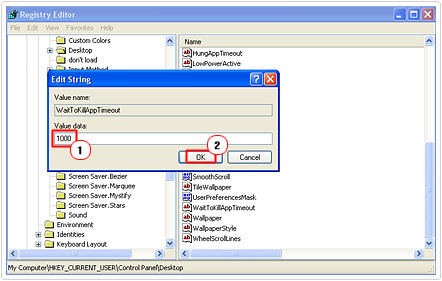
5. This will load up an Edit String dialog box, modify the current Value data from 20000 (equivalent to 20 seconds) to 1000 (equivalent to 1 second), then click on OK.
WaitToKillServiceTimeout
This registry entry determines the amount of time that the system will wait for services to close after it has notified these services that the system has entered the shutdown phase.
Once the value set on this registry entry has lapsed, the user will be notified that the service has failed to stop. The user will then be given the option to either force the service to stop or to wait for it to stop on its own accord. If the user decides to wait, then the value set inside this registry entry will determine how long before the next failure to stop dialog box appears.
If all system services stop before the value in this entry lapses, then the computer will shutdown.
Note: There are some services that increase the value of the WaitToKillServiceTimeout entry, so that they can perform certain cleanup tasks during shutdown.
1. To alter this entry, first ensure you have administrative rights on your computer.
2. Then click on Start -> Run [Windows Vista/7: Press  + R], and type regedit and click on OK.

3. Once Registry Editor loads up, navigate to the following path:
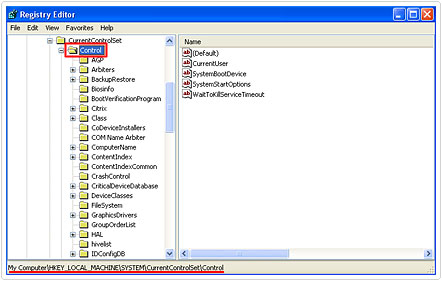
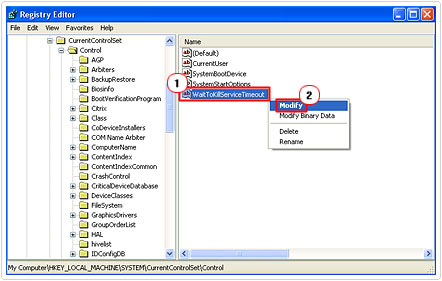
4. Then locate the WaitToKillServiceTimeout entry and right click on it and select Modify.
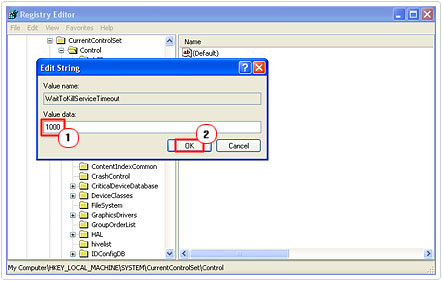
5. This will bring up an Edit String dialog box, change the Value data from 20000 (equivalent to 20 seconds) to 1000 (equivalent to 1 second), then click on OK.
HungAppTimeout
This particular registry entry determines how long the computer will wait after the user clicks on the End Task button within Windows Task Manager. If the process fails to close within the specified time, then an End Task dialog box will load up, stating the process didn’t respond.
This registry entry complements the WaitToKillAppTimeout entry, making them most effective when used in conjunction with one another to make your system shutdown Windows faster.
1. The first thing you’re going to want to do is log into your system with administrative rights.
2. Then click on Start -> Run [Windows Vista/7: Press  + R], and type regedit and click on OK.

3. Once the Registry Editor loads up, navigate to the following path:

4. Then find the HungAppTimeout entry and right click on it and select Modify.
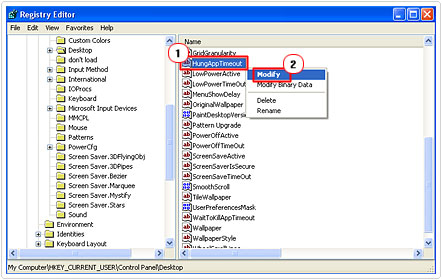
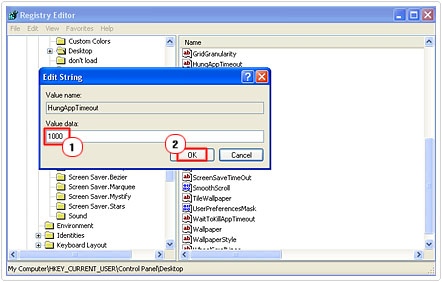
5. From the Edit String dialog box, you’re going to want to change the Value data from 5000 (equivalent to 5 seconds) to 1000 (equivalent to 1 seconds), then click on OK.
Notes
If you have more than one person using the computer in your home/office and you would like these shutdown settings to be applicable to their user profile(s), then you should do the following.
1. First, ensuring you have logged in with administrative rights.
2. Then click on Start -> Run [Windows Vista/7: Press  + R], and type regedit and click on OK.

3. Once Registry Editor loads up, navigate to the following path:
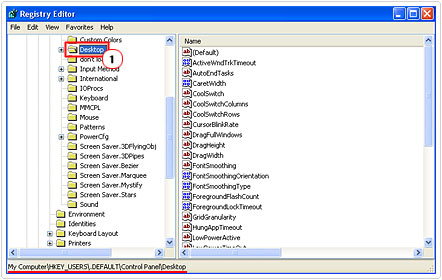
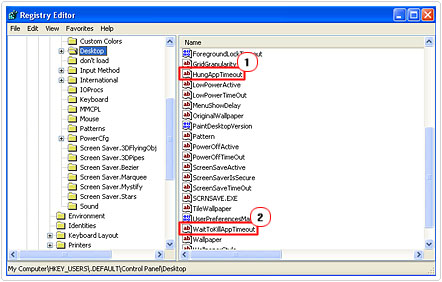
4. Here, you will be able to find the registry entries WaitToKillAppTimeout and HungAppTimeout, which you can alter to corresponding with the Value data above.
AutoEndTasks
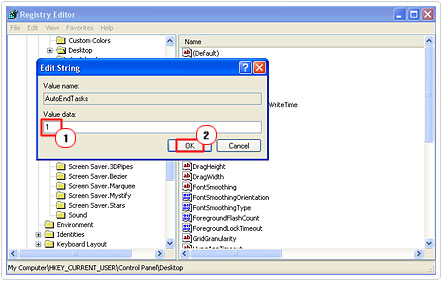
If a process fails to close during the shutdown phase, the operating system will, by default notify you, and ask you whether you’d like to force an end to the process or wait until it closes by itself. With this feature on, Windows will automatically end any process that takes too long to close without your confirmation, which should shutdown Windows faster.
1. First ensuring you’ve logged into your computer with administrative rights.
2. Start Registry Editor by clicking on Start -> Run [Windows Vista/7: Press  + R], typing regedit and clicking on OK.

3. Once Registry Editor has loaded up, navigate to the following path:

4. Then find the registry entry AutoEndTasks, right click on it and select Modify.
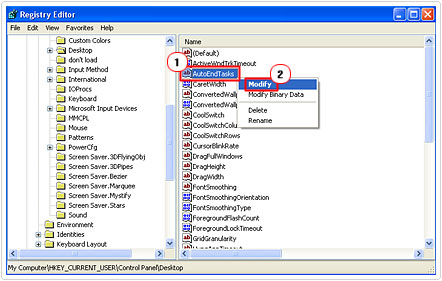
5. From the Edit String dialog box, change the Value Data from 0 to 1 (to turn on this feature). Then click on OK.
Create a Shutdown Shortcut
Another method that you can use to shutdown windows faster is to create a shut down shortcut. It’s an incredibly effective way of decreasing the amount of time that it’ll typically take for you to shut your system down. To create this shortcut, simply do the following.
1. First, right click on your Desktop and select New -> Shortcut.
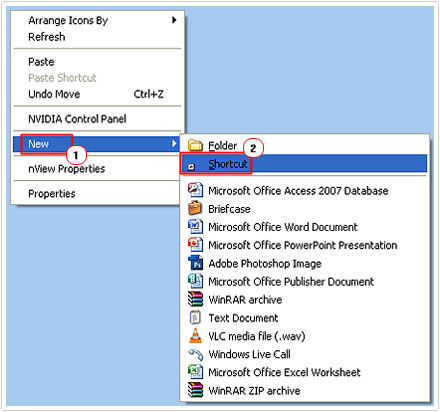
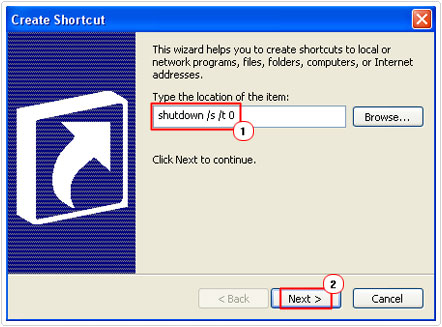
2. In the Create Shortcut dialog box, type in shutdown /s /t 0 then click on Next.
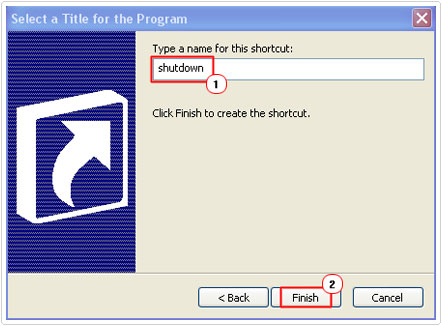
3. Lastly, give the shortcut a name, and then click on Finish.
Notes
Double clicking on this shortcut will shut your system down immediately. So make sure you keep it somewhere convenient, so that you don’t mistakenly click on it.
If you would like to create a shortcut that restarts your system, then use the following parameter shutdown /s /t 01 in place of the previous one above.
Are you looking for a way to repair all the errors on your computer?

If the answer is Yes, then I highly recommend you check out Advanced System Repair Pro.
Which is the leading registry cleaner program online that is able to cure your system from a number of different ailments such as Windows Installer Errors, Runtime Errors, Malicious Software, Spyware, System Freezing, Active Malware, Blue Screen of Death Errors, Rundll Errors, Slow Erratic Computer Performance, ActiveX Errors and much more. Click here to check it out NOW!


Great! Only one problem: WaitToKillAppTimeOut is not there!
Not on all the latest operating systems. However a certainty on Windows XP/ME/98, which I’m certain you no longer use anyway.
My relatives always say that I am killing my time here at web, but I know I am getting experience daily by reading
such good posts.