| Attention Before you read this post, I highly recommend you check out my resources page for access to the tools and services I use to not only maintain my system but also fix all my computer errors, by clicking here! |
Skype is currently the number one software platform for messaging, audio and video calls. Through the utilisation of this application you can send and receive instant messages from friends and family. You can also exchange images, files and host conference calls. Skype not working for you? Then you’ve come to the right place.
With all that out of the way, problems with Skype not working correctly have become fairly common over the years. The inability to sign in, even though the service is reporting that the network is fine, is something that happens quite often. A very annoying issue, that is fortunately very easy to fix.
A couple years back, Skype’s support team posted step by step instructions on how to rectify this problem on all the most popular operating systems. They stipulated that the problem lies primarily with a specific xml file which you need to delete before you restart the Skype application.
The file that they talk about is called “shared.xml”, users need only close down Skype, locate this file and delete it, and that should get everything up and running again. However, there are a host of other methods that you can use to fix this problem. So I will be covering them all in this tutorial.
There was an incident some time back, which led to a system-wide outage of the Skype network service, as a result Skype was inaccessible for a large number of people scattered all over the world. However, the Skype support team were able to identify and fix the problem, but questions were still raised as a result of it, questions which alluded to the effectiveness and reliability of the voice, video and instant messaging service.
However, Microsoft successfully purchased Skype in 2011, and since that time, incidences as the one described above have yet to reoccur. Although, log in issues are still quite common (coming from someone who has experienced such problems within the past 12 months).
There are a number of methods that you can use to fix your Skype problem. Below are approximately four of the most popular and effective methods of rectifying any problem you are experiencing with Skype, in addition to the xml method which I previously mentioned. So keep reading for the step-by-step instructions!
If Skype Not Working Delete Shared.xml File
This is the most widely used method of repairing Skype issues, but it is not foolproof, which is why I’ve accompanied it with a number of other repair methods. If Skype not working for you, then you want to locate and delete this xml file, to do that, simply do the following:
1. Assuming you have already logged in and have Skype running, the first thing you will want to do is close the program down by right clicking on the Skype Icon in the bottom right hand corner of the screen and selecting Quit.
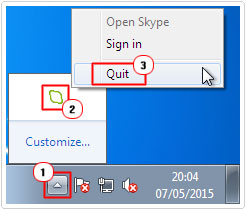
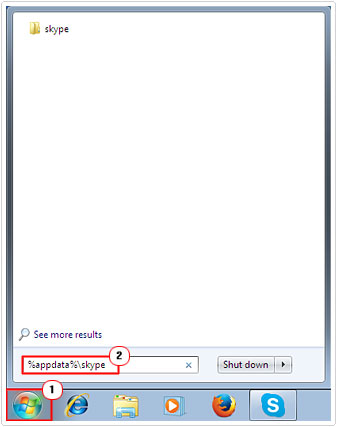
2. Once you’ve closed Skype, click on Start -> Run, type %appdata%\skype and click on OK. [Windows Vista/7: Start -> Type %appdata%\skype (into the Search programs and files box) and Press Enter]
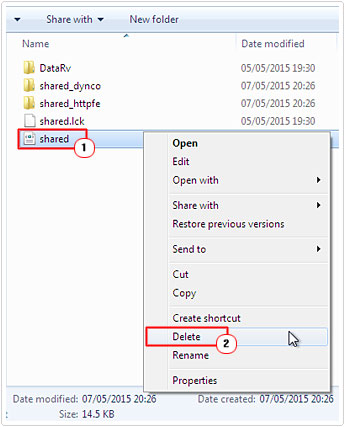
3. This will bring up the Skype Application Data folder, from here, locate the shared.xml file and delete it, by right clicking on it and selecting Delete.
4. Once you have successfully deleted the file, restart your computer, and once you boot back in, your Skype application should be working correctly.
Rename Skype Application Data Folder
Deleting or renaming the Skype application data folder is sometimes an effective way of correcting any log in issues that you are experiencing with it. Skype not working, then you can carry out this method simply by following the instructions below:
1. Assuming you’ve already logged into your computer and have Skype running, open Task Manager, by right clicking on the Taskbar and selecting Task Manager. [Windows Vista/7: Start Task Manager]
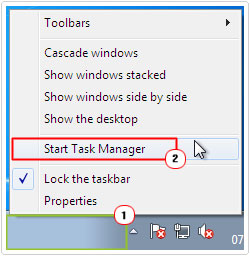
2. This will load up Windows Task Manager, from here, click on Processes, and then click on Skype.exe followed by End Process. (When the confirmation box pops up, click on End Process again)
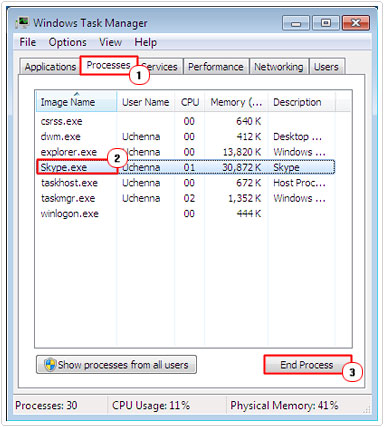
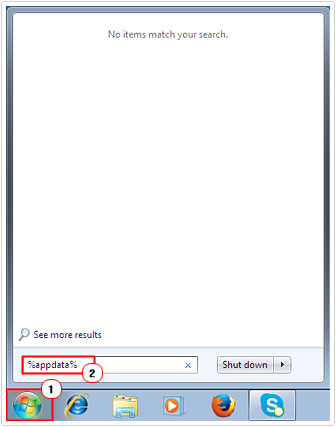
3. Once you have successfully closed Skype, click on Start -> Run, type %appdata% and click on OK. [Windows Vista/7: Click on the Start button, Type %appdata% (into the Search programs and files box) and Press Enter]
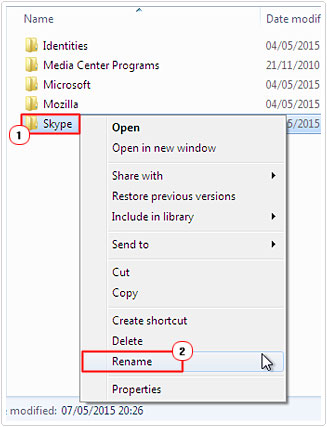
4. This will bring up the Application Data folder, from here, locate and rename the Skype folder, by right clicking on it and selecting Rename.
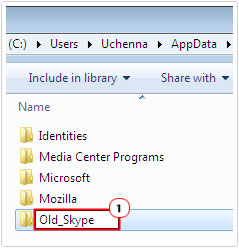
5. Then change its name from Skype to Old_Skype.
6. Once you’ve renamed the folder, click on Start -> Run, type %temp%\skype and click on OK. [Windows Vista/7: Start -> Type %temp%\skype (into the Search programs and files box) and Press Enter]
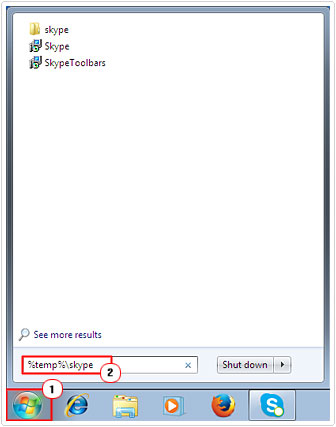
7. The Skype Temp folder should load up, from here, right click on DbTemp and select Delete.
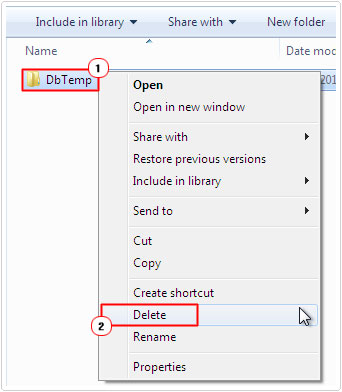
8. Once you’ve completed all of the above tasks, restart the Skype application.
Rename Nvdxgiwrap.dll File
This next method involves making changes to a hardware DLL file. So this method is only applicable for people that have an Nvidia graphics device in their computer. If Skype not working after attempting the previous methods, then you carry out this fix by doing the following:
1. Assuming you have already booted into your computer with administrative rights, click on Start -> Run, type C:\Program Files\NVIDIA Corporation\CoProcManager and click on OK. [Windows Vista/7: Start -> Type C:\Program Files\NVIDIA Corporation\CoProcManager (into the Search programs and files box) and Press Enter]
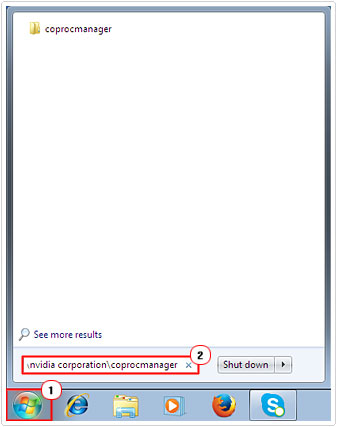
2. If the folder pop ups, locate the nvdxgiwrap.dll file, right click on it and select Rename.
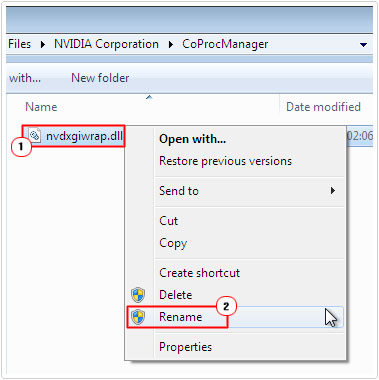
3. Change the file name from nvdxgiwrap.dll to old_nvdxgiwrap.dll.
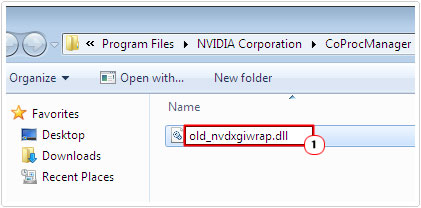
4. Restart Skype and check whether that has fixed the problem.
Reinstall Skype
This method involves uninstalling the Skype application (in its entirety), from your system, after which you can install a fresh copy of Skype on your computer. If Skype not working up to this point, this method can be seen as a last resort, which should be adopted after all other methods have failed to yield the desired results.
Anyway, to remove Skype, just do the following:
1. If Skype is already running on your computer, then the first thing you will have to do is close it. This can be done by right clicking on the Taskbar and selecting Task Manager. [Windows Vista/7: Start Task Manager]

2. Once Windows Task Manager loads up, click on Processes, and then click on Skype.exe followed by End Process. (Click on the End Process button again when the confirmation box pops up)

3. Once you have closed Skype, the next step is to uninstall it. This can be done by clicking on Start -> Run, typing appwiz.cpl and clicking on OK. [Windows Vista/7: Start -> Type appwiz.cpl (into the Search programs and files box) and Press Enter]
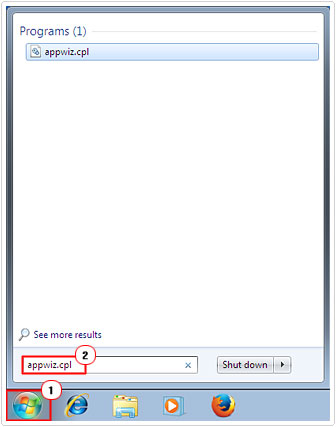
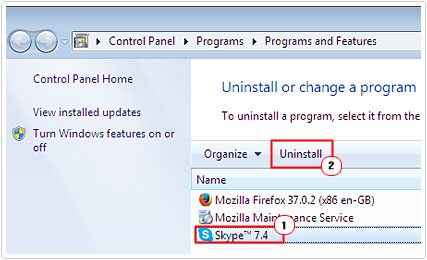
4. This will bring up Add or Remove Programs [Windows Vista/7: Uninstall or change a program], from here, click on Skype, then click on Uninstall. Repeat the process to uninstall Skype Click to Call, (assuming you also have that installed).
5. Once you’ve finished uninstalling Skype, click on Start -> Run, type %appdata% and click on OK. [Windows Vista/7: Start -> Type %appdata% (into the Search programs and files box) and Press Enter]

6. Once the Application Data folder loads up, delete the Skype folder by right clicking on it and selecting Delete.
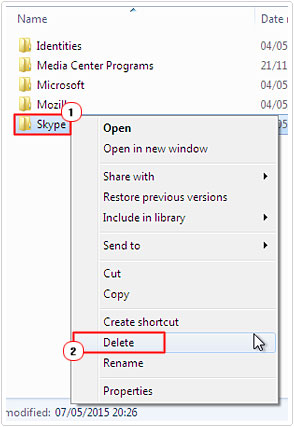
Note: When you delete this folder you will lose all your chat log files. Alternatively, you could rename the folder, and then copy the contents of the old folder over to the new, once you’ve finished the reinstallation.
7. Once you’ve finished deleting the folder, download and install a fresh copy of Skype from here: http://www.skype.com/en/download-skype/skype-for-computer/
Are you looking for a way to repair all the errors on your computer?

If the answer is Yes, then I highly recommend you check out Advanced System Repair Pro.
Which is the leading registry cleaner program online that is able to cure your system from a number of different ailments such as Windows Installer Errors, Runtime Errors, Malicious Software, Spyware, System Freezing, Active Malware, Blue Screen of Death Errors, Rundll Errors, Slow Erratic Computer Performance, ActiveX Errors and much more. Click here to check it out NOW!


I’m curious to find out what blog platform you have been utilizing? I’m experiencing some minor security issues with my latest site and I would like to find something more safe. Do you have any solutions?
I’m using WordPress, like most people nowadays. Definitely the easiest and most stable platform available.