| Attention Before you read this post, I highly recommend you check out my resources page for access to the tools and services I use to not only maintain my system but also fix all my computer errors, by clicking here! |
Is your computer have a slow startup time? Well, you needn’t worry, since you can seek solace in the fact that many people’s systems suffer from the same symptoms. However, there are things that you can do to counter this issue, but it’s up to you, whether you want to expand a lot of money to do so, or not. For most people, their immediate reaction or rather solution is to go out and purchase new or additional hardware, such as a new processor, larger hard drive or more RAM. If you have the money to do that, then I won’t stop you, it’s probably best you went down that path. However, it is possible for you to decrease your boot time by performing a number of tweaks on your operating system.
If the slow startup times that you’re experiencing are due to errors in your registry, then you will have to weed them out using either manual or automated methods. If you don’t know what the registry is, it’s basically a store area for your system, were information on your applications and hardware components is kept. During the boot up phase, your system must search through thousands of different registry keys, and if it finds any errors, then it may attempt to fix them during the actual boot up phase. This creates a delay during boot up which is proportionate to the amount of errors it has to sift through.
There are registry cleaner programs that you can use as a preventative measure such as Advanced System Repair Pro. So before we get into the tweaks, you may want to check that out.
You can find out more about this program here:
CLICK HERE TO CHECK OUT ADVANCED SYSTEM REPAIR PRO
Alter Your BOOT.INI Settings to Improve Slow Startup
This alteration can be implemented on all Windows versions. It entails you editing your BOOT.INI file through the System Configuration Utility. Basically, during the boot up phase your computer will timeout for a predetermined time in order for it to locate new software and hardware components. By shortening this timeout (or removing it altogether), you can decrease your slow startup time.
1. To get started, simply log into your computer with a user profile that has administrative rights.
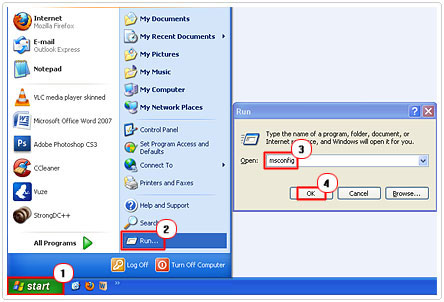
2. Then click on Start -> Run [Windows Vista/7: Press  + R], and type in “msconfig” and click on OK.
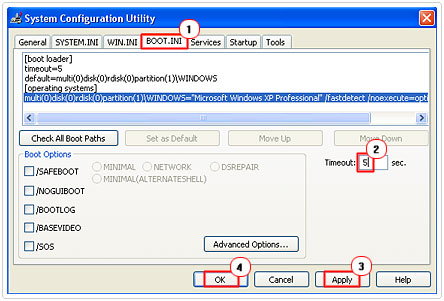
3. Once the System Configuration Utility loads up, click on the BOOT.INI Tab and change the default timeout from 30 to 5 or less. Then click on Apply and OK, and restart your computer.
Remove User Profile Passwords
Password locking your computer will increase the amount of time you have to wait for your system to boot up. The operating system must stop, partway through the boot up phase in order for it to allow you to type in your unique password. Removing this password on your user profile will give you that much needed boost to your slow start time.
To go about doing this, follow the instructions below.
1. First, ensure you’ve logged into your computer with a user profile that has administrative rights.
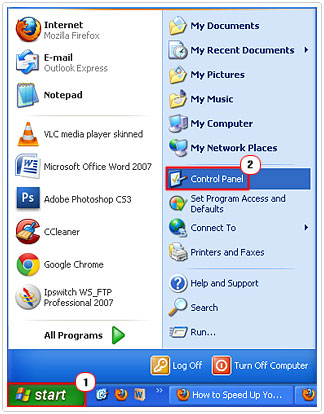
2. Then click on Start -> Control Panel.
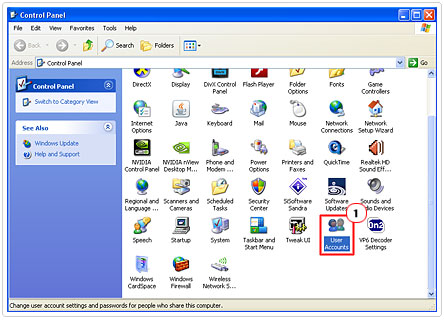
3. From the Control Panel, double click on User Accounts.
4. Once User Accounts has loaded up, click on your User Profile.
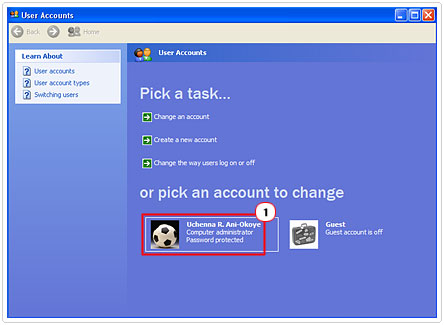
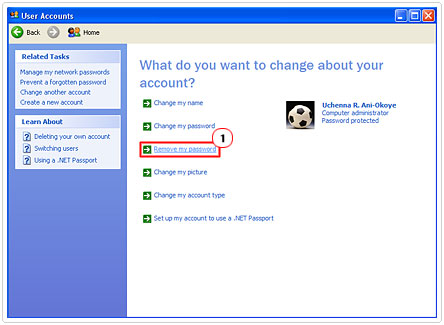
5. From the User Profile screen, click on Remove my Password.
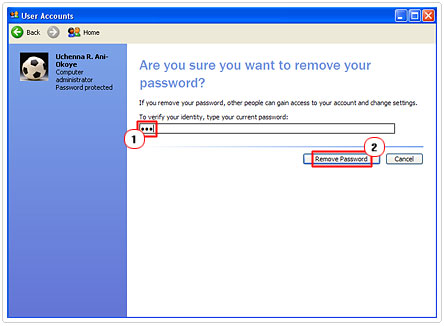
6. It will ask you to verify your identity by typing in the current password, do so and click on Remove Password.
Remove the GUI on Boot
During the last phase of the boot up process, a Windows logo will be displayed as a welcome message and an indication that your system is near operational. This Windows logo is your boot GUI (Graphic User Interface). This part of your boot process can take around 5 seconds. The good thing is that you can disable it, improving on your slow startup time, as it’s not entirely necessary.
To remove the GUI follow the instructions below.
1. First ensure you’ve logged in with administrative rights
2. Then click on Start -> Run [Windows Vista/7: Press  + R], and type “msconfig” and click on OK.

3. Once the System Configuration Utility has loaded up, click on the BOOT.INI Tab, from this Tab click on /NOGUIBOOT and Apply and OK.
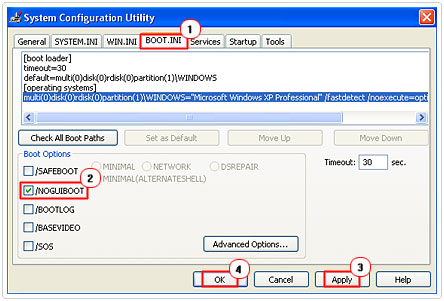
4. Restart your system once finished.
Enable the Prefetch
Prefetch is a utility built into the operating system designed to decrease slow startup times by loading data into system memory prior to it being demanded.
To switch this feature on, just follow the simple instructions below.
WARNING: Deleting or editing the wrong registry entries will irreparably damage your operating system.
1. First, ensure you’ve logged into your computer with administrative rights.
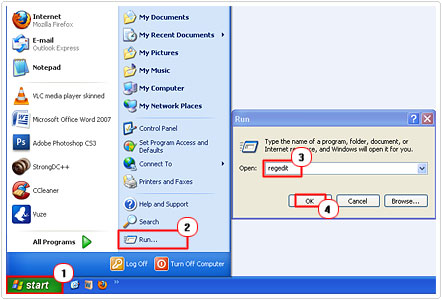
2. Then click on Start -> Run [Windows Vista/7: Press  + R], and type in “regedit” and click on OK.
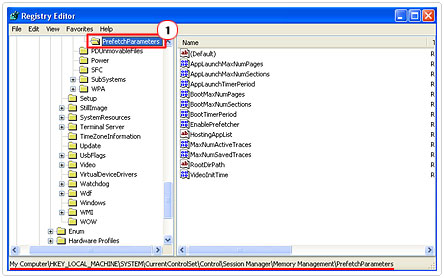
3. Once the Registry Editor has loaded up, navigated to the following path:
4. Once there, double click on “EnablePrefetcher” and change the Value data to 3.
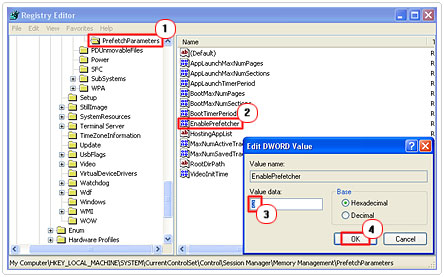
The other values you can use are:
| Value Data | What It Does |
| This will completely disable prefetching on your system. | |
| This will enable prefetching just for applications. | |
| This will enable prefetching solely for system boot up. | |
| This will enable prefetching for both applications and system boot up. |
The default value is 3, so you may not have to alter anything, however, if your system suffers from limited memory, then you should consider changing the value data to 2.
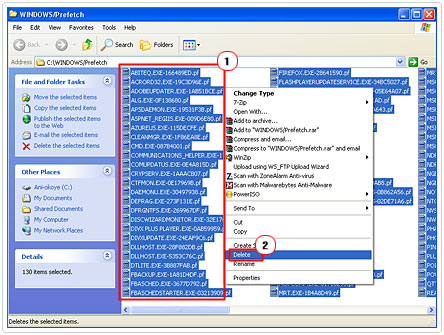
Clearing out the Prefetch Cache is another effective way in decreasing your boot time. To do this, follow the instructions below.
1. Ensure you’re logged into your computer with administrative rights.
2. Then click on Start -> Run [Windows Vista/7: Press  + R], and type “%windir%/Prefetch” and click on OK.
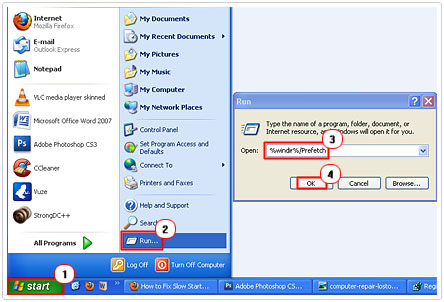
3. Once the Prefetch Cache folder loads up, select all the files and delete them.
Change the Menu Show Delay
Decreasing the delay of your menus, won’t necessarily improve your slow startup, but will speed up the rate in which they open, such as the Add/Remove applet, Start menu etc. It will also have a positive effect on the speed in which your system boots up. It’s a method you can deploy on all versions of Windows; all that is required is a simple registry change.
1. The first thing that you will need to do is log into your system with administrative rights.
2. Then click on Start -> Run [Windows Vista/7: Press  + R], and type “regedit” and click on OK.

3. Once Registry Editor loads up, navigate to the following path:
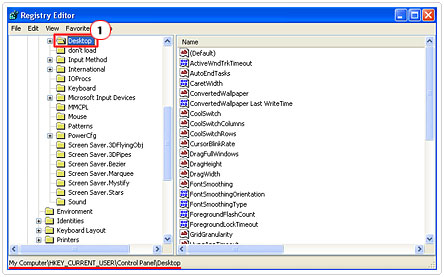
4. Then double click on MenuShowDelay, and change the Data value to 0 (to remove the delay) and click on OK.
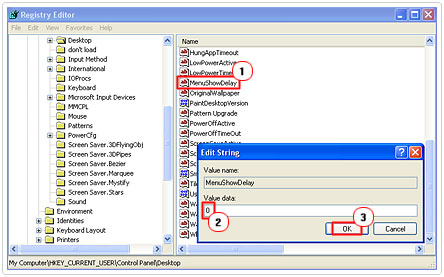
5. Once completed, restart your system.
Run a Boot Defragment
It’s possible for you to specifically defragment those files that are loaded into the system during the boot up phase. This is an excellent tool that you should reap immediate benefits from, once executed. If you feel your system is experiencing slow startup issues, then a boot defragment is what you need.
1. First, ensure you’ve logged into your computer with administrative rights.
2. Then click on Start -> Run [Windows Vista/7: Press  + R], and type “regedit” and click on OK.

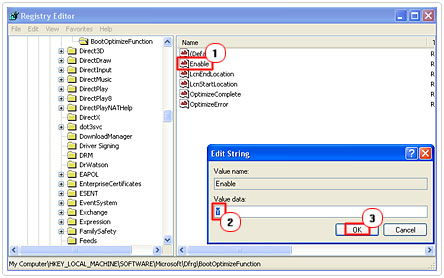
3. Once the Registry Editor has loaded up, navigate to the path below:
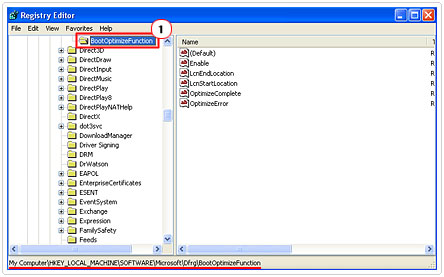
4. From there, double click on Enable and change the Value data to Y and click on OK.
Disable Short File Names
The file system of your hard drive typically generates a short file name according to the 8.3 naming conventions for longer file names and for those file names that have special characters in them. By default, this feature is turned on; this enables files to have two names: the first is the name specified by the user and the second may be a shortened version of it created by your file system. However, if the name specified by the file conforms to the naming convention, then a second shortened name is not created.
Turning this feature off will dramatically improve your slow startup time and speed up file and application performance. However, applications that are unable to read long file names may not be able to run. So there is a risk involved when doing this.
1. Anyway, to turn off this feature ensure you’ve logged into your computer with administrative rights.
2. Then click on Start -> Run [Windows Vista/7: Press  + R], and type “regedit” and click on OK.

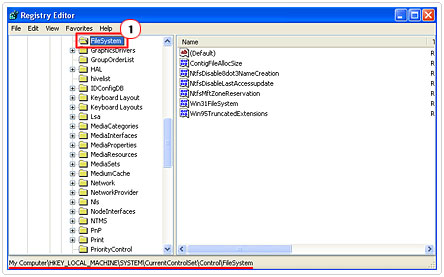
3. From the Registry Editor, navigate to the following path:
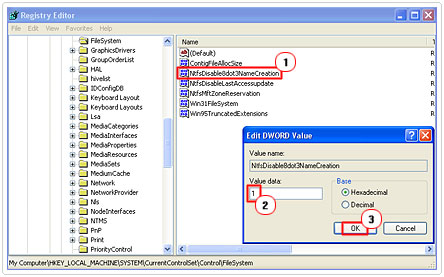
4. Once there, double click on “NtfsDisable8dot3NameCreation” and set Value data to 1 to disable shortened names.
Are you looking for a way to repair all the errors on your computer?

If the answer is Yes, then I highly recommend you check out Advanced System Repair Pro.
Which is the leading registry cleaner program online that is able to cure your system from a number of different ailments such as Windows Installer Errors, Runtime Errors, Malicious Software, Spyware, System Freezing, Active Malware, Blue Screen of Death Errors, Rundll Errors, Slow Erratic Computer Performance, ActiveX Errors and much more. Click here to check it out NOW!

