| Attention Before you read this post, I highly recommend you check out my resources page for access to the tools and services I use to not only maintain my system but also fix all my computer errors, by clicking here! |
The Microsoft Windows Search Indexer is a component of Windows that indexes in excess of 300 common file types. The purpose of this component is to speed up the process of locating and finding files and documents making Windows Search quicker and more efficient. Every time the user adds a new file or document to their operating system, the index is automatically updated. The Windows Search Indexer must be kept up-to-date as it’s crucial to the accessibility of Windows files.
It’s not uncommon for the Indexer to be accidently erased or a user to attempt to access the Indexer only to receive one of a number of error messages associated with the Windows Search Indexer. When a user encounters a problem with this specific Windows component, there are many steps that he/she can do to rectify it, all of which I intend to cover in this tutorial.
Indexed Content
The Windows Search Indexer is designed to look for data in locations such as the Start menu, home folder, contact lists etc. Because the Indexer has the ability to index the properties of a file, this allows the user to search on specific text within a document or message with the Windows Search feature locating the associated files. Whenever you use Windows Search, the operating system automatically checks the index for the content that you have requested; this is done before searching the hard drive in its entirety. This allows the user to locate searched files almost instantly.
Windows Versions
Initially, Microsoft released a version of Windows Search Indexer for Windows XP, 2000 and Windows Server 2003 in the form of a downloadable add-on. In later versions such as Windows Vista/7/8, Microsoft integrated the Search Indexer into them, and made them active by default. If you’re still running a Windows XP based system, then you can and should download the Indexer from here: https://www.microsoft.com/en-gb/download/details.aspx?id=23
Common Performance Problems
In order avoid clogging up system resources; the Windows Search Indexer is designed to scan your system for new files and documents (which it adds to the index) during times when the computer is least active. However, if the Indexer is configured to index data from a large number of locations on your computer or to index files and documents in their entirety (rather than just their filename), then you may experience some performance issues.
By reducing the amount of content that the Search indexer keeps tabs on, you can actually fix this common problem. It’s also possible for you to disable the Search Indexer altogether. However, this is not a recommended option, as it will adversely affect the speed in which the operating system completes a search.
Location of Windows Search Indexer
By default, you should be able to find the Windows Search Index in the following location:
C:\ProgramData\Microsoft\Search
However, it is possible for you to alter its location, by accessing the components options and making the necessary changes.
Configuring the Windows Search Index
It’s possible for you to configure the Indexer to suit your own personal requirements. To do that, simply do the following:
1. First, boot into your computer with full administrative rights.
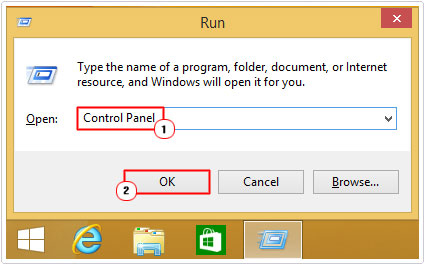
2. Then press  + R, type Control Panel and click on OK.
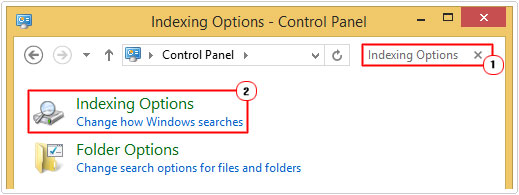
3. In the Search Control Panel box, type Indexing Options, and then click on Indexing Options.
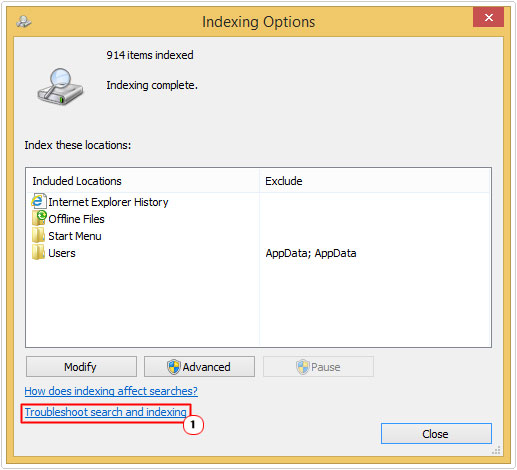
You will be able to see and change the various locations on the operating system that are being indexed. You can also, at any point in time pause the indexer for 15 minutes. Additionally, the advanced button, offers a wide range of complex options.
Fixing the Errors
If you attempted to open the Indexer and came unstuck due to a problem, or maybe you had problems using Windows Search, there are many things you can do to fix the problem; to follow are a number of the most effective and common methods of repairing any Indexer-related errors.
Run Antimalware Tool
When first experiencing problems with the Indexer there are several options available to you. However, of these options the best thing you can do is run the antimalware tool called Spyhunter.
This tool has the capabilities of not only cleaning your computer of viruses, but also of repairing the damage done to the integrity of your operating system, restoring features and functions that previously were not working.
Anyway, you can get a hold of this powerful tool from here:
CLICK HERE TO CHECK OUT SPYHUNTER
Repair Windows
If you are unable to get the Windows Search Indexer to work, after attempting the solution above, then you should consider a repair installation of Windows.
When it comes to repairing the operating system using Windows built-in features, you have two options, the first is a reset, which is unlikely to fix the problem and the second is a total revamp of your hard drive, deleting all your personal data in the process.
For step by step instructions on how to carry out these two particular methods (depending on your Windows version), I suggest you visit my post on CRITICAL_PROCESS_DIED problems.
However, there is a third party solution available to you in the form of Reimage, which is a Windows Repair tool, this tool will not only repair your operating system, but also do it on the fly, saving all your personal data in the process and fixing all your errors.
Anyway, for more information on this powerful tool, visit the following link:
CLICK HERE TO CHECK OUT REIMAGE
 The solution(s) below are for ADVANCED level computer users. If you are a beginner to intermediate computer user, I highly recommend you use the automated tool(s) above! The solution(s) below are for ADVANCED level computer users. If you are a beginner to intermediate computer user, I highly recommend you use the automated tool(s) above! |
Use Troubleshooter
When experiencing problems with the Search Indexer, the first thing that you should always do is use the troubleshooter. Issues such as an incorrect or corrupted search index, slow search performance and incomplete search results can very easily be resolved with this tool. Anyway, to access this tool, simply do the following:
1. First, load up the Indexing Options by following steps 1 – 3 of Configuring the Windows Search Index.
2. Once Indexing Options has loaded up, click on Troubleshoot search and indexing.
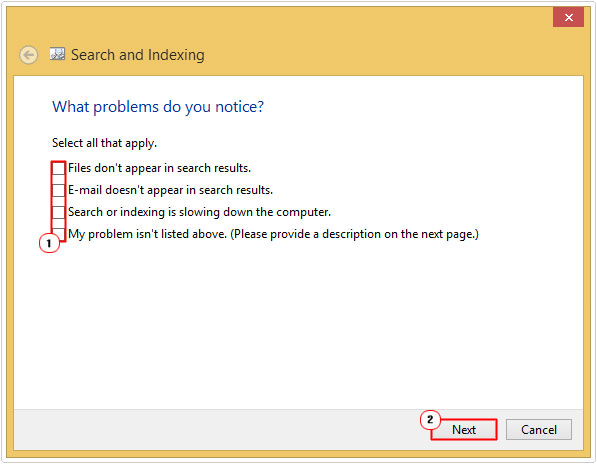
3. The Search and Indexing troubleshoot applet will pop up, asking you What problems do you notice, check the box next to all that apply and click on Next.
Microsoft troubleshooter will then attempt to fix the Indexer using the information you have provided.
Having all the latest Windows updates and service packs installed on your computer is very important, as it will ensure the troubleshooter is able to fix any eventual problems.
Check Windows Search Index Is Enabled
If you’re still unable to properly use the Windows Search Indexer, then there is a strong chance that the Windows search feature has been disabled or been deactivated, maybe by some third party application on your computer. To enable it, simply do the following:
1. First, boot into your computer with full administrative rights.
2. Then press  + R, type Control Panel and click on OK.

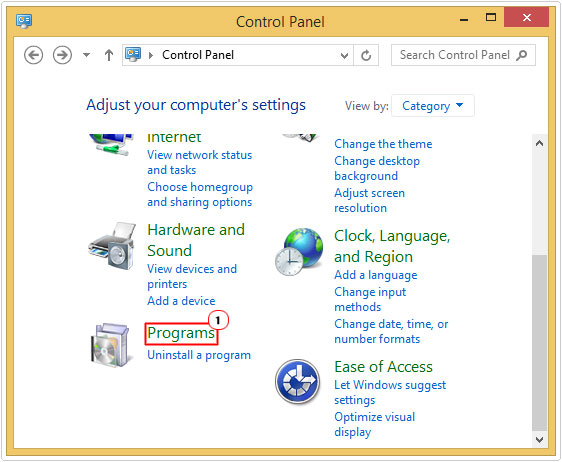
3. Once Control Panel loads up, click on Programs.
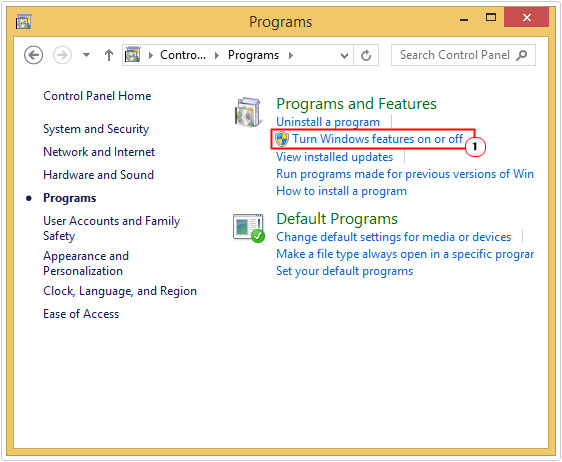
4. When Programs loads up, click on Turn Windows features on or off.
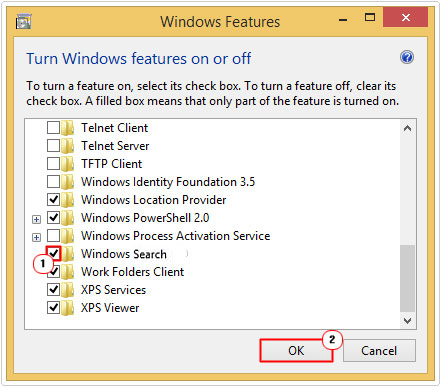
5. A Turn Windows features on or off applet should pop up, check the box next to Windows Search and click on OK.
Rebuild the Search Indexer
If the methods above failed to fix the problem, then you should look into rebuilding the entire Search Index. To do this, simply do the following:
1. Start Indexing Options using steps 1 – 3 of Configuring the Windows Search Index.
2. When Indexing Options loads up, click on Advanced.
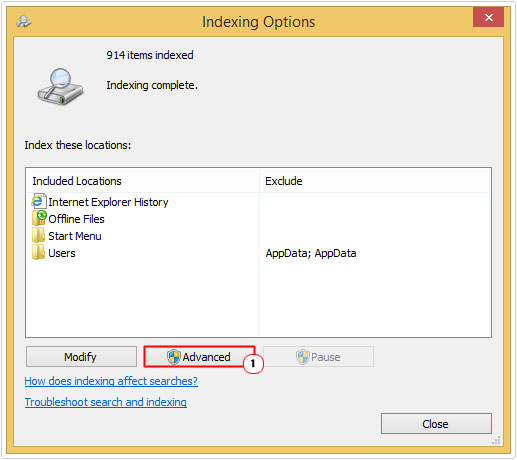
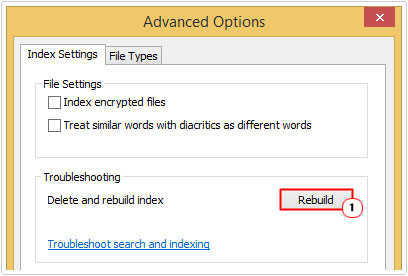
3. This will bring up the Advanced Options applet, form here click on the Rebuild button.
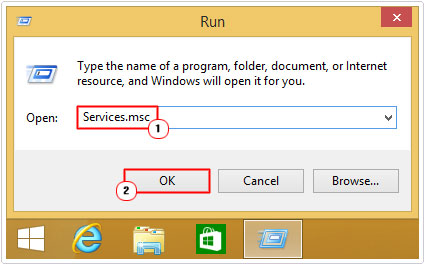
4. From here, press  + R, type Services.msc and click on OK.
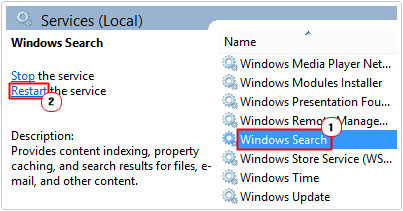
5. This will bring up Services; you’ll want to locate Windows Search and then click on it and click on Restart.
Indexer Registry Fix
If the Indexer refuses to run, or if when you load up Indexing Options you are unable to access the advanced options while receiving one of the following error messages:
Waiting to receive indexing status
Windows Search Indexer stopped working and was closed
Then there is a strong chance that a crucial registry key has been corrupted. To fix it, simply do the following:
WARNING: Deleting or editing the wrong registry entry can irreparably damage your operating system.
1. First, boot into your computer with full administrative rights.
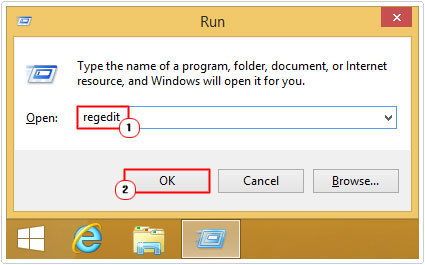
2. Press  + R, type regedit and click on OK.
3. This will load up the Registry Editor, from here, navigate to the following path:
HKEY_LOCAL_MACHINE\SOFTWARE\Microsoft\Windows Search
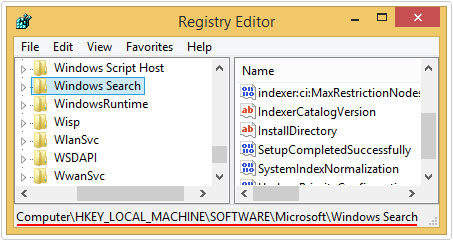
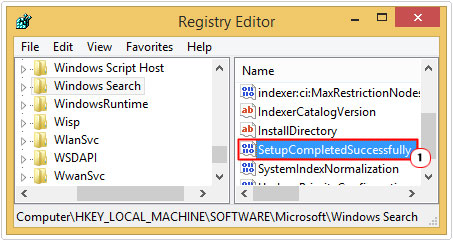
4. In the right pane, double click on SetupCompletedSuccessfully.
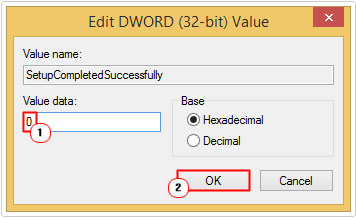
5. This will bring up the Edit Value Data box, from here, change the Value data to 0 and click on OK.
6. Lastly, restart your computer.
This action will reset Windows, reset your crawl, and rebuild the index and much more.
Delete Search Index Folder
If all of the above methods up till now, failed to fix the Indexer, then you can try deleting all the files associated with the Search Indexer. To do this, do the following:
1. First, log into your computer with full administrative rights.
2. Then click on the Windows Explorer Icon.

3. Once Windows Explorer loads up, click on Organize -> Folder and search options.
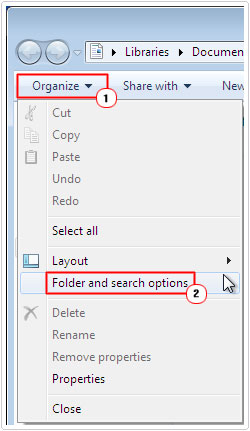
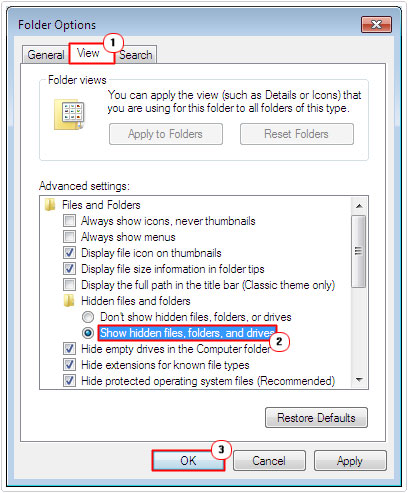
4. This will bring up the Folder Options applet, from here, click on the View Tab, then click on Show hidden files, folders, and drives and click on OK.
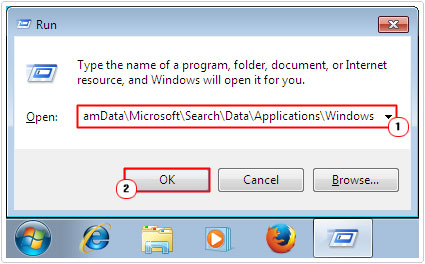
5. Once you’ve done that, press  + R, type C:\ProgramData\Microsoft\Search\Data\Applications\Windows and click on OK.
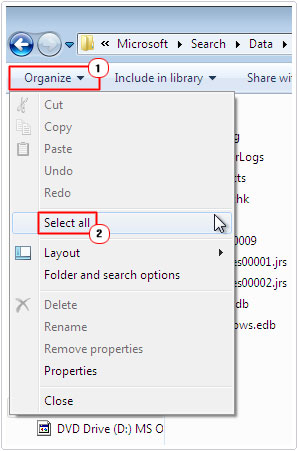
6. Delete everything you find in this folder by clicking on Organize -> Select All.
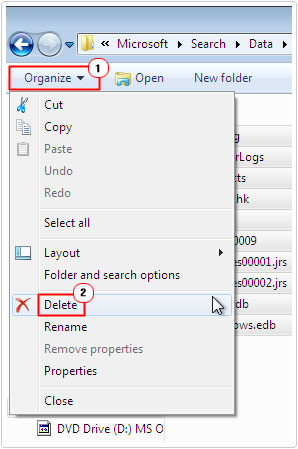
7. Then Organize -> Delete.
7. Then press  + R, type C:\ProgramData\Microsoft\Search\Data\Temp and click on OK.
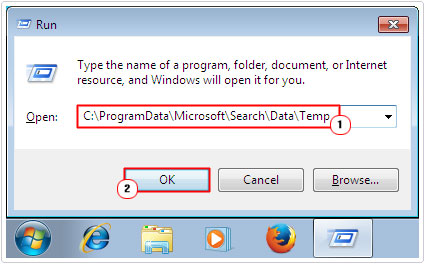
8. Again, delete everything in this folder, using step 6.
If you receive an Access is Denied message when attempting to delete the files, then you will need to stop Windows Search. Simply follow steps 3 – 4 of Rebuild the Search Indexer, but this time, click on Stop.
After you’ve deleted all the files, restart your system.
Use KB932989
Another effective method that you can use, involves using the Microsoft update KB932989 to fix this component. Simply visit the following link and follow the onscreen instructions: http://support.microsoft.com/kb/932989
Are you looking for a way to repair all the errors on your computer?

If the answer is Yes, then I highly recommend you check out Advanced System Repair Pro.
Which is the leading registry cleaner program online that is able to cure your system from a number of different ailments such as Windows Installer Errors, Runtime Errors, Malicious Software, Spyware, System Freezing, Active Malware, Blue Screen of Death Errors, Rundll Errors, Slow Erratic Computer Performance, ActiveX Errors and much more. Click here to check it out NOW!

