| Attention Before you read this post, I highly recommend you check out my resources page for access to the tools and services I use to not only maintain my system but also fix all my computer errors, by clicking here! |
Without a functioning operating system, our computers are as good as dead. The accidental deletion of a system file, corrupt installations, and driver issues may lead you into the path of restoration. In past Windows versions, once you reached a stumbling block such as this, your only viable cause of action was formatting and reinstalling your operating system, which would typically result in total loss of data. But today, it’s now possible for you to use Windows system restore to set your computer back to a previous state, providing you have at least Windows XP running on your system.
Windows system restore may be considered for a plethora of reasons, but the most common are as follows:
- Software related issues due to the recent failed installation of a system update, i.e. Service Pack, IE Update, Hot fix etc…
- Contracted a virus while surfing the internet.
- Accidental deletion of important system files/folders.
Windows system restore is also useful as an optimisation tool, as you can restore your system back to a state when it was running faster. When you use Windows system restore expect it to replace batch files, scripts and various other executable files which you may have previously deleted.
Running a system restore is a fairly simple process, it doesn’t require any real technical knowhow, but you should have at least some knowledge of the way the operating system works. For those of you who have very little computer knowledge, this may be a little too frightening for you to undertake. Calling a friend or family member who’s more experienced with computers may be your best/better option.
If you want to restore your windows to another state, then follow the step-by-step guidelines below:
How to Run Windows System Restore
1. Begin by logging into Windows with a user account that has administrative rights.
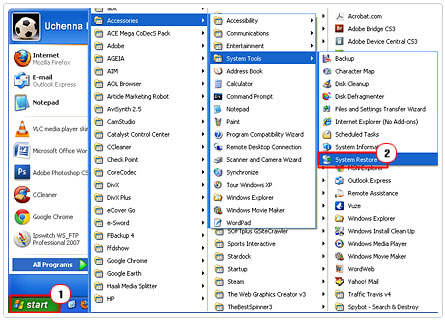
2. Then click on Start -> Programs -> Accessories -> System Tools -> System Restore.
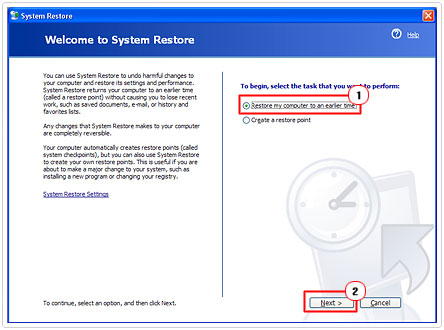
3. Once the ‘Welcome to System Restore’ page loads up, select ‘restore my computer to an earlier time’ then click on Next.
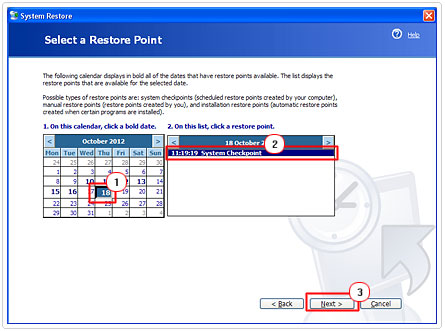
4. After you click on Next, you will be taken to the ‘Select a Restore Point’ page. On this page you will find two boxes – on box 1, you are to select one of the previous days available – on box 2, you are to select a time within that day. Once you’ve done that, click on Next.
Note: The number of restore points available to you, will depend entirely on the amount of hard disk space you allocated to Windows System Restore.
5. It will take you to the ‘Confirm Restore Point Selection’ page. Simply click on Next.
6. The system will attempt to restore your system back to the state that you selected.
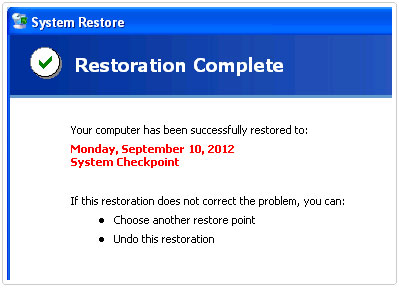
7. Once the initial loading sequence has ended, the system will restart and then confirm whether or not the restore was successful. When the ‘Restoration Complete’ page pops up, click on OK for the computer to complete boot up.
How To Change Disk Space Available To System Restore
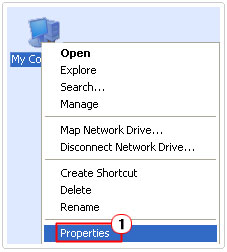
Changing the amount of space available to System Restore is a fairly simple process. (a) Simply Right-Click on My Computer (on your desktop), and select Properties,
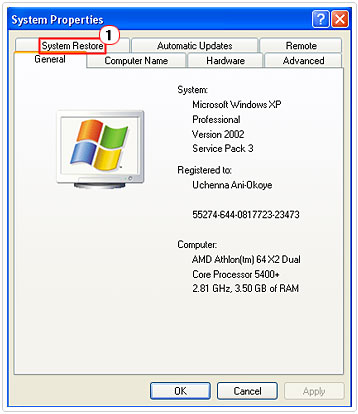
(b) and then click on the System Restore tab.
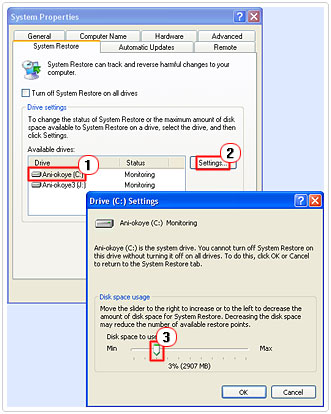
(c) From there select the drive that you want to alter, and then click on Settings, drag the slider either to min or max, to suit your current needs, and then select OK.
How to Undo a System Restore
The steps mentioned above should help you restore your system back to a previous state, but in the event that it doesn’t, it will notify you that the process has failed. In the event that a successful restoration leads to an unresponsive system, you should immediately undo the system restore. You can do this by following the instructions below:
1. Begin by ensuring that you are logged into your operating system with a user account that has administrative rights.
2. Then click on Start -> Programs -> Accessories -> System Tools -> System Restore.
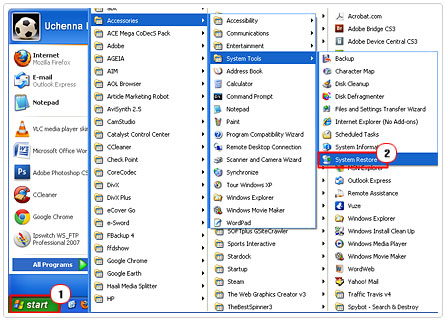
3. Once the ‘Welcome to System Restore’ page loads up, select ‘Undo my last restoration’ then click on Next.
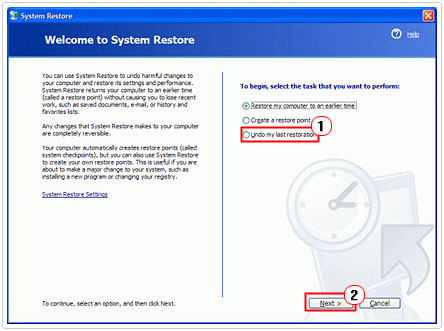
4. It will take you to the ‘Confirm Restoration Undo’ page. Simply click on Next.
6. The system will attempt to undo the previous restoration.
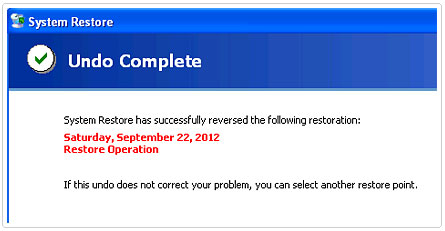
7. Once complete the system will restart and then confirm the Undo was complete. Click on OK for the computer to complete the boot up sequence.
How to Disable System Restore
System Restore is usually enabled by default on a fresh installation of Windows. However, it is possible for you to enable or disable this feature based on your own preference. Disabling System Restore is a fairly simple process; follow the instructions below to ensure you get it right, first time.
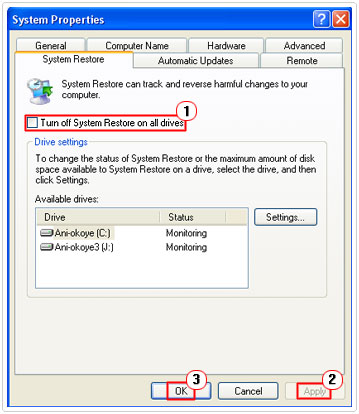
Repeat steps (a) to (b) from ‘How To Change Disk Space Available to System Restore’
From this point, click on Turn off System Restore on all drives, and click Apply, and then OK.
How to Create a Restore Point
Maybe you would like to create your own restore point? If you have System Restore enabled, then it will automatically create restore points for you, however, there may be times when you intend to make significant changes to your computer and would like to create a restore point that you can use to reverse any potentially detrimental effects on your system. The System Restore feature is very helpful for predicaments like this. Below is a comprehensive step-by-step guide that you can use to successfully complete this task:
1. You’ll need administrative rights to complete this task, so make sure you’re logged in with an applicable user account.
2. Then click on Start -> Programs -> Accessories -> System Tools -> System Restore.
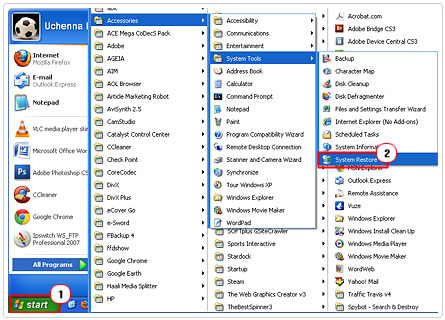
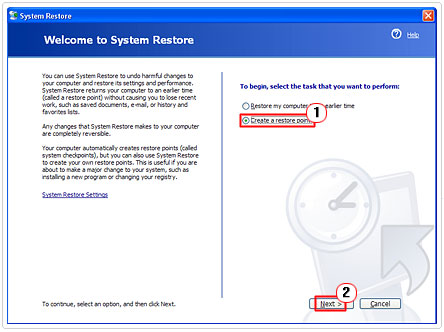
3. Once the ‘Welcome to System Restore’ page loads up, select ‘Create a restore point’ then click on Next.
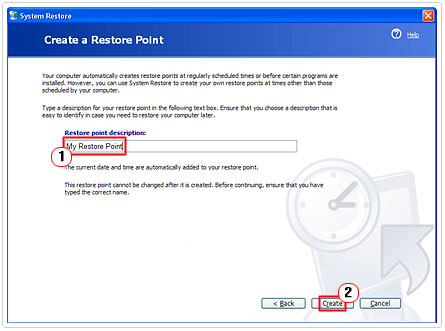
4. The following page will ask for a restore point description. Give it a descriptive name and then click on Create.
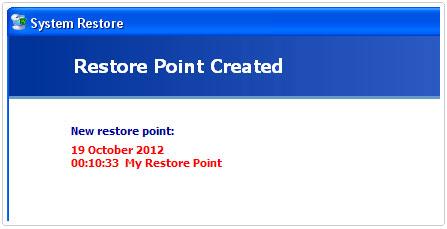
5. Once the restore point has been created, you will be given confirmation on the ‘Restore Point Created’ page, if the process fails, click on Home and repeat steps (1) – (4), otherwise click on Close.
Are you looking for a way to repair all the errors on your computer?

If the answer is Yes, then I highly recommend you check out Advanced System Repair Pro.
Which is the leading registry cleaner program online that is able to cure your system from a number of different ailments such as Windows Installer Errors, Runtime Errors, Malicious Software, Spyware, System Freezing, Active Malware, Blue Screen of Death Errors, Rundll Errors, Slow Erratic Computer Performance, ActiveX Errors and much more. Click here to check it out NOW!

